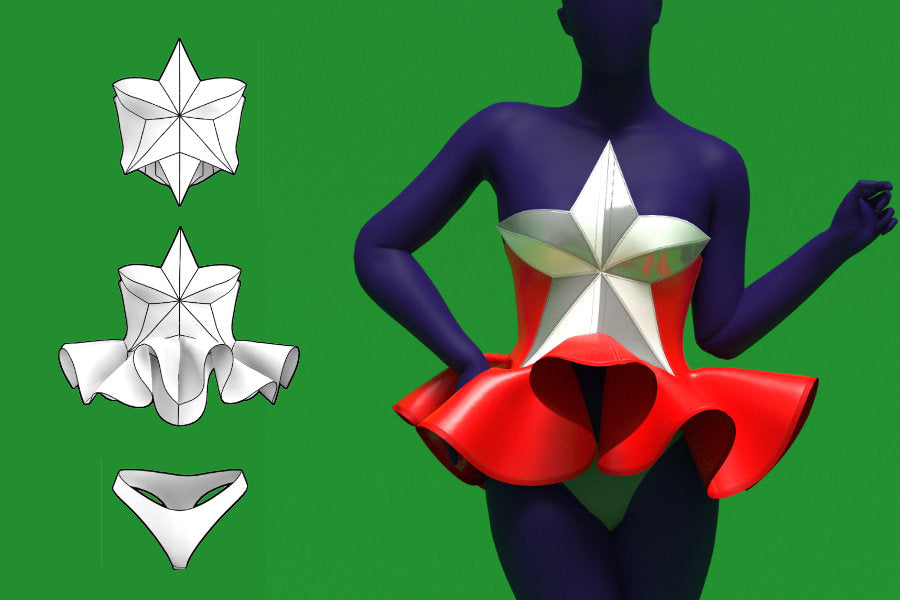
How to Sew a Star Corset with Peplums Set
Jump to InstructionsOverview
Learn how to sew our Star Corset Set with this advanced tutorial designed for experienced sewists. This guide walks you through building the vinyl corset, optional high waist peplums, and the fully lined stretch thong, with clear methods for shaping, boning, and structural finishing. These steps are intended for heavy duty or industrial machines and will help you achieve a clean, professional result.
Fabric Yardage
The fabric chart below shows the suggested yardage for each fabric type. Fabric A is divided into two parts: the corset pieces and the peplum pieces. These are ideally made from the same vinyl, though you can mix and match fabrics if you prefer. Fabric A for the corset covers shell pieces 0 through 4, and Fabric A for the peplums covers the shell peplum pieces.
Fabrics B and C are the two colors used to create the front star. You may alternate these colors, such as white and silver, or make the entire star one color by combining both yardage columns. Fabric D stretch is for the thong, including both the shell and lining, and should be cut from a four way stretch fabric.
Please note that Fabric A corset, Fabric A peplums, and Fabrics B and C for the star refer only to the shell layer. You will need the same amount of yardage again for whichever lining material you choose. All yardage estimates assume a fabric width of 54 to 58 inches.
| Size | Fabric A Corset | Fabric A Peplums | Fabric B Stars | Fabric C Stars | Fabric D Stretch |
|---|---|---|---|---|---|
| XS | 0.5y | 1.5y | 0.25y | 0.25y | 0.5y |
| S | 0.5y | 1.5y | 0.25y | 0.25y | 0.5y |
| M | 1.75y | 1.75y | 0.25y | 0.25y | 0.5y |
| L | 1.75y | 1.75y | 0.25y | 0.25y | 0.5y |
| XL | 1.75y | 1.75y | 0.25y | 0.25y | 0.5y |
| 2XL | 1.75y | 1.75y | 0.25y | 0.25y | 0.5y |
Fabric & Notions
Fabrics
Use vinyl, PVC, or faux leather to construct the corset top and the optional peplums. You may also use these materials for the lining, or switch to a lightweight non stretch cotton or polyester for the lining and for the peplums.
Use four-way stretch fabric like Spandex, Lyra, or stretch vinyl for only the thong pattern.
Notions
- Rigilene plastic sewable boning (6 mm, 3/8 inch, or similar width)
- Eyelets and grommets for the center back
- Lacing ribbon or cord for the back closure
- Bias tape or bias trim for finishing edges
- Fold over elastic or lingerie elastic for the thong
- Clips for holding vinyl layers together
- Optional: horsehair braid (2 to 3 inches wide) for non vinyl peplum hem structure
Sizing Details
This pattern is drafted in our exclusive drag queen sizes from XS to 2XL, created to fit padded bodies with broader shoulders, arms, and legs. While this pattern is made with drag performers in mind, it can be worn by any gender who matches the size measurements provided below.
| Size | Mens Chest | Drag Chest (Padded) | Mens Waist | Drag Waist (Corseted) | Mens Hip | Drag Hip (Padded) | Height |
|---|---|---|---|---|---|---|---|
| XS | 33-35 | 36-38 | 27.5-29.5 | 24.5-26.5 | 32.5-34.5 | 38-40 | 70 |
| S | 35-37 | 38-40 | 29.5-31.5 | 26.5-28.5 | 34.5-36.5 | 40-42 | 70 |
| M | 39-41 | 42-44 | 33.5-35.5 | 30.5-32.5 | 38.5-40.5 | 44-46 | 70 |
| L | 43-45 | 46-48 | 37.5-39.5 | 34.5-36.5 | 42-44 | 47.5-49.5 | 70 |
| XL | 47-49 | 50-52 | 42.5-44.5 | 39.5-41.5 | 45-47 | 50.5-52.5 | 70 |
| 2XL | 51-53 | 55-57 | 47.5-49.5 | 44.5-46.5 | 48-50 | 54.5-56.5 | 70 |
Sewing Instructions
Color Guide

Skill Level and Machine Requirements
This pattern is intended for advanced sewists. The star corset uses multiple layers of vinyl, angled seams, and edge stitching that require a heavy duty or industrial sewing machine. A standard home sewing machine is not strong enough for this project. You should use a machine designed to sew thick materials like vinyl, faux leather, or denim so it can handle the layers without damaging the fabric or the machine.
The Different Ways to Make This Set
This pattern is a full set that includes the star corset, optional peplums, and a stretch thong. You can sew the corset on its own, or you can attach the peplums around the bottom edge for a more dramatic silhouette. There are several ways to sew this set depending on the fabrics you choose. The thong is included because the peplums sit at the high waist and do not act as a mini skirt.
Ideally, this pattern works best with thick vinyl or faux leather for the shell, lightweight non stretch cotton or polyester for most linings, and four way stretch fabrics for the thong.

About the Star Corset Design
The corset front forms a star shape, so the seams angle outward instead of running vertically. This creates many construction options. Watching a few corset tutorials will help you understand different approaches for layers, materials, and edge finishes.
Corset Top Only
There are two clear ways to build the standalone corset top.You can use vinyl, PVC, or faux leather for both the shell and the lining. In this method, stack both layers and edge stitch all exposed edges. Thick vinyl does not fold cleanly, so bias trim is not recommended for the sharp angles when using two vinyl layers.
You can also use vinyl only for the shell and switch to a lightweight cotton or polyester for the lining. This version needs bias trim around the top and bottom edges since the lining cannot support a raw vinyl edge.
When making the corset without peplums, include piece 10 at the center front to add more coverage over the stomach. You do not need piece 10 when attaching the peplums.
Corset Top with Vinyl Peplums
If you add peplums, the first option is to use matching vinyl for the peplum shell and a lightweight cotton or polyester for the lining. Do not use double vinyl in the peplums since the weight makes it hard to create smooth folds and waves. Finish the bottom hem of the peplums with bias trim.
Corset Top with Non Vinyl Peplums
The second method uses lightweight cotton or polyester for both the shell and lining. This depends on what fabrics you can find in your area. The shell uses the full peplum pieces. The lining uses only the three inch letter B pieces, which cover the horse hair braid. The horse hair braid sits between the layers to support the wavy hem. Since this option does not use vinyl, the horse hair braid is essential. Without it the peplums will sag and lay flat.
Stretch Thong
The thong is made from a four way stretch fabric. Use the same fabric for both the shell and the lining.
Paper Pattern and Fabric
For the corset top only, you will use pieces 0 through 10. Piece 0 is the modesty panel, which should be cut on a fold. This piece is optional. If the corset fits you well, you may not need it. The modesty panel sits behind the center back eyelets so you can adjust the corset wider without exposing skin.
Piece 1 is the center back piece where the eyelets will be placed. Pieces 2, 3, and 4 continue around the body toward the front. Pieces 1 through 4 all have vertical boning like a standard corset. The shell for these pieces should be vinyl. For the lining, you can use vinyl or switch to a lightweight non stretch cotton polyester. If you use double vinyl, you can stack the layers and edge stitch the raw edges. If you use a lightweight cotton lining, you will need bias tape to finish the edges.
Pieces 5, 6, 7, 8, 9, and 10 form the center front star. Piece 5 is the top point of the star. Pieces 6 and 7 create the upper sides and shape the bust. Pieces 8 and 9 form the lower sides of the star. Piece 10 is the lower center point that you will only use when making the corset top without peplums. These pieces work best when made from vinyl for both the shell and the lining. The sharp angles make bias trim difficult, and the cleanest finish is created by stacking the vinyl layers and edge stitching.
Cut every piece as mirrored pairs so you have both a left and a right side for the full corset.
Pay close attention to the fabric letter annotations on each pattern piece. These letters tell you which color or fabric type each piece should be cut from. The star pieces are designed to alternate colors, such as white with silver or white with gold. Pieces 1 through 4, which form the back and sides of the corset, should all be cut from the same color, such as red.

Peplum Paper Pieces and Fabric
The peplums are optional, and you can add them to the corset top if you want more drama. The peplum pieces are numbers 11, 12, and 13. Each piece is drafted to be cut on a folded layer of vinyl or fabric. After cutting on the fold, you will have a mirrored half circle for each peplum. Repeat the same cuts for the opposite side so that each peplum has a left and right half.
Piece 13 attaches to the bottom of the number 9 star piece. Piece 12 attaches to the bottom of pieces 3 and 4. Piece 11 attaches to the bottom of pieces 1 and 2. After attaching each peplum to its matching corset section, sew the side seams of the peplums together so they connect smoothly around the body.
For vinyl peplums, use vinyl for the shell and a lightweight non stretch cotton for the lining. Finish the bottom edge of each peplum with bias trim.

If you do not want to use vinyl for the peplums, you can switch to a lightweight non stretch cotton for both the shell and the lining. In this method, the shell uses the full paper pattern pieces 11, 12, and 13. The lining uses only the smaller B pieces, 11B, 12B, and 13B, which cover the horse hair braid at the hem. The horse hair braid must be placed between the shell and the B lining pieces to support the wavy peplum shape.

Use only the 11B, 12B, and 13B lining pieces when you are not using vinyl. Vinyl peplums should use a full lining instead.
Thong Paper Pieces and Fabric
Piece 14 is the front of the thong. Cut two of piece 14 on a folded layer of four way stretch fabric. One will be the shell and one will be the lining.
Piece 15 is the crotch piece. Cut two of piece 15, one for the shell and one for the lining.
Piece 16 is the back of the thong. Cut two of piece 16 on a fold, again one for the shell and one for the lining.
All thong pieces should be made from the same stretchy fabric for both shell and lining so the thong moves smoothly with the body.

Sewing the Corset Top Shell 1-4
Begin by preparing the shell pieces for numbers 1 and 2. Place the two vinyl layers right sides together and align them along the letter A edges. Clip the layers together so you do not puncture the vinyl. Sew along the A edge with a straight stitch using a half inch seam allowance.

After sewing, spread the seams on the wrong side. You can either press both seam allowances outward or flip both allowances toward the number 2 side. Top stitch the seam allowances down to create your boning channels. The tunnels must be wide enough for your plastic boning. You can sew two channels, one on each side of the seam, or only one channel on the number 2 side. The number of channels depends on the structure you want.

Next, attach piece 3 to piece 2. Place them right sides together along the letter B edges and sew using the same seam allowance and the same boning channel method. After that, attach piece 4 to piece 3 along the letter C edges, again using the same construction steps.
Repeat this entire process for the mirrored set of pieces 1 through 4 on the opposite side of the corset shell. We will add the boning later.

Sewing the Corset Top Lining 1-4
Sew the lining pieces for 1 through 4 using the same order and seam allowances as the shell. If you are using vinyl for the lining, sew the seams the same way as the shell, but you do not need to create boning tunnels. The boning is only added to the shell layer. After sewing each seam, open the seam allowances and edge stitch them down. The width of the stitching does not matter here. The goal is simply to keep the seams flat and secure.
If you are using a lightweight non stretch cotton for the lining, sew pieces 1 through 4 together in the same sequence. Open the seams and edge stitch them down. Again, no boning channels are needed on the lining.

Sewing the Front Star Front Shell
Begin assembling the front star by joining pieces 5 and 6. Place them right sides together along the letter F edges and sew with a straight stitch. These angled seams do not need boning channels. After sewing, open the seam allowances on the wrong side and edge stitch them down along both sides of the seam.
Next, attach piece 6 to piece 7. Match them at the bust notch and sew along the letter E edge. Open the seam allowances and edge stitch along both sides of the seam the same way.

Attach piece 7 to piece 8 along the letter I edge and finish the seam the same way. Then attach piece 8 to piece 9 along the letter J edge and finish the seam again with open seam allowances and edge stitching.
If you are making the corset top without peplums, sew piece 9 to piece 10 along the letter L edge. If you are adding peplums, do not sew piece 10.
Once pieces 5, 6, 7, 8, and 9 are sewn together, with piece 10 added for the corset top only version, repeat this entire process for the mirrored opposite half of the shell.

After both halves are complete, sew the two star assemblies together along the long center front edge, from the top of piece 5 down to piece 10 if used. This center front seam is the only star seam that needs boning channels. Open the seam allowances and top stitch two tunnels along the center front. Each tunnel should be wide enough to fit a bone, since the center front uses two bones, one on each side of the seam.

Sewing the Lining for the Star Front Pieces
For the lining of the center front star pieces, the ideal method is to use vinyl for both layers. These pieces have many sharp angles, and bias trim is difficult to apply cleanly along those points. Sew the vinyl lining pieces together in the same order and with the same seam allowances as the shell. Open each seam on the wrong side and edge stitch it down.
At the center front of the lining, you do not need boning channels. Simply open the seam allowances and edge stitch them flat.
If you choose to use a lightweight non stretch cotton for the lining of the star pieces, sew them together in the same order as the vinyl version. Open the seams and edge stitch them down. Since cotton cannot hold a clean raw vinyl edge, you will need to finish the top and bottom edges of the lining with bias trim.
Joining the Back Panels to the Star Front
Keep the shell and lining separate at this stage. Once the shell pieces 1 through 4 and the star pieces 5 through 9 or 5 through 10 are fully assembled, you can join the front and back sections together.
Attach piece 4 to piece 7 along the letter D edge. Match the notch at the start of D, sew with a straight stitch, then open the seam allowances on the wrong side and edge stitch them flat.
Next, attach the lower edge of piece 4 to the H edge of piece 8. Sew this seam the same way and finish it with open seam allowances and edge stitching.
Repeat this full process for the opposite half of the shell. Then sew the lining pieces together in the exact same sequence, but without creating any boning channels.

Joining the Shell and Lining
Vinyl Shell with Vinyl Lining
At this point you should have a fully assembled shell and a fully assembled lining. If you chose vinyl for both layers, join them using the following method.
Place the shell and lining wrong sides together. Stack the pieces so every seam matches its partner. Use clips along all the edges to hold the layers in place and to make sure all seams line up cleanly. Accuracy here is important, since vinyl will show any shifting or unevenness.
Once clipped, begin edge stitching along the raw edges. The edge stitch should be very close to the edge, about 2 to 3 millimeters away. Start at the center back edge of piece 1 and stitch upward along the entire top edge of pieces 1, 2, 3, and 4. Continue stitching across the top edges of the star points, moving across pieces 6 and 7, and then up to the top of piece 5.
Do not sew the bottom edge of the corset yet. Leave the entire bottom edge open so you can insert your boning later.

or Vinyl Shell with Cotton Lining
If your corset uses a vinyl shell and a lightweight non stretch cotton lining, stack the layers together with wrong sides facing each other. Clip the layers so every seam matches and the pieces stay aligned.
Instead of edge stitching the top edges like the vinyl-on-vinyl method, you will finish the entire top edge with bias tape.
Unfold your double fold bias tape and place it right side down against the right side of the vinyl shell. Sew the first fold of the bias tape along the full top edge. Begin at the center back of piece 1 and continue up and around the upper edges of pieces 1, 2, 3, and 4, then across the points of the star on pieces 6 and 7, and finally up to the top of piece 5.
This part is more complex because you must turn the bias tape cleanly around multiple sharp angles. If needed, watch a YouTube tutorial on applying bias tape to acute angles.
Once the bias tape is fully sewn to the outer layer, fold it upward and then wrap it over the edge toward the inside of the corset. Smooth the tape so it lies flat. Then top stitch the inner edge of the bias tape down from the wrong side of the corset, following the same path around the top edges.
Do not sew the bottom edge yet. Keep the bottom open for inserting boning later.

Watch this YouTube video on bais tape on angles:
https://youtube.com/shorts/oIGWphB9pCs?si=t0HbStKq2YbViCcr
Inserting Boning
Once the shell and lining are fully joined, you can begin inserting the boning. Start with the center back on piece 1. Top stitch three parallel rows to create three tunnels. The first tunnel should be wide enough to hold boning. The second tunnel should be wide enough for eyelets. The third tunnel should be wide enough for another bone. Stitch these channels through both the shell and lining layers.

After the channels are sewn, insert boning into the first and third tunnels of piece 1. You can also insert boning along the vertical seams of pieces 2, 3, and 4. Choose one or two channels per seam depending on the structure you want. Also insert 2 bones along the star center front tunnels.
Cut your bones to match the length of each channel, but make each bone about a half inch shorter than the full length so the ends do not press into the bottom edge. Round off the ends of each bone by melting, sanding, or wrapping the tips in tape to prevent punctures.

Once all the bones are inserted, you can close the bottom of the corset top. Use bias tape if your lining is cotton. If your corset is two layers of vinyl, you can simply edge stitch the bottom closed.
If you plan to attach the peplums, leave the bottom edge open for now and finish it later when the peplums are added.

Installing Eyelets
Once all boning is inserted and the back channels are complete, install your eyelets and grommets along the center back of piece 1. Follow the spacing and placement shown on the paper pattern. After the eyelets are in, lace the corset using the bunny ear method. If you are new to that style of lacing, you can watch a YouTube tutorial for a quick visual guide.

Watch this YouTube video on lacing up a corset:
https://youtu.be/r5dVA_DMy1c?si=wYiAPQ20eo69pOIC
Sewing the Modesty Panel (Piece 0)
The modesty panel is optional. If you want one, cut two layers of piece 0. You can use vinyl for both layers or vinyl for the shell and cotton for the lining. You can also choose to keep the seam allowance or remove it depending on your chosen fabric.
Stack the two layers with wrong sides facing each other so the right sides are exposed on both sides of the panel. Clip the layers together and edge stitch around the top and side edges. Do not finish the bottom edge yet.
Finish the top and side edges with bias trim if you prefer a clean enclosed look. Bias trim is optional when both layers are vinyl, but recommended when one layer is cotton.
After the edges are stable, sew two boning channels on each side into the modesty panel. Leave room between these channels for eyelets. Install two eyelets between the bones so they align with the center two eyelets on piece 1 of the corset. Install another eyelet at the top center of the modesty panel and another at the bottom center.
Insert your bones into the channels, making them a half inch shorter than the panel height so the ends do not press into the trim. Once the bones are inserted, close the bottom edge by either edge stitching (for vinyl) or adding bias trim.
You can then lace your corset again with the modesty panel in place. If needed, watch a YouTube video on lacing a corset with a modesty panel for a visual reference.

Watch this YouTube video on adding a modesty panel:
https://youtu.be/E0eWWGM5h5o?si=QyNcJU05Y3YUZjlj
Adding the Peplums
Sewing the Vinyl Shell Peplums with Cotton Lining
If you are adding peplums, the ideal method is to use a vinyl shell with a lightweight cotton lining. For this method, pieces 11, 12, and 13 should each be cut on a fold. This gives you three half circle peplum pieces for each side of the garment, totaling to 6 half circles.
Start by assembling the shell layer. Sew the side edges of 11 to 12, then sew 12 to 13. Spread the seams open on the wrong side and edge stitch them flat so the vinyl stays smooth. Assemble the lining layer in the same way using your lightweight non stretch cotton. Spread and edge stitch those seams as well.


Once the shell and lining are complete, stack them wrong sides together and clip them so they line up perfectly. Do not attach the peplums to the corset yet. Edge stitch the stacked layers together along the bottom hem to keep the shell and lining stable, or add bias trim at this point if you prefer a finished hem before attaching.


Next, attach the top inner curves of the peplums to the bottom edge of the corset top. Make small snips along the inner curve of both shell and lining. Stay within the seam allowance and do not cut past it. These snips help open the curve so it can align with the straight and angled edges of the corset.

The inner curve of piece 11 should align from the center back of piece 1 to the end of piece 2 where piece 3 begins. The inner curve of piece 12 should align from piece 3 down to the end of piece 4. The inner curve of piece 13 should align with the entire bottom edge of piece 9 on the front star. Remember, if you're adding peplums, the number 10 peice of the star is not needed.

Stack the peplums upside down over the corset so the right sides of the fabrics face each other. Take your time easing and clipping the curves evenly. Once everything is clipped into position, sew the peplums to the corset with a straight stitch and a half inch seam allowance. Be careful not to sew over any boning inside the corset. Repeat the process for the opposite side of the corset.
You can then edge stitch the seams downward along the top edge of the peplums. Next, sew the center front and center back seams together. You can also choose to leave the center front and center back unsewn and simply hemmed if you prefer a slit effect.
Finish the bottom hem of the peplums with bias trim once all sections are attached. You can also add bias trim to the raw seam on the inside where the bottom of the corset and the top of the peplums meet.

Using Non Vinyl Peplums Method
If you choose not to use vinyl for the shell of the peplums and prefer a lightweight non stretch cotton fabric, you can follow this method. Sew pieces 11, 12, and 13 together the same way as the vinyl version to form the full peplum shape. For the lining, you can choose not to use a full lining layer. Instead, you can support the hem with horsehair braid to keep the peplums structured. You may finish the hem in different ways. You can add the complete hem covers using the letter B pieces provided in the pattern, especially since the peplums sit high at the waist and the inside may show when worn. The B pieces allow you to enclose the horsehair braid cleanly. You can also follow the hemming method shown in the referenced video, or simply finish the raw edges on the wrong side of the cotton if you prefer a lighter look.
Watch this YouTube video on creating a horsehair braid hem:
https://youtu.be/CXXSbLydvCY?si=2cd2tP6JVrxJOYHb
Sewing the Thong

Watch this YouTube video on how to sew a reversible thong:
https://youtu.be/_r8u48l3EdA?si=cDK0sjyPw96l6n0X
Get the Pattern