How to Sew a Mini Skirt with Wave Ruffles
Jump to InstructionsOverview
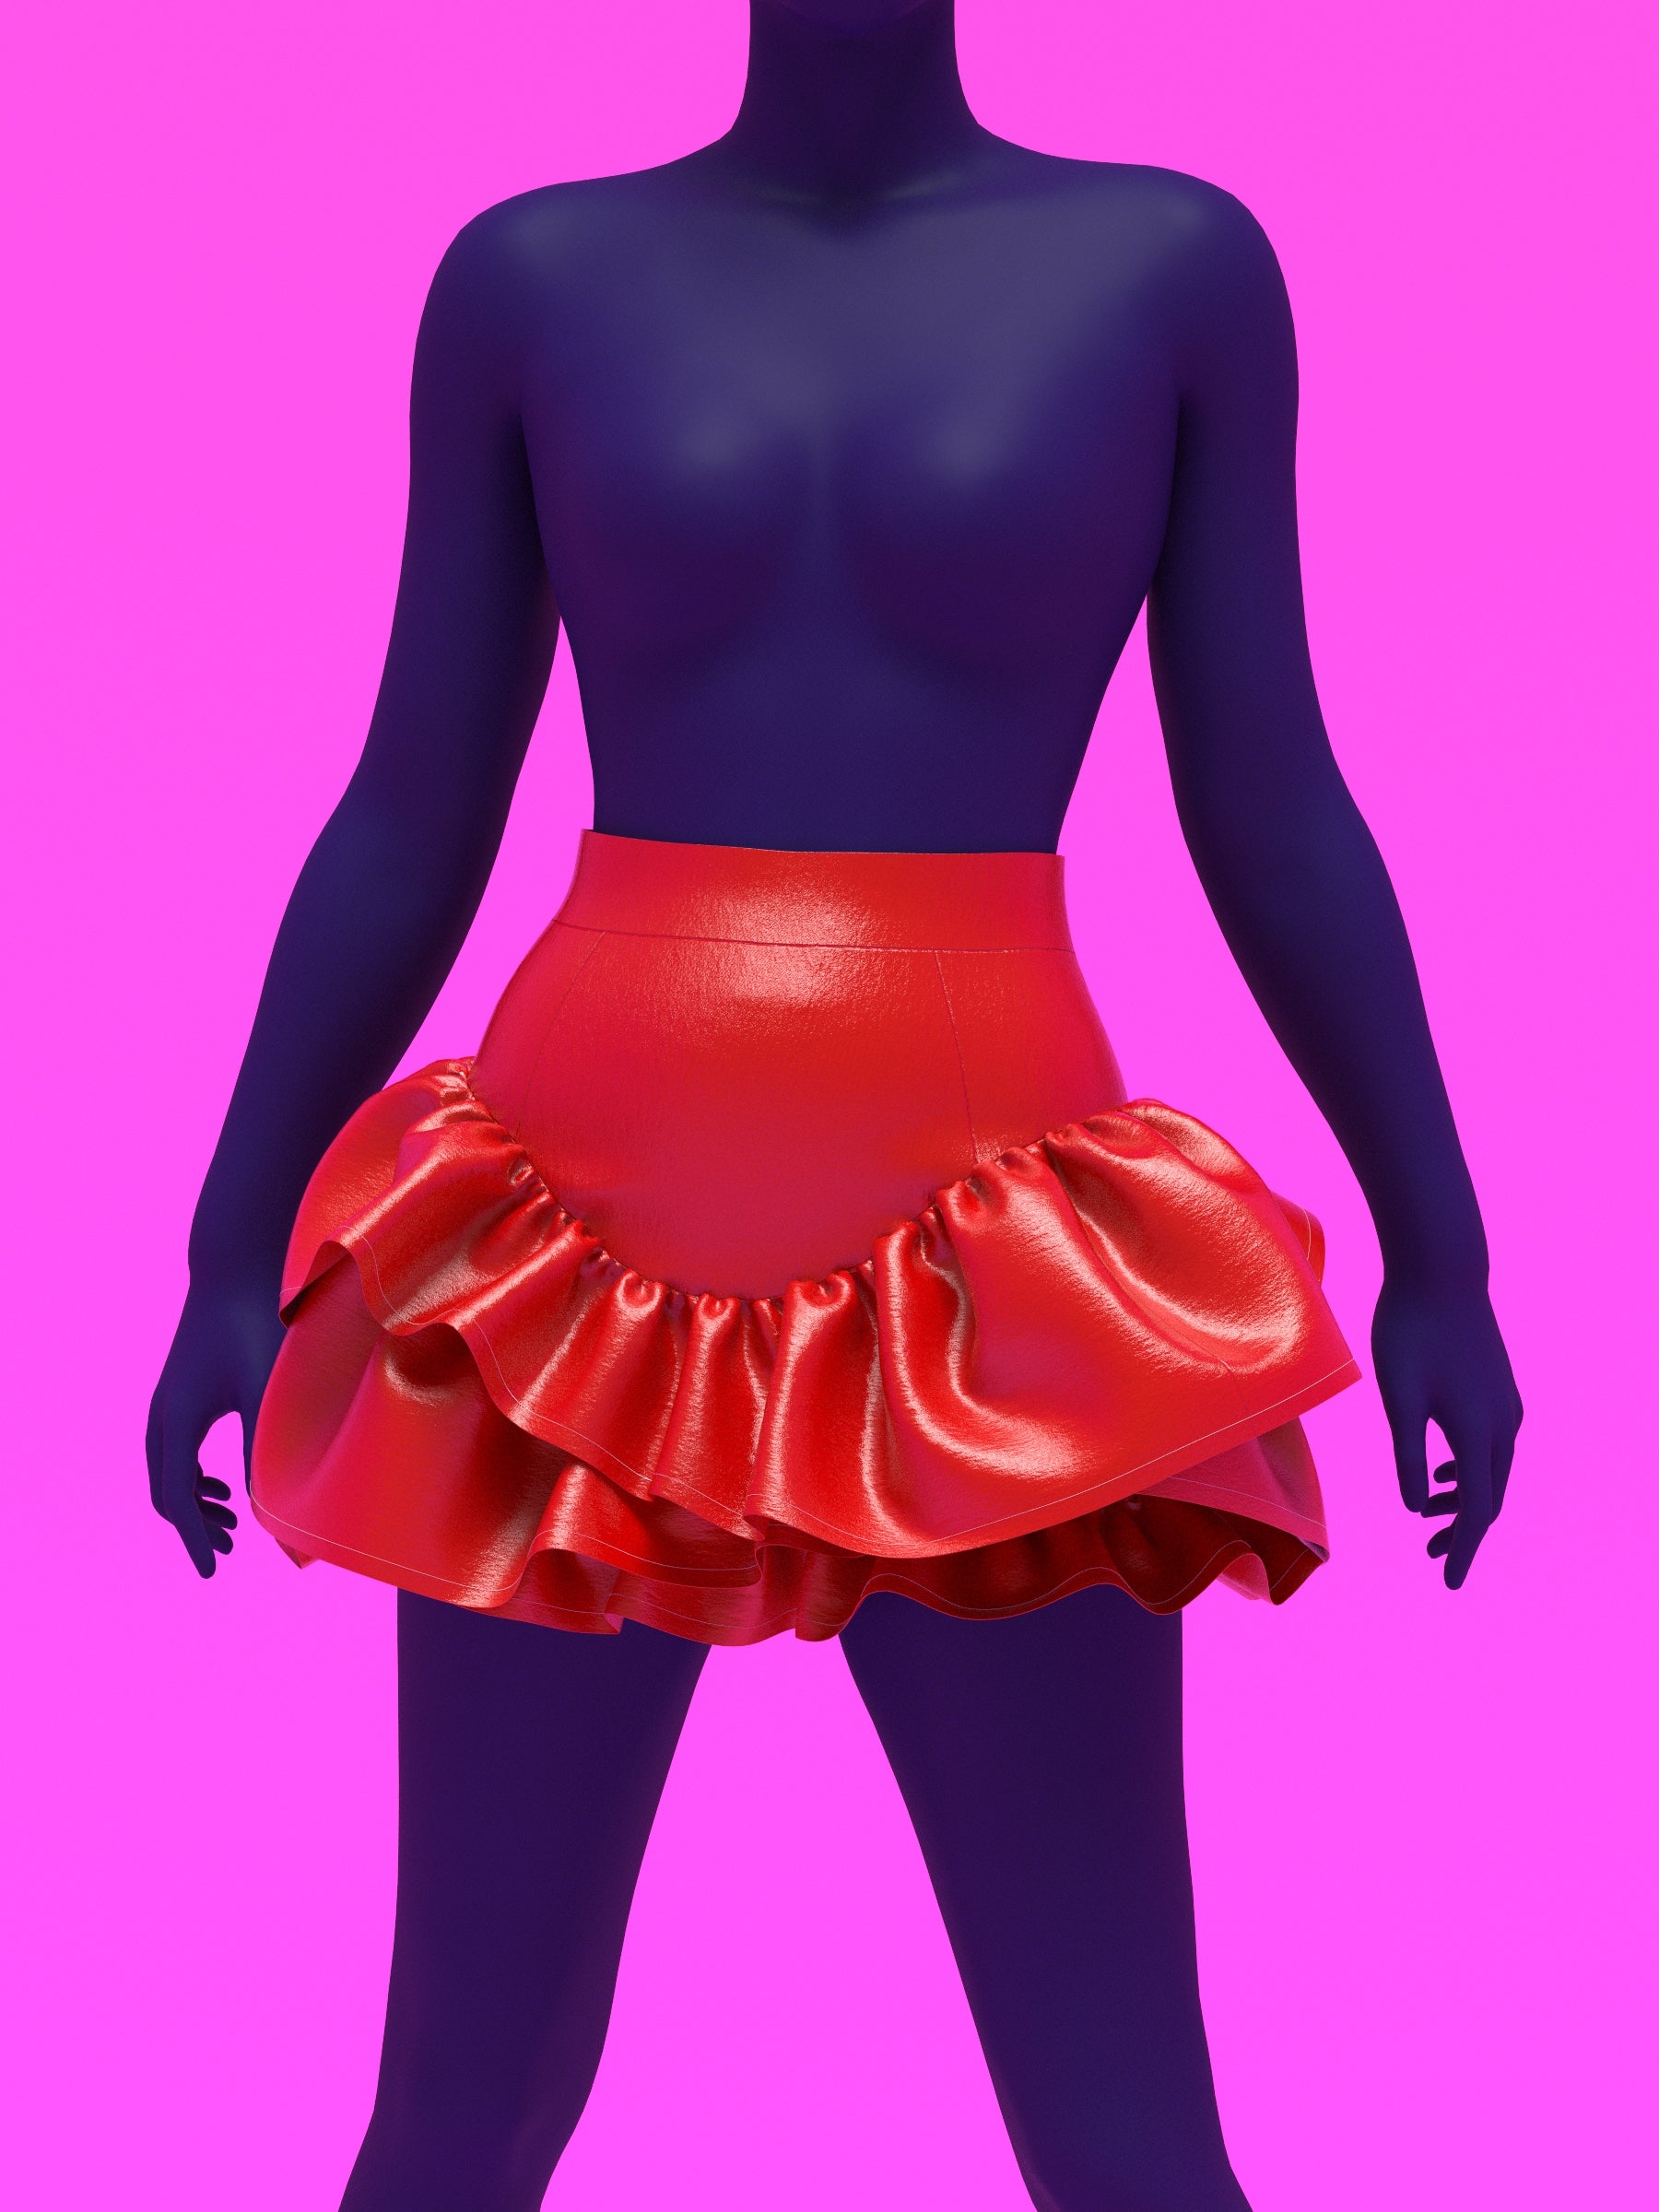
Learn how to sew a high waisted mini skirt with wave ruffles in this easy to follow sewing tutorial. This pattern lets you choose one, two, or three rows of ruffles with either a symmetrical or asymmetrical layout, making it perfect for creating exaggerated hip volume and a dramatic mini skirt silhouette. Designed to be beginner friendly, it is ideal for drag queens, performers, and anyone looking to sew a bold, flared skirt with strong visual impact.
Fabric Yardage
The fabric chart below shows the suggested yardage for the skirt and ruffles. All yardage estimates assume a fabric width of 54 to 58 inches.
| Size | Skirt and Ruffles |
|---|---|
| XS | 2y |
| S | 2y |
| M | 2y |
| L | 2y |
| XL | 2.5y |
| 2XL | 2.5y |
Fabric & Notions
Fabric
Suitable for light to medium weight non-stretch fabrics such as denim, satin, cotton, rayon, or velvet.
Notions
Invisible zipper (10 inches / 25 cm long for all sizes).
Sizing Details
This pattern is drafted in our exclusive drag queen sizes from XS to 2XL, created to fit padded bodies with broader shoulders, arms, and legs. While this pattern is made with drag performers in mind, it can be worn by any gender who matches the size measurements provided below.
| Size | Mens Chest | Drag Chest (Padded) | Mens Waist | Drag Waist (Corseted) | Mens Hip | Drag Hip (Padded) | Height |
|---|---|---|---|---|---|---|---|
| XS | 33-35 | 36-38 | 27.5-29.5 | 24.5-26.5 | 32.5-34.5 | 38-40 | 70 |
| S | 35-37 | 38-40 | 29.5-31.5 | 26.5-28.5 | 34.5-36.5 | 40-42 | 70 |
| M | 39-41 | 42-44 | 33.5-35.5 | 30.5-32.5 | 38.5-40.5 | 44-46 | 70 |
| L | 43-45 | 46-48 | 37.5-39.5 | 34.5-36.5 | 42-44 | 47.5-49.5 | 70 |
| XL | 47-49 | 50-52 | 42.5-44.5 | 39.5-41.5 | 45-47 | 50.5-52.5 | 70 |
| 2XL | 51-53 | 55-57 | 47.5-49.5 | 44.5-46.5 | 48-50 | 54.5-56.5 | 70 |
Sewing Instructions
Color Guide

Fabric Pieces
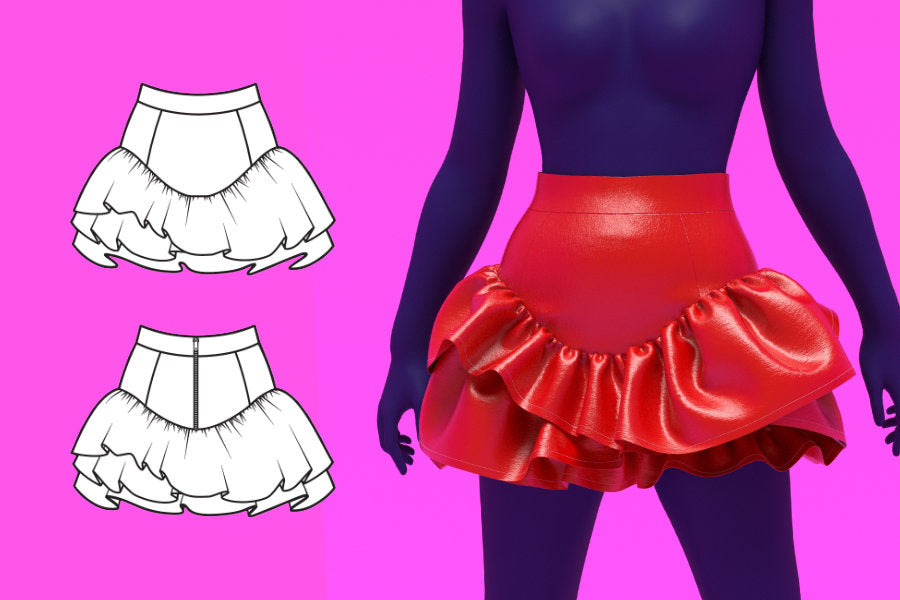
This is a non-stretch mini skirt with wave ruffles. You may choose to construct the skirt with one, two, or three rows of ruffles, depending on the volume and length you want. A lining is not required for this garment, but one may be added if desired.
After assembling your paper pattern pieces, use them to cut out your fabric. Once all pieces are cut, you should have the following components: one front waistband, two back waistbands, one front center yoke, two mirrored front side yokes, one front middle piece, one front bottom piece, two mirrored back side yokes, two mirrored back center yokes, one back middle cut on the fold, one back bottom cut on the fold, four top and middle ruffles cut on the fold, and two bottom ruffles cut on the fold.

Sewing the Yokes
Take the back center yoke and back side yoke pieces and place them right sides together. Sew them along the side seams only, using a straight stitch with a 1/2 inch seam allowance, then serge or overlock the raw edges. Repeat this process with the front center yoke and front side yoke pieces.

Next, place the front yoke and back yoke right sides together and sew the side seams in the same manner, then finish the raw edges. The center back seam should remain unsewn.

Sewing the Waistband
Take the front waistband and the two back waistband pieces and place them right sides together. Sew the side seams and press the seam allowances open. Serge one long edge of the waistband.

Place the waistband and yoke right sides together, aligning the raw edge of the waistband with the top edge of the yoke. Sew the waistband to the yoke.

Ten press the seam allowance up toward the waistband.

Attaching the Zipper
Serge the center back edges of both the yoke and the waistband.

Install a 10 inch invisible zipper along the center back opening, starting at the fold line of the waistband and sewing downward.

Once the zipper is in place, fold the waistband lengthwise with right sides together. Sew the top edge of the waistband to the zipper tape on one side, then repeat on the opposite side. Turn the waistband right side out and press carefully.

After turning the waistband right side out, press it flat, making sure all seam allowances are folded neatly to the inside. Topstitch along the bottom edge of the waistband, sewing through all layers to secure the folded waistband in place.

Assembling the Ruffles
Take two top or middle ruffle pieces and place them right sides together. Sew the side seams using a straight stitch, then serge the raw edges. Hem the ruffle using your preferred method, such as a double fold hem or add bias tape, and stitch along the bottom edge.

Repeat this process with the remaining top and middle ruffle pieces, then repeat again for the two bottom ruffle pieces.

Attaching the Ruffles
Take the back middle and front middle pieces and place them right sides together. Sew the side seams using a straight stitch, then serge the raw edges. Repeat this same process with the back bottom and front bottom pieces.

Take the bottom ruffle and sew a loose hand basting stitch along the top raw edge, leaving long thread tails at each end. Gently pull the thread tails to gather the ruffle until it matches the length of the bottom front and back pieces.

Starting from the bottom, place the gathered bottom ruffle upside down along the bottom edge of the skirt with right sides facing each other. Sew along the raw edge to attach the ruffle, then turn the ruffle downward and press.

Gather the top and middle ruffles in the same way. Hand sew a loose basting stitch along the raw edges, leaving long thread tails at each end. Gently pull the thread tails to gather the ruffles until they match the length of the skirt’s middle piece.

When attaching the top and middle ruffles to the skirt, you have two layout options. You may choose an asymmetrical arrangement, as shown in the product photos, for an off-center, overlapping look, or you may attach the ruffles symmetrically for a more balanced finish.
Ruffle Positions
For an asymmetrical layout, attach the middle ruffle by placing the skirt’s bottom and middle pieces right sides together, aligning the side seams and center notches. Insert the middle ruffle between them, matching the ruffle’s center notch to the notch labeled “Asymmetrical ruffle placement.” In this layout, the ruffle side seams will not align with the skirt side seams.

Next, attach the top ruffle by placing the skirt’s middle piece and the yoke right sides together, again aligning the side seams and center notches. Insert the top ruffle between these layers, matching the ruffle’s center notch to the “Asymmetrical ruffle placement” notch. The ruffle side seams will also be offset in this step.

For a symmetrical layout, attach the middle ruffle by placing the skirt’s bottom and middle pieces right sides together, aligning the side seams and center notches. Sandwich the middle ruffle between them, matching the ruffle’s center notch to the skirt’s center notches, then sew. Once sewn, remove the basting stitches.

Next, attach the top ruffle by placing the skirt’s middle piece and the yoke right sides together, aligning the side seams and center notches. Sandwich the top ruffle between these layers, matching the ruffle’s center notch to the skirt’s center notches, then sew. Once sewn, remove the basting stitches.

Finish any exposed or raw edges around the ruffles using a serger, and your garment is now finished.
Get the Pattern