How to Sew a Men's Pointed Shoulder Catsuit
Jump to InstructionsOverview
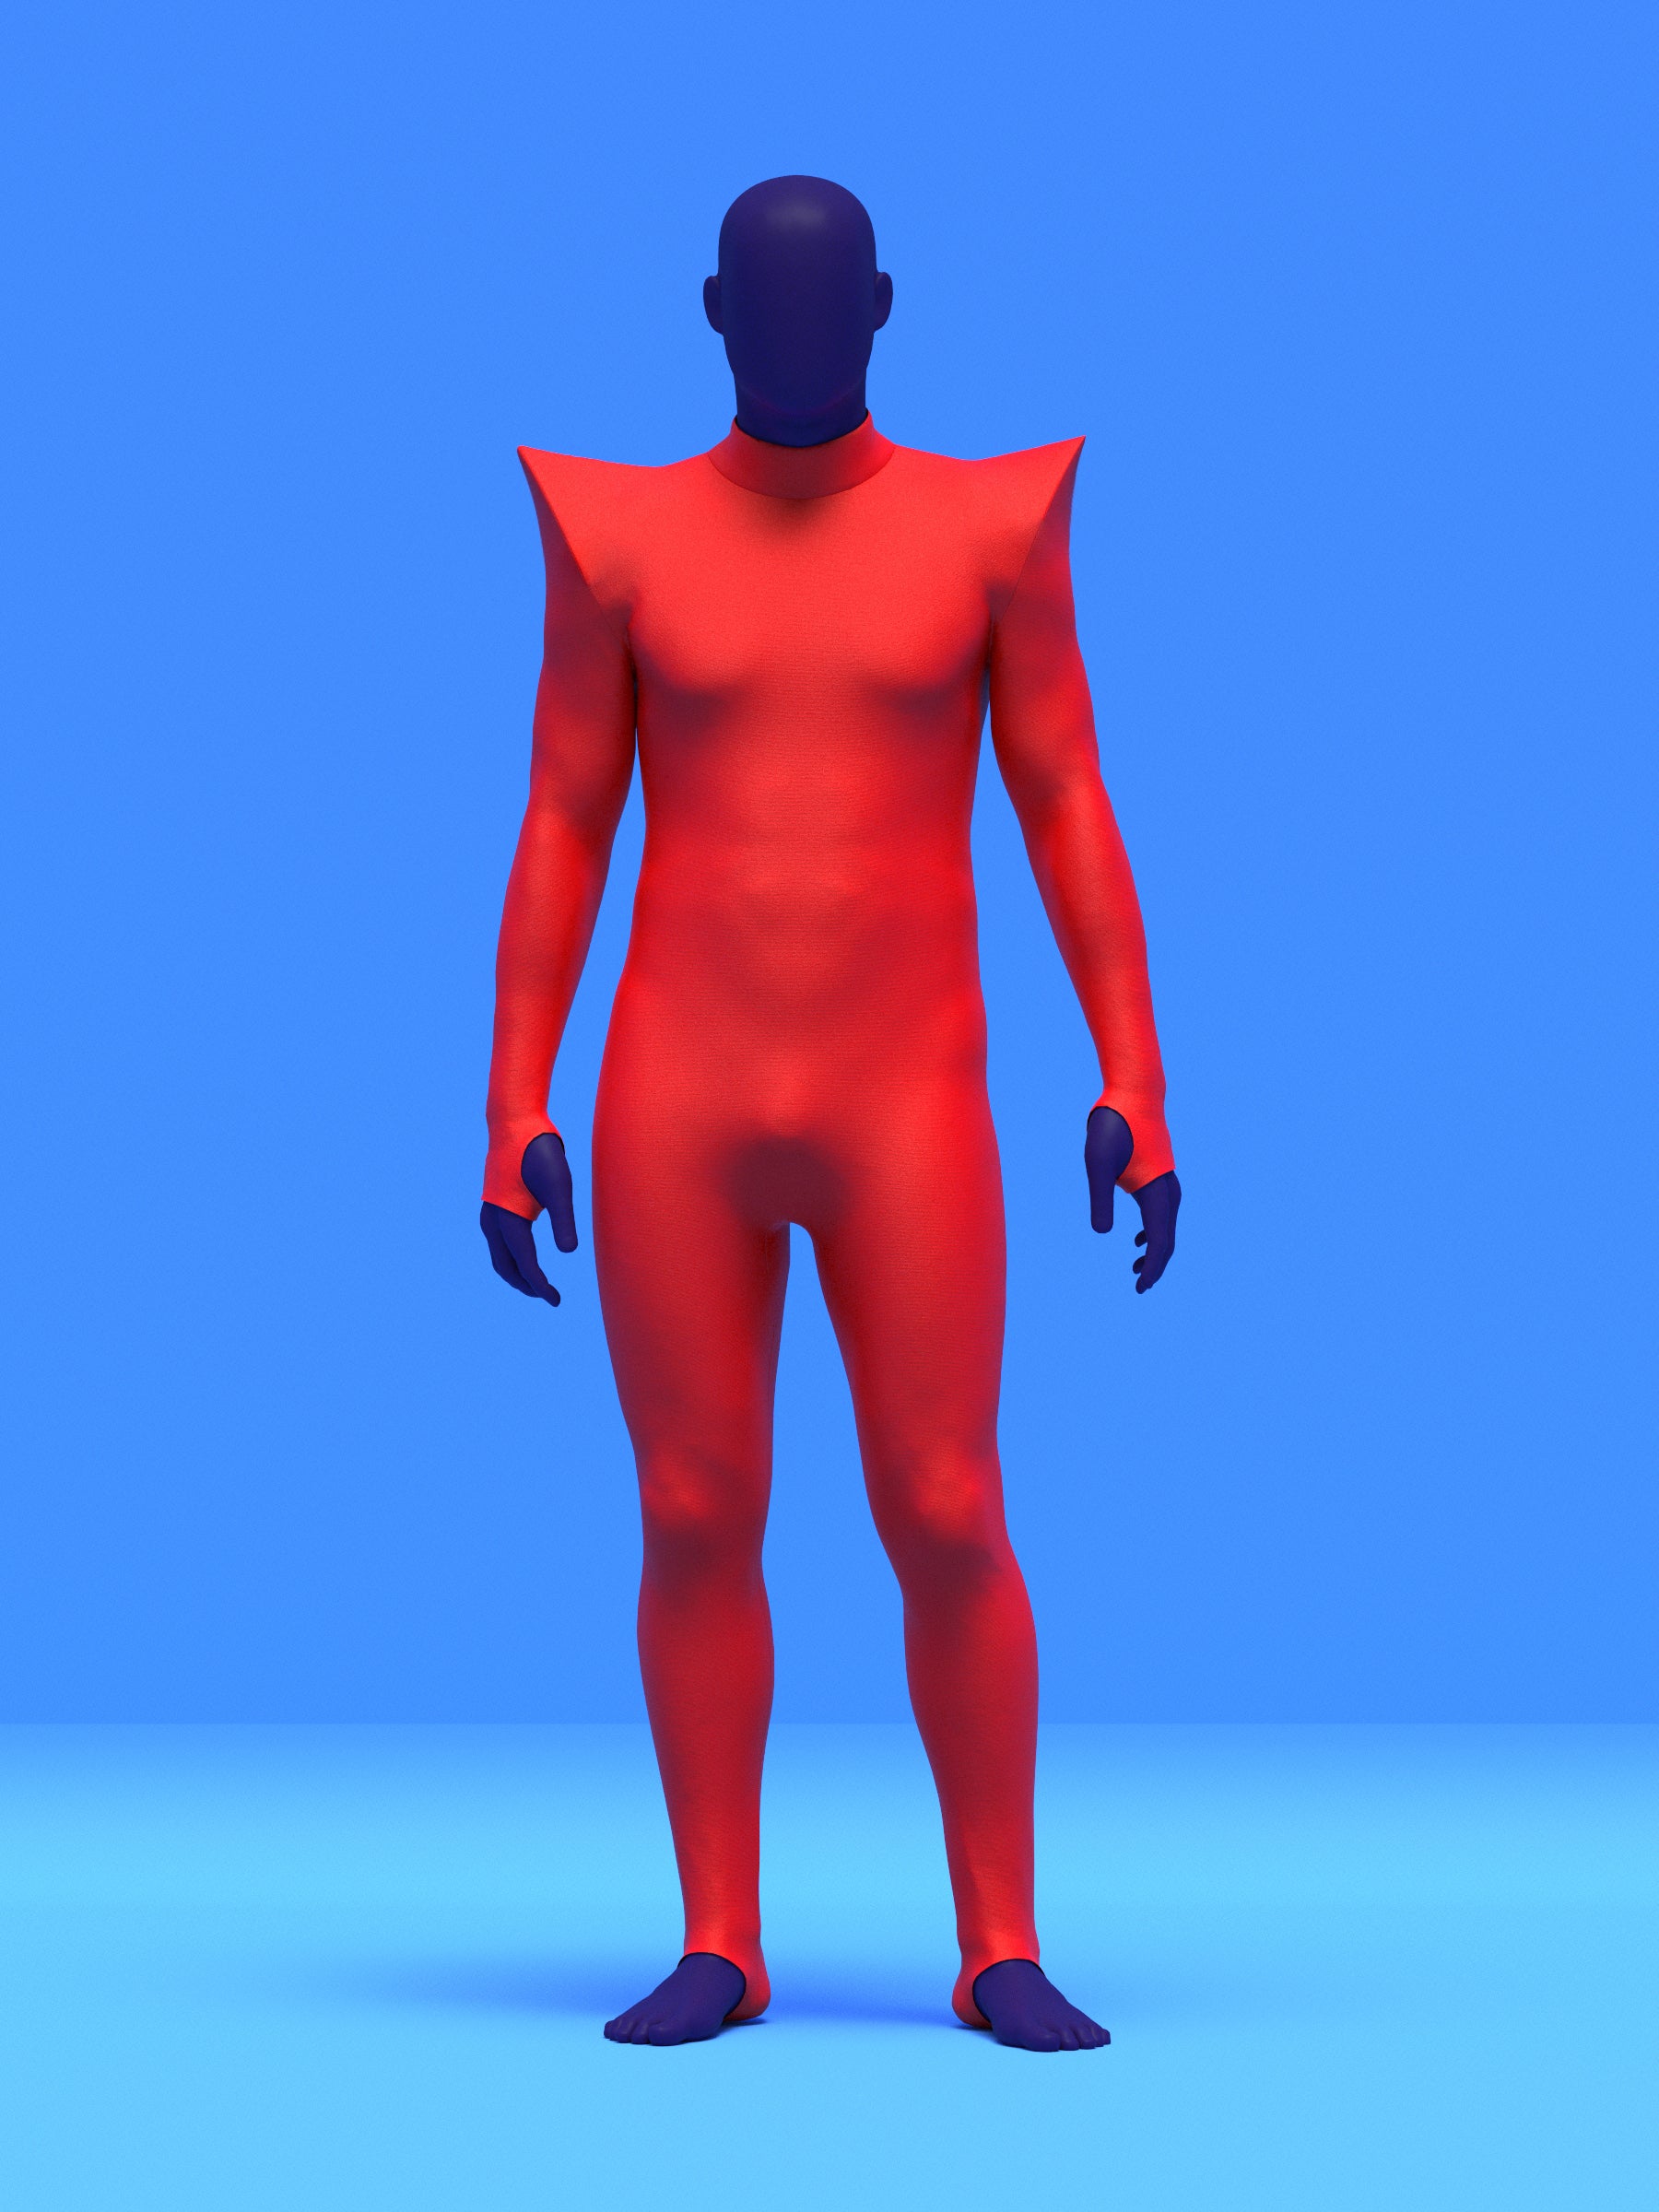
Learn how to sew our pointed shoulder catsuit for men’s cosplay, superhero builds, and performance wear. This four way stretch design features structured pyramid shoulder pads built from ultra firm interfacing and encased in stretch fabric for a sharp, powerful silhouette. Follow step by step instructions for constructing the interfaced shoulder units, installing the collar and center back zipper, attaching sleeves with thumb holes, closing the body, and finishing the leg stirrups. Designed for four way stretch fabrics only and approachable for confident beginners ready to elevate their look.
Fabric Yardage
The fabric yardage below is for stretch fabric bolt widths of 54" or more.
| Size | Fabric |
|---|---|
| XS | 2y |
| S | 2y |
| M | 2.5y |
| L | 2.5y |
| XL | 2.75y |
| 2XL | 2.75y |
Fabric & Notions
Fabric
- Four way stretch fabrics only, such as Spandex, Lycra, Milliskin Tricot, and Power Mesh.
Notions
- 22-24" invisible zipper, for back closure.
- For Shoulder Interfacing, One-Sided Fusible Ultra Firm Stabilizer/ Interfacing such as (71F Peltex)
- Tear-away Stabilizer for Zipper.
- Double Folded Bias Tape/Trim for Thumbhole.
- 1/4" Elastic for ankle stirrups
Sizing Details
This pattern is drafted in our Mens sizes from XS to 2XL, crafted in accordance with ASTM international standards. Our size range is designed to cater to men worldwide, ensuring a consistent and well-fitting experience for individuals with an average height of 5'10".
| Size | Mens Chest | Mens Waist | Mens Hip | Height |
|---|---|---|---|---|
| XS | 33-35 | 27.5-29.5 | 32.5-34.5 | 70 |
| S | 35-37 | 29.5-31.5 | 34.5-36.5 | 70 |
| M | 39-41 | 33.5-35.5 | 38.5-40.5 | 70 |
| L | 43-45 | 37.5-39.5 | 42-44 | 70 |
| XL | 47-49 | 42.5-44.5 | 45-47 | 70 |
| 2XL | 51-53 | 47.5-49.5 | 48-50 | 70 |
Sewing Instructions
Color Guide

About Pattern
This is a four way stretch full body men’s catsuit sewing pattern designed for cosplay, superheroes, and high impact performance looks. It works perfectly as a base suit for conventions, stage wear, or layered costume builds.
The shoulders are structured with interfacing to create sharp, exaggerated points, giving the garment a strong, architectural silhouette.
The fit is tight and form fitting to contour the body. It includes a crotch gusset for added mobility and comfort, making it ideal for action poses and movement heavy wear. Designed for four way stretch fabrics only.
Fabric Pieces
This pattern includes paper pattern pieces. Use these pieces to cut your fabric before starting construction.
Piece 1, the front of the catsuit, is cut one on the fold to create a seamless center front and smooth, sculpted finish.
Piece 2, the back of the catsuit, is cut as two mirrored pieces to form the full back.
Piece 3, the sleeve, is cut two on the fold. The sleeves are symmetrical for both arms except for the thumb hole. Mirror the thumb hole placement so each sleeve has the correct opening. Only one thumb hole opening is needed per sleeve.
Piece 4, the crotch gusset, is cut one on the fold. The gusset allows for flexibility and movement, and you may adjust its size slightly depending on your preferred fit or alterations.
Piece 5, the collar, is cut one on the fold.
Piece 6, the shoulder interfacing without seam allowance, is cut in ultra firm interfacing. Cut four pieces, two mirrored for the front shoulders, and two mirrored for the back shoulders.
Piece 7, the casing for the Piece 6 interfacing, is cut in stretch fabric. Cut eight pieces to fully encase the interfacing sections.
Piece 8, the pointed shoulder sleeve interfacing without seam allowance, is cut in ultra firm interfacing. Cut two pieces mirrored, one per sleeve.
Piece 9, the pointed shoulder sleeve interfacing casing, is cut in stretch fabric. Cut four pieces to enclose the Piece 8 interfacing.

Constructing the Shoulder Interfacing
Begin by assembling the shoulder interfacing pieces. For structure, it is best to use an ultra firm interfacing for Pieces 6 and 8. For each shoulder, you will need two mirrored Piece 6 sections and one Piece 9 section.
An ultra firm option such as Pellon 71F works very well. It is thick and sturdy, almost like cardboard but slightly flexible. This helps maintain the sharp pointed shoulder shape. If you prefer a different interfacing, you may use a medium weight type and fuse multiple layers together until you achieve a stiff, structured result for each piece.
Pieces 6 and 8 do not include seam allowance because they will be sewn together edge to edge. Take one Piece 6 and one Piece 8 and align them at the marked dots. Sew them side by side using a zigzag stitch, gently pushing the edges together as you stitch so there is no gap between them.

Next, attach the second mirrored Piece 6 to the opposite side of the Piece 8 in the same way, using a zigzag stitch and sewing the edges directly together.
Finally, sew the two Piece 6 sections together along the pointed shoulder edge, again using a zigzag stitch and butting the edges together. Once complete, the three pieces will form a structured pyramid shape in ultra firm interfacing, creating the base for your exaggerated pointed shoulder.

Encasing the Shoulder Interfacing
Once the interfacing pyramid is constructed, it will be encased inside a fabric shell and lining using Pieces 6 and 8. This finished shoulder unit will later be sewn into the shoulder seams of the leotard, but for now focus on building the structured pad.
Take one Piece 6 and one Piece 8. These pieces include a 1/2 inch seam allowance. Place Piece 6 right side facing on top of Piece 8, aligning along the letter A edge. Sew from the A edge down toward the B marking.
Repeat this step with the second Piece 6 on the opposite side of the same Piece 8, again sewing from A toward B. Then sew the two Piece 6 edges together along the top A edge. This completes the shell layer.

Repeat the same construction steps to create the lining layer.
Next, place the shell and lining right sides facing each other and sew around all B edges. Leave an unsewn opening large enough to insert the interfacing pyramid.
Turn the shell and lining right side out through the opening. Insert the structured interfacing pyramid into the casing, pushing it fully into the pointed tip. Fold the seam allowance of the opening inward and topstitch closed to fully encase the shoulder pad.

Repeat the entire process for the second shoulder and set both aside for later construction.
Sewing the Front and Back
Take the front and back catsuit pieces and stack them with right sides facing each other. Align and pin along both shoulder seams.
Sew the shoulder seams using a stretch stitch. A lightning bolt stitch is preferred, or use a small zigzag stitch. Sew with a 1/2 inch seam allowance.

Once stitched, finish the raw edges on the wrong side using an overlock machine to serge and trim the seam allowance cleanly.

Preparing and Attaching the Collar
Take the collar. Fold it lengthwise in half along the fold line with the wrong sides facing each other. Match the raw edges and pin along the fold to keep it in place.

Turn the catsuit body right side out. With the collar still folded, position it upside down so the raw edges of the collar align with the neckline. The right side of the collar should face the right side of the catsuit.
Begin pinning at the center back slit and continue around the neckline. The collar notch should align with the shoulder seam. The folded edge that was cut on fold should sit at the center front of the catsuit.
Pin the collar evenly around the entire neckline. Sew through both collar layers and the neckline using a stretch stitch, preferably a lightning bolt or small zigzag, with a 1/2 inch seam allowance. Then finish the raw edge with a serger on the wrong side.

Installing the Zipper
Use a 20 to 24 inch zipper for the center back. An invisible zipper is recommended, but a regular zipper may also be used. Follow the specific instructions for your zipper type.
With the catsuit right side out, place one side of the zipper right sides together with one side of the center back opening, starting at the collar edge. The top of the zipper tape should align with the collar fold. Fold the excess zipper tape at the top inward so it is cleanly finished at the collar.
Sew from the collar down to the end of the slit using a straight stitch. Keep the stitching close to the zipper teeth, depending on your zipper type.
If desired, place a strip of tearaway stabilizer between the zipper tape and the fabric before sewing. This helps prevent rippling. After stitching, gently tear away any excess stabilizer.
Repeat the same steps for the opposite side of the zipper, aligning the top edges evenly at the collar and sewing down to the base of the opening.

Once installed, the excess zipper tape should lie flat on the wrong side of the garment. You may topstitch at the base of the zipper and along each side of the zipper opening for added security and a clean finish.
Once the zipper is secured to the back pieces, sew the remaining gap below the zipper at the back crotch.

Attaching the Sleeves
Take the sleeve pieces. Make sure the right sleeve has the thumb hole positioned toward the right side of the front, and the left sleeve has the thumb hole positioned toward the left side of the front. When worn, the thumb openings should sit correctly on each hand.
Finish the thumbhole by adding a double folded stretch bias tape, or try a rolled hem. You can also leave it raw, since this small opening can be difficult to sew.

Lay the catsuit body flat with the right side facing up. Take one sleeve and place it right sides together with the armhole, aligning the sleeve cap with the shoulder seam.
Pin the sleeve along the armhole curve up to the shoulder point. You may find it easier to sew one side at a time rather than pinning the entire sleeve at once.
Sew the sleeve to the armhole using a stretch stitch, such as a lightning bolt or small zigzag, with a 1/2 inch seam allowance. After sewing, finish the raw edges together using a serger.

Repeat for the opposite sleeve.
Attaching the Gusset
Place the back piece right side up. Position the gusset right facing over the center back crotch area. The middle of the gusset should align with the center back seam edge, and the pointed ends should aim toward the notches near the inner thigh.
Pin the gusset in place, then sew using a stretch stitch with a 1/2 inch seam allowance. Then serge.
Do not sew the other side of the gusset to the front piece yet. That will be attached and finished later.

Closing the Body
Turn the garment wrong side out. Align the sleeve underarm edges and sew from the wrist up through the underarm to the armpit using a stretch stitch, and serge the raw edges. Repeat for the opposite sleeve.
Next, align the front and back side seams. Sew from the underarm down to the bottom leg opening using a stretch stitch, then serge.
Hem the sleeves with a rolled hem by folding the raw edge twice, then topstitching with a stretch or zigzag stitch.

After the side seams are complete, align the front and back gusset edges. Sew along the crotch and inner leg seams using a stretch stitch, then serge.

For the ankle leg stirrups, first serge the raw edges. Then sew the short ends of the stirrup sides together, right sides facing, using a stretch stitch, then serge.
Insert elastic into the middle of the stirrup loop. Fold a rolled hem along the open edges, enclosing the elastic inside, and topstitch using a small zigzag stitch to hem and secure. Repeat for the opposite leg.

Attaching the Shoulder Pads
Turn the catsuit wrong side out.
Take one completed shoulder pad unit and position it inside the shoulder area so the pointed tip sits at the shoulder seam.
Using a hand needle and thread, tack the shell casing fabric of the shoulder pad to the serged seam allowances on the inside of the garment. Secure it along the shoulder seam and at the area where the armhole seam meets the sleeve. Take small stitches through the seam allowance only so they do not show on the outside.

Repeat the same process for the opposite shoulder.
Turn the garment right side and your pointed shoulder catsuit is finished.
Get the Pattern