Cómo coser una bata estilo vintage con patrón de costura
Saltar a instruccionesDescripción general
Yardas de tela
La tabla de telas a continuación muestra las yardas recomendadas según el tipo de tela. Estas yardas corresponden a rollos de tela de 54" o más de ancho, y a 36" para cintas al bies y cadeneta.
| Tamaño | Principal | Canesú + Cintura | Tela de adorno | Recortar la piel |
|---|---|---|---|---|
| XS | 3,5 años | 0,5 años | 2,5 años | 8 años |
| S | 3,5 años | 0,5 años | 2,5 años | 8,5 años |
| METRO | 3,5 años | 0,5 años | 2,5 años | 8,5 años |
| L | 4 años | 0,5 años | 2,5 años | 9 años |
| SG | 4,5 años | 0,5 años | 3 años | 10 años |
| 2XL | 4,5 años | 0,5 años | 3 años | 10 años |
Telas y artículos de mercería
Tela
- Tejido exterior no elástico, como satén, charmeuse, rayón challis, crepé ligero, mezclas de seda, encaje o terciopelo ligero.
Nociones
- Cinta al bies (opcional para rematar bordes sin rematar)
- Piel sintética opcional, ribete de plumas o tela tejida a juego para ribete doblado.
Detalles de tallas
Este patrón está diseñado en nuestras exclusivas tallas drag queen, desde la XS hasta la 2XL, para cuerpos con relleno y hombros, brazos y piernas más anchos. Aunque está diseñado pensando en drag, puede ser usado por personas de cualquier género que cumplan con las medidas que se indican a continuación.
| Tamaño | Pecho de hombre | Arrastre el pecho (acolchado) | Cintura de hombre | Cintura de arrastre (con corsé) | Cadera masculina | Arrastre de cadera (acolchado) | Altura |
|---|---|---|---|---|---|---|---|
| XS | 33-35 | 36-38 | 27,5-29,5 | 24.5-26.5 | 32,5-34,5 | 38-40 | 70 |
| S | 35-37 | 38-40 | 29,5-31,5 | 26,5-28,5 | 34,5-36,5 | 40-42 | 70 |
| METRO | 39-41 | 42-44 | 33,5-35,5 | 30,5-32,5 | 38,5-40,5 | 44-46 | 70 |
| L | 43-45 | 46-48 | 37,5-39,5 | 34,5-36,5 | 42-44 | 47,5-49,5 | 70 |
| SG | 47-49 | 50-52 | 42,5-44,5 | 39,5-41,5 | 45-47 | 50,5-52,5 | 70 |
| 2XL | 51-53 | 55-57 | 47,5-49,5 | 44,5-46,5 | 48-50 | 54.5-56.5 | 70 |
Instrucciones de costura
Color Guide

About the Pattern
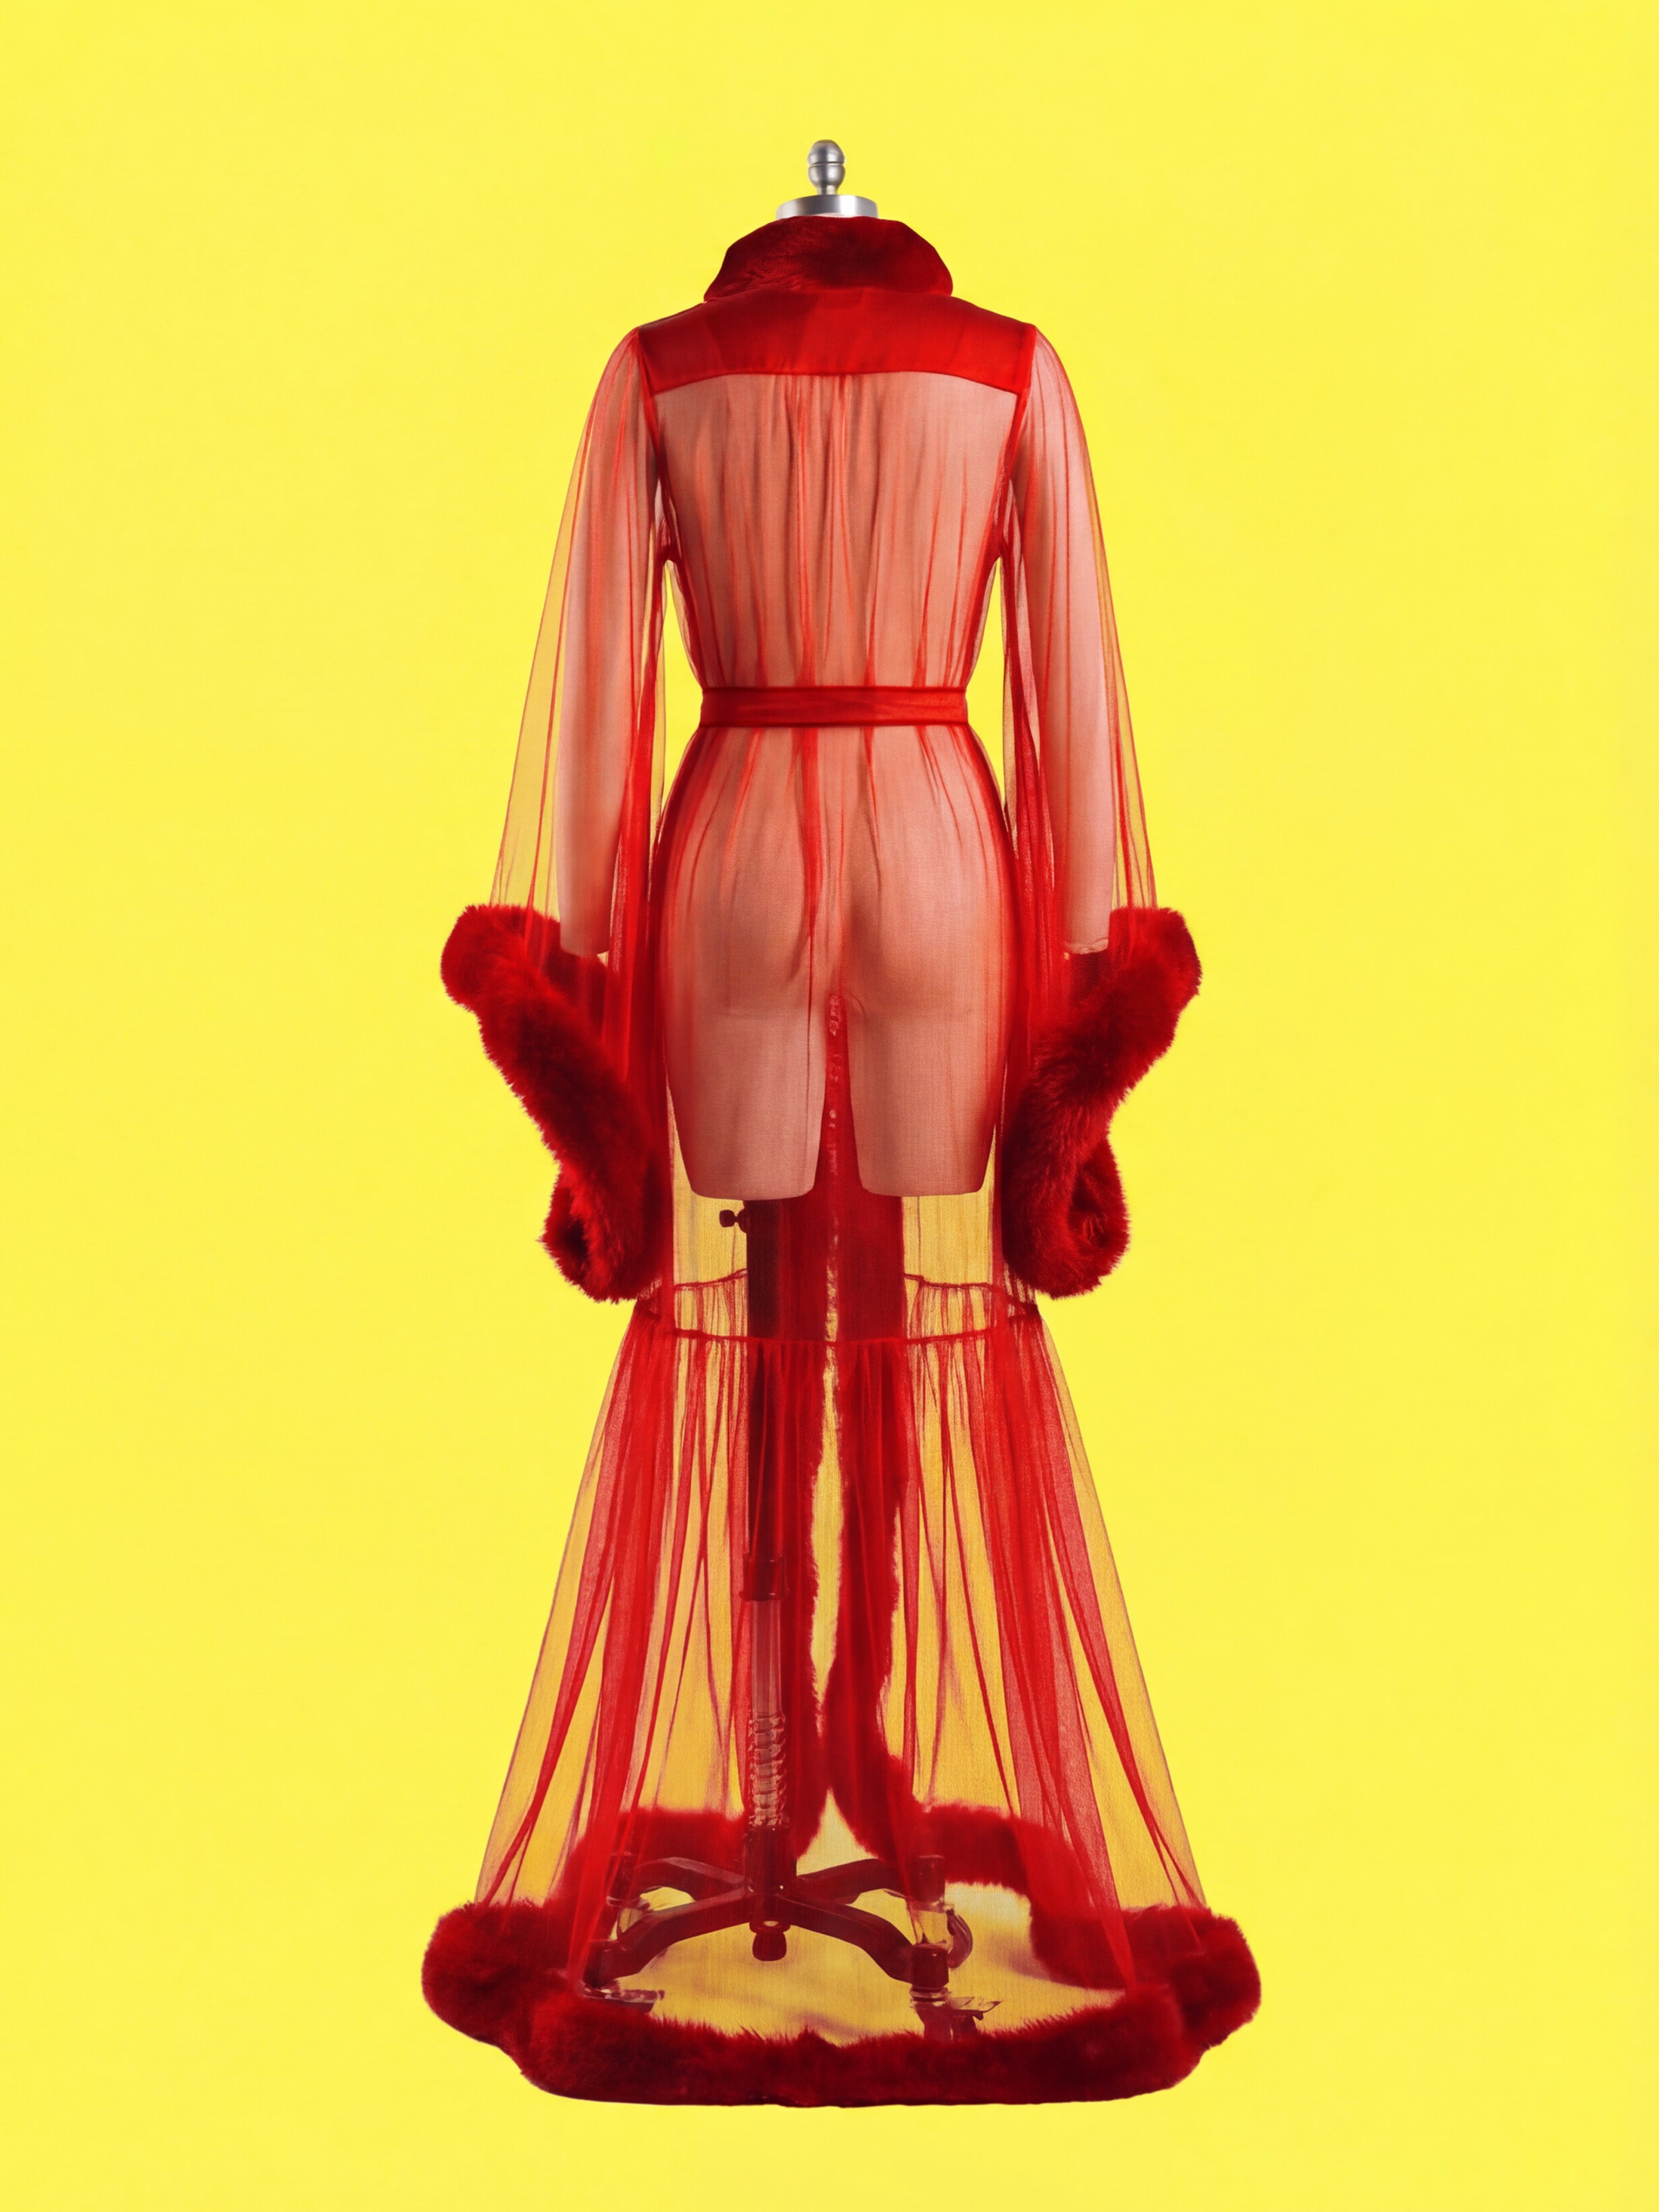
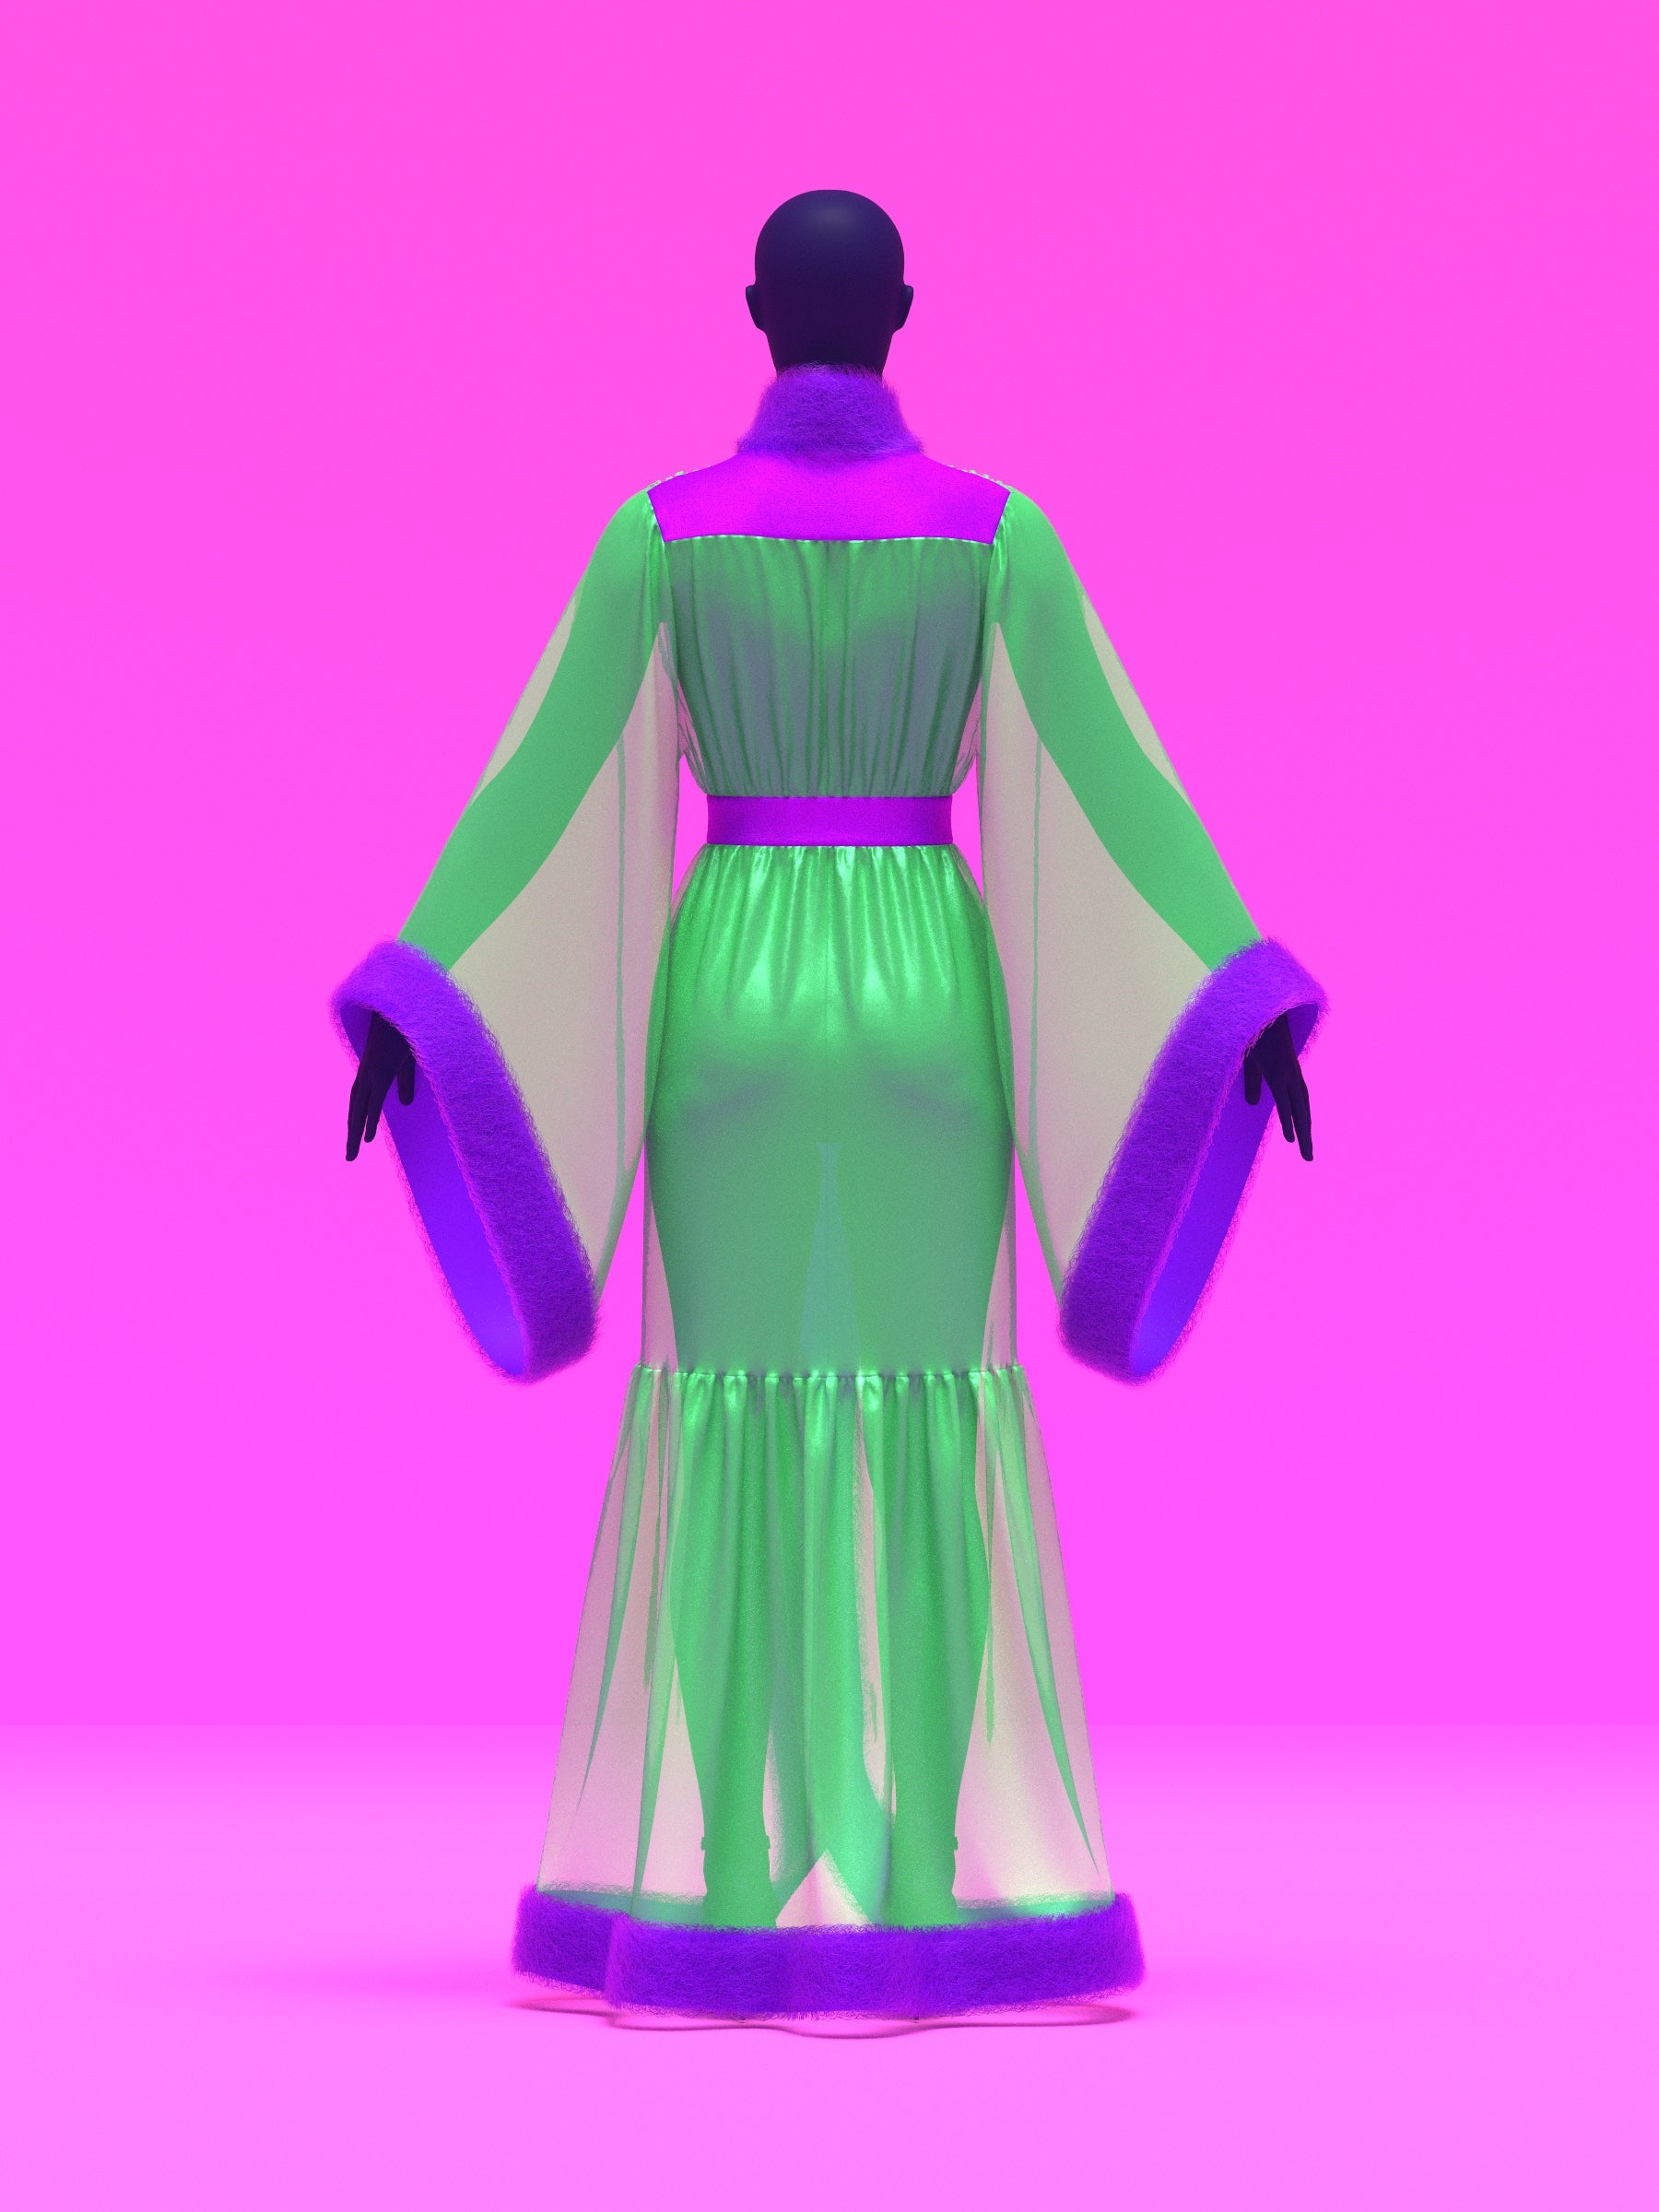
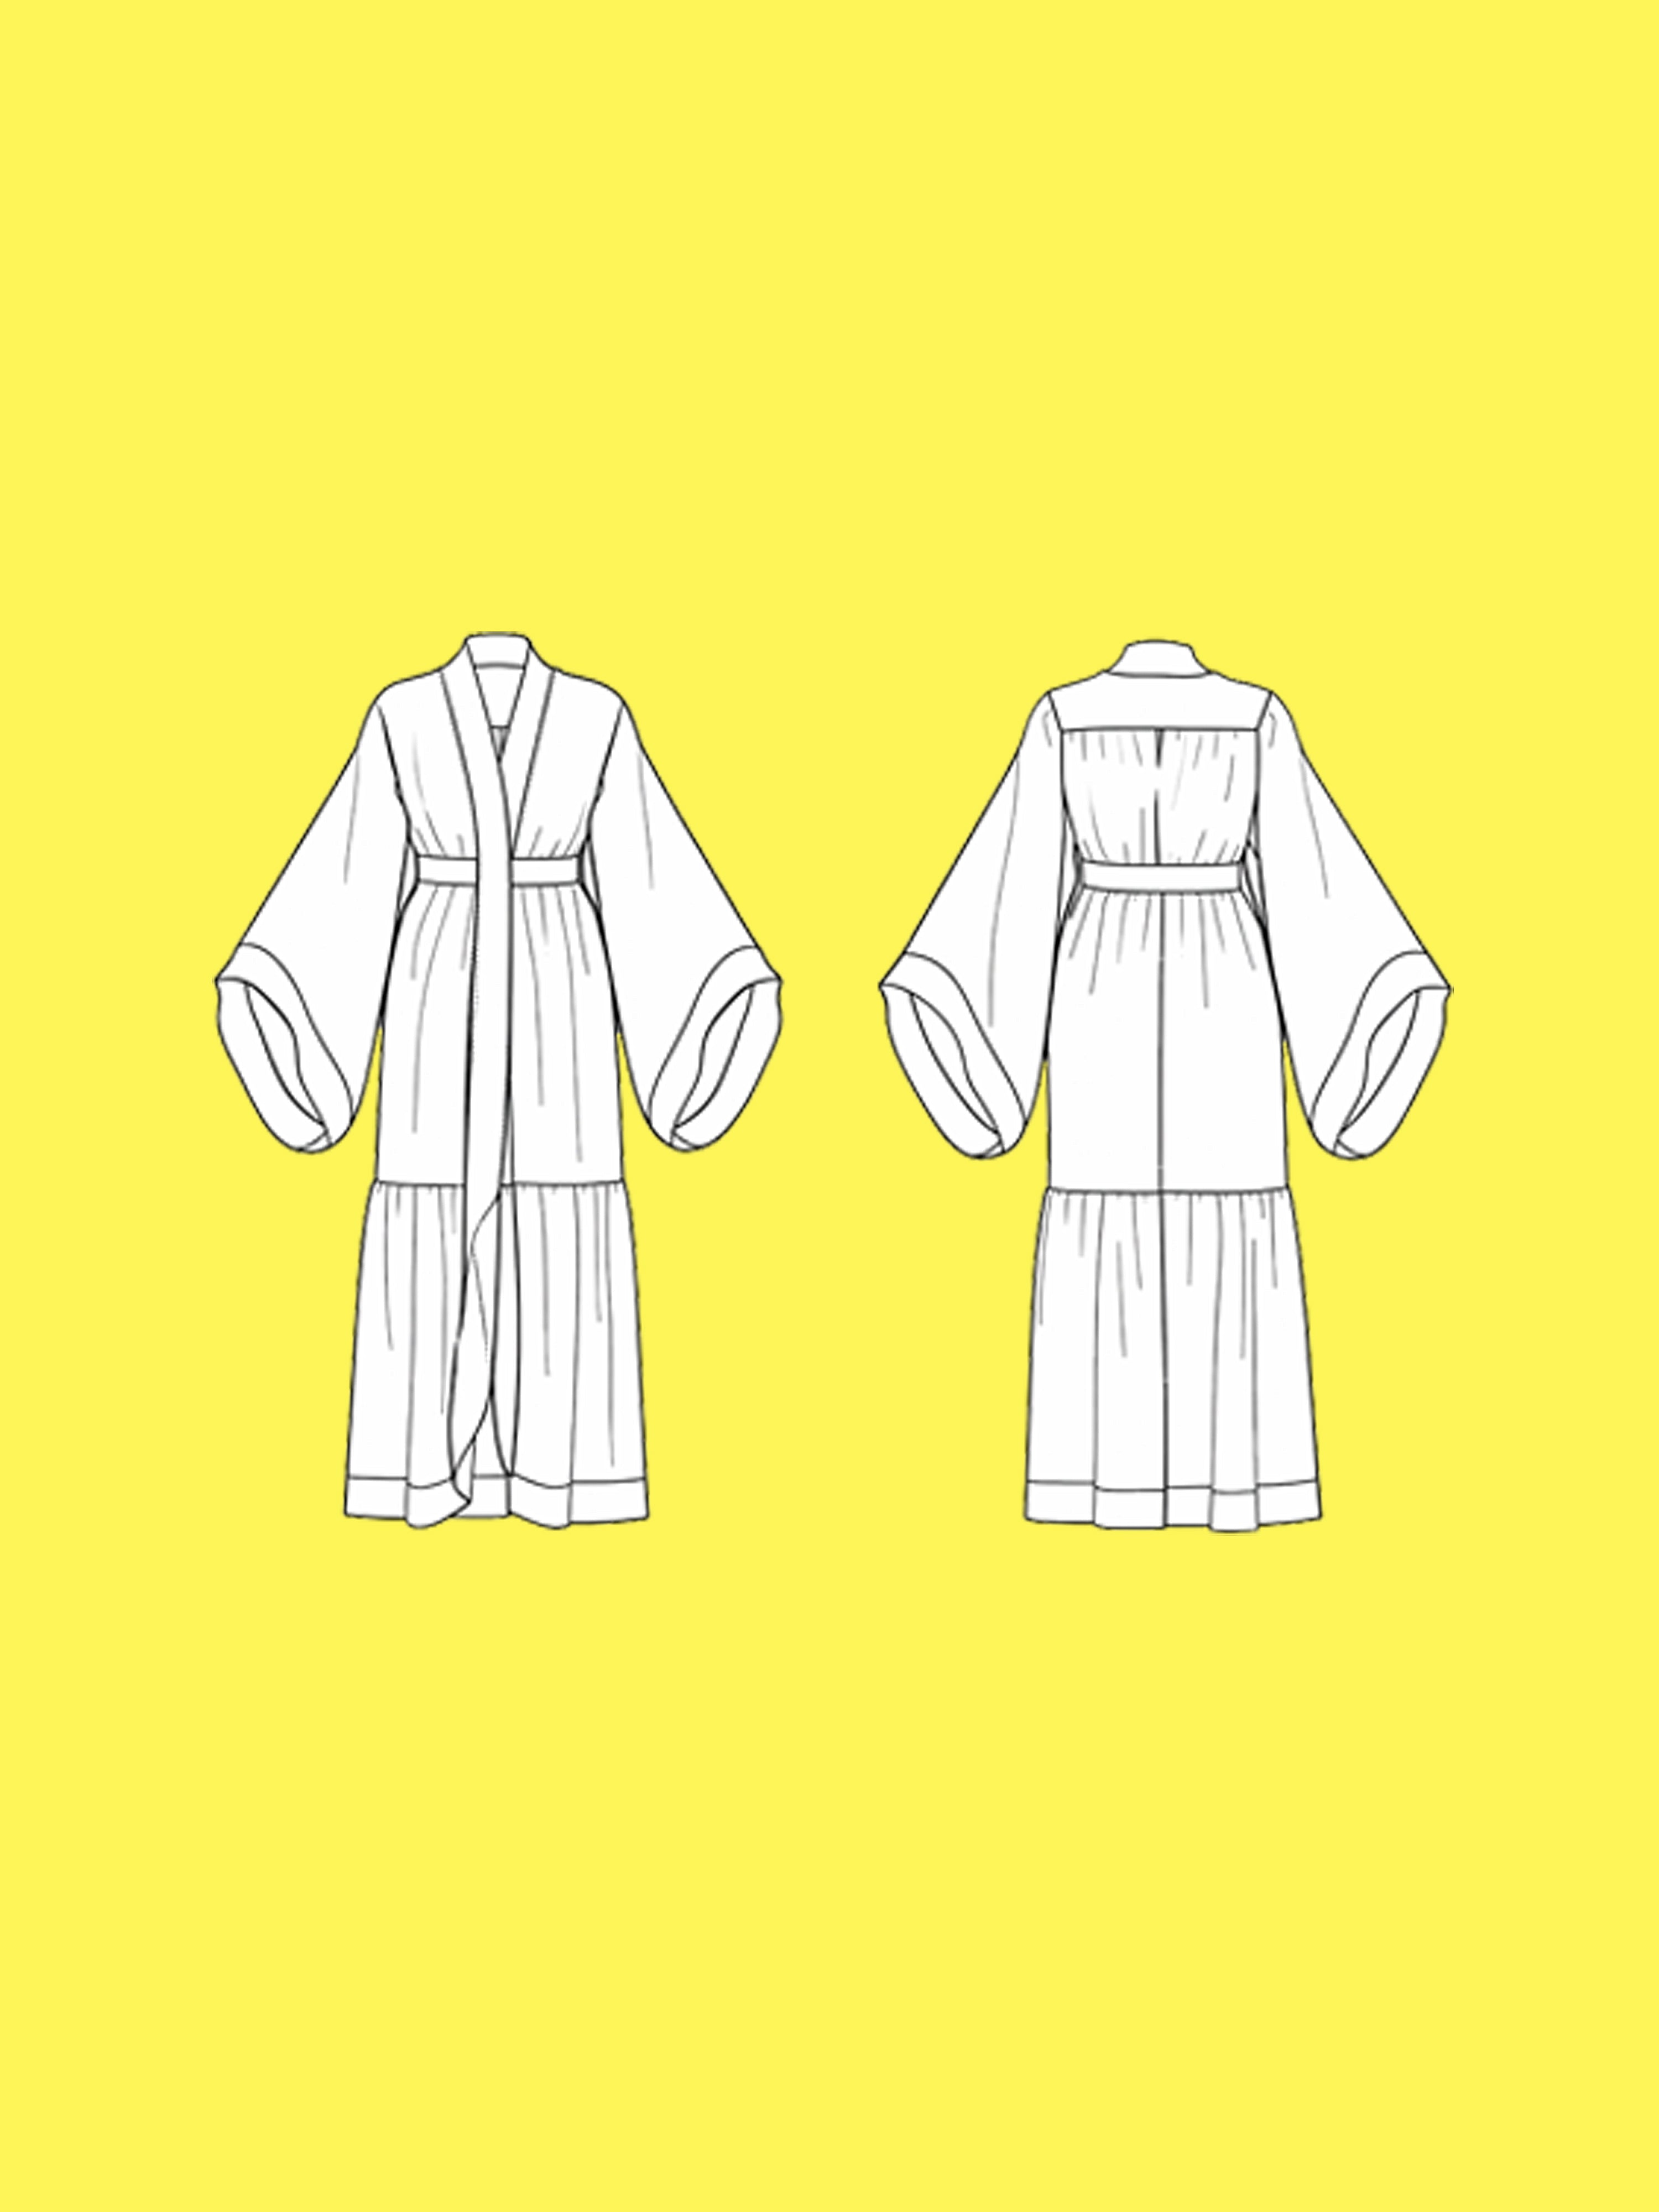
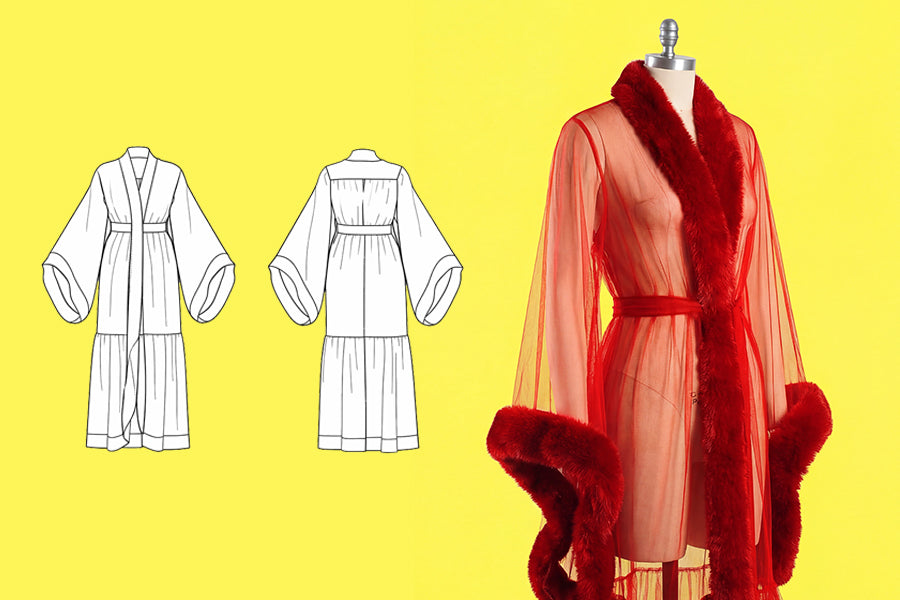
This Vintage Gathered Robe sewing pattern is inspired by old Hollywood glamour and designed as a bold drag reveal accessory. The robe features oversized sleeves, a dramatic wide trim along the neckline, hem, and front edges, and a sewn-in waist belt with gathered sections that create a ruffled effect. The trim can be made using faux fur or folded fabric, depending on the desired look. The length is fully customizable, allowing the robe to either touch the floor for maximum drama or stop at the knee for a lighter silhouette. Designed for lightweight fabrics such as lace or satin, this pattern encourages experimentation with vintage-inspired materials, including contrasting fabrics for the waist belt and trim to enhance texture and visual impact.
Fabric Pieces
This pattern includes 11 paper pattern pieces. Use these pieces to cut your fabric before beginning construction.
Pattern piece 1 is the back yoke. Cut 2 on the fold, using one for the shell and one for the lining.
Pattern piece 2 is the back above-waist section. Cut 2 mirrored from the shell fabric only, with no lining.
Pattern piece 3 is the back waistband. Cut 1 on the fold for the shell and 1 on the fold for the lining.
Pattern piece 4 is the front and back above-the-knee section. Cut 4 total from the shell fabric, using 2 for the front and 2 for the back. This piece does not use lining.
Pattern piece 5 is the below-the-knee section. Cut 4 total. Use 2 for the back and 2 mirrored for the front, making sure the front pieces include the curved bottom edge.
Pattern piece 6 is the front above-waist section. Cut 2 mirrored from the shell fabric only.
Pattern piece 7 is the front belt and waistband. Cut 2 mirrored for the shell and 2 mirrored for the lining.
Pattern piece 8 is the sleeve. Cut 2 on the fold from the shell fabric, one for each sleeve. No lining is required.
Pattern pieces 9, 10, and 11 are the trim pieces. You should cut these out following the trim dimension charts provided. These may be cut from fabric, folded fabric, or faux fur.
Pattern piece 9 is the around the neck trim. Pattern piece 10 is cut 2, below the knee and around the back trims. Pattern piece 11 is cut for the sleeve trims..

Back Construction
Begin with the back pieces. Take pattern piece 2, the back above-waist sections, Sew the two pieces together along the center back using a straight stitch, following the 1/2 inch seam allowance.
With the seam sewn and still on the wrong side of the fabric, finish the raw edges. You may use a serger or overlock stitch to enclose the seam, or choose an alternative finish such as a French seam or another method that hides or encloses raw edges.

Once the back above-waist pieces are joined, gather the top edge marked as edge A. To gather, sew a long loose basting stitch within the 1/2 inch seam allowance. Do not backstitch. This can be done by machine or by hand, though hand basting with a long running stitch is often the easiest. Gently pull the thread tails to gather the fabric evenly, being careful not to snap the thread.
Adjust the gathers so the width of the gathered edge matches the bottom edge of pattern piece 1, the back yoke.

Take the shell back yoke and place it right side down on top of the gathered edge of the back above-waist piece. As well as, place the lining yoke on the opposite side so the gathered piece is sandwiched between the shell and lining yoke layers.
Baste the layers together if needed, then sew through all layers along the bottom edge of the yoke using a straight stitch. You may also serge this seam if desired.
After sewing, flip the yoke upward and press the seam flat. For a clean finish, you may edge stitch or topstitch along the seam to secure the yoke and add definition.

Attaching the Back Waistband
Next, attach the assembled back piece to pattern piece 3, the back waistband. This waistband includes both a shell and a lining, and there are a couple construction methods you can choose from.
One option is to prepare the waistband first. Press the seam allowance of both the shell and lining pieces inward toward the wrong side along the top and bottom edges of pattern piece 3. This creates pressed guides that make insertion easier later.

Gather the bottom edge of pattern piece 2 in the same way the yoke edge was gathered. Sew a long basting stitch within the 1/2 inch seam allowance, then gently pull the threads until the gathered edge matches the full width of edge B on the back waistband.
Once gathered, insert the gathered edge between the pressed top edges of the waistband shell and lining. Align the raw edges evenly, then topstitch through all layers to secure the waistband in place.

Alternatively, you may construct the waistband using the same sandwich method used for the yoke. Place the gathered back piece between the shell and lining waistband layers and sew through all layers using a straight stitch. Press the waistband flat after sewing for a clean finish.
Back Above-the-Knee
Next, attach pattern piece 4, the above-the-knee sections, to the back waistband. Begin by taking the two back pieces of pattern piece 4 and sewing them together along the center back edge using a straight stitch and the 1/2 inch seam allowance. Finish the raw edge in the same manner used for pattern piece 2, using a serger, overlock stitch, or another preferred seam finish.

Once the back above-the-knee pieces are joined, gather the top edge. Sew a long basting stitch within the 1/2 inch seam allowance and gently pull the threads until the gathered edge matches the width of edge C on the back waistband.

Insert the gathered edge between the shell and lining layers of the back waistband. Align the edges evenly and sew through all layers to secure the gathered section in place. Press the seam flat after sewing for a clean, finished look.

Back Below-the-Knee
Continue constructing the back by working with pattern piece 5, the below-the-knee sections. For the back, these pieces are cut as two full rectangles. Note that the front pieces will have curved bottom edges, but the back remains straight.
Take the two back pieces of pattern piece 5 and sew them together along the center back edge using a straight stitch and the 1/2 inch seam allowance. Finish the raw edge using the same method as previous seams, such as a serger, overlock stitch, or another enclosed seam finish.

Next, gather the top edge of pattern piece 5 along the edge marked letter D. Sew a long basting stitch within the seam allowance and gently pull the threads until the gathered edge matches the width of the bottom edge of pattern piece 4 at the letter D seam.

Sew the gathered edge of pattern piece 5 to the bottom edge of pattern piece 4 using a straight stitch. Finish the raw edge with a serger if desired, or apply bias tape or bias trim along the seam to neatly enclose and hide the raw edges.
At this point, the entire back section of the robe should be fully assembled. Set the back aside, as the next steps will focus on constructing the front pieces.

Front: Waistband Ties
Begin the front construction with pattern piece 7, the front waistband. Pair each shell piece with its corresponding lining piece and stack them right sides facing together.
Locate the angled edge, which will form the exposed tie end of the waistband. Starting at notch F, sew along the top edge, around the angled corner, and down the angled side to notch G at the bottom edge. Use a straight stitch and follow the 1/2 inch seam allowance. Stop sewing at the notches, leaving the opposite end of the front waistband open.

Trim away excess seam allowance at the angled corner to reduce bulk. Turn the waistband tie right side out through the open end and press it flat, shaping the angled edge cleanly.
Repeat this process for both front waistband tie pieces.

Attaching Front Above the Waist
Once the front waistband tie pieces are turned right side out, the straight edge at the side seam should remain open. This open edge will be used to insert the front robe pieces. If desired, press the top and bottom edges of pattern piece 7 inward along the seam allowance to create crease guides.

Take pattern piece 6, the front above-waist sections, and gather the bottom edge marked letter F. Sew a long basting stitch within the seam allowance and pull the threads until the gathered edge fits evenly between notch F and the side seam along the top edge of the front waistband piece.

Insert the gathered edge of pattern piece 6 into the open end of the front waistband shell and lining. Align the raw edges and sew through all layers to secure the gathered front piece in place, using a straight stitch.

Front Below Waist
Attach pattern piece 4, the front above-the-knee sections, to the bottom raw edge of the front waistband. Gather the top edge of pattern piece 4 and match it to the lower edge of pattern piece 7 from notch G to the side seam. Sew the gathered edge in place using the same method used in previous steps.

Take pattern piece 5, the front below-the-knee curved pieces. Gather the top edge and attach it to the bottom edge of pattern piece 4, matching the gathered width evenly, just as was done for the back sections. Finish the raw edges as desired.
At this point, the front panels of the robe should be fully assembled.

Attaching the Front to the Back
Now sew the front and back sections together, starting at the shoulder yoke. Take pattern piece 6 and gather the shoulder edge marked letter E so that it matches the total width of the letter E edge on pattern piece 1, the back yoke.
On the back yoke, press the seam allowance inward along the letter E edge for both the shell and the lining to create placement guides. Insert the gathered shoulder edge of pattern piece 6 between the shell and lining layers of the yoke.
Topstitch through all layers to secure the seam. Repeat this process for both front shoulder edges.

Attaching the Sleeves
Once the front and back sections are joined at the shoulders, attach the sleeves. Lay the robe flat with the front and back spread open and facing right side up.
Place each sleeve right sides facing the front and back armholes. Align the sleeve notch with the point where pattern pieces 1 and 2 meet at the back yoke. Make sure the sleeve is evenly distributed so both the front and back sides are symmetrical.

Pin the sleeve in place around the armhole, then sew along the armhole edge using a straight stitch. Finish the raw edges with a serger or overlock stitch for a clean finish.

Sewing the Side Seams
With the sleeves attached, turn the entire garment wrong side out. Align the front and back pieces and pin along the inner sleeve seam, through the underarm, and down the side seams.
Sew continuously from the sleeve wrist, through the armpit, and down the side seam using a straight stitch. Finish the raw edges with a serger or your preferred method for enclosing or hiding raw edges.
Once the side seams are complete, the robe body is fully constructed and ready for trim application.

Attaching the Trim
If you are using folded fabric instead of faux fur for the trim, begin by assembling the trim pieces. Use the center of the pattern piece 9, for the center back neckline, while pattern piece 10 extends the trim downward below the knee. The seam where these two pieces join will align near the seam where pattern pieces 4 and 5 meet.
Sew pattern piece 9 to pattern piece 10 ends to create one continuous long trim loop.

Once pattern pieces 9 and 10 are sewn together, fold the trim lengthwise with wrong sides facing each other to create a clean folded edge. Press the fold firmly to set the crease.

Starting at the center back neckline, align the raw edges of the folded trim with the raw edge of the robe, placing the trim right sides facing the right side of the robe. The folded edge of pattern piece 9 should sit at the center back neck. Pin the trim evenly along the neckline and down the front opening, continuing around the bottom hem, forming one continuous loop.
Leave a small opening at the waistband so the front waistband ties can be placed behind the trim. And finish those non-connected belt gaps by folding the seam allowance inside the trim with top-stitches.

Sew the trim in place using a straight stitch. Finish the raw edges with a serger or overlock stitch if desired. Press the trim outward and topstitch along the folded edge to secure it and give a polished finish.

Repeat for attaching both sleeve trims.
If using faux fur instead of folded fabric, use the trim lengths as a guide and attach the fur in the same placement, typically by hand sewing or carefully stitching along the backing to avoid catching the fur pile.
Here are some video for sewing fur and feather trim:
https://www.youtube.com/watch?v=PunLHt_sSEM&list=LL&index=3 https://www.youtube.com/watch?v=GUD9v4cZbV8&list=LL&index=2Obtén el patrón