Cómo coser un maillot con hombros en punta y bloques de color
Saltar a instruccionesDescripción general
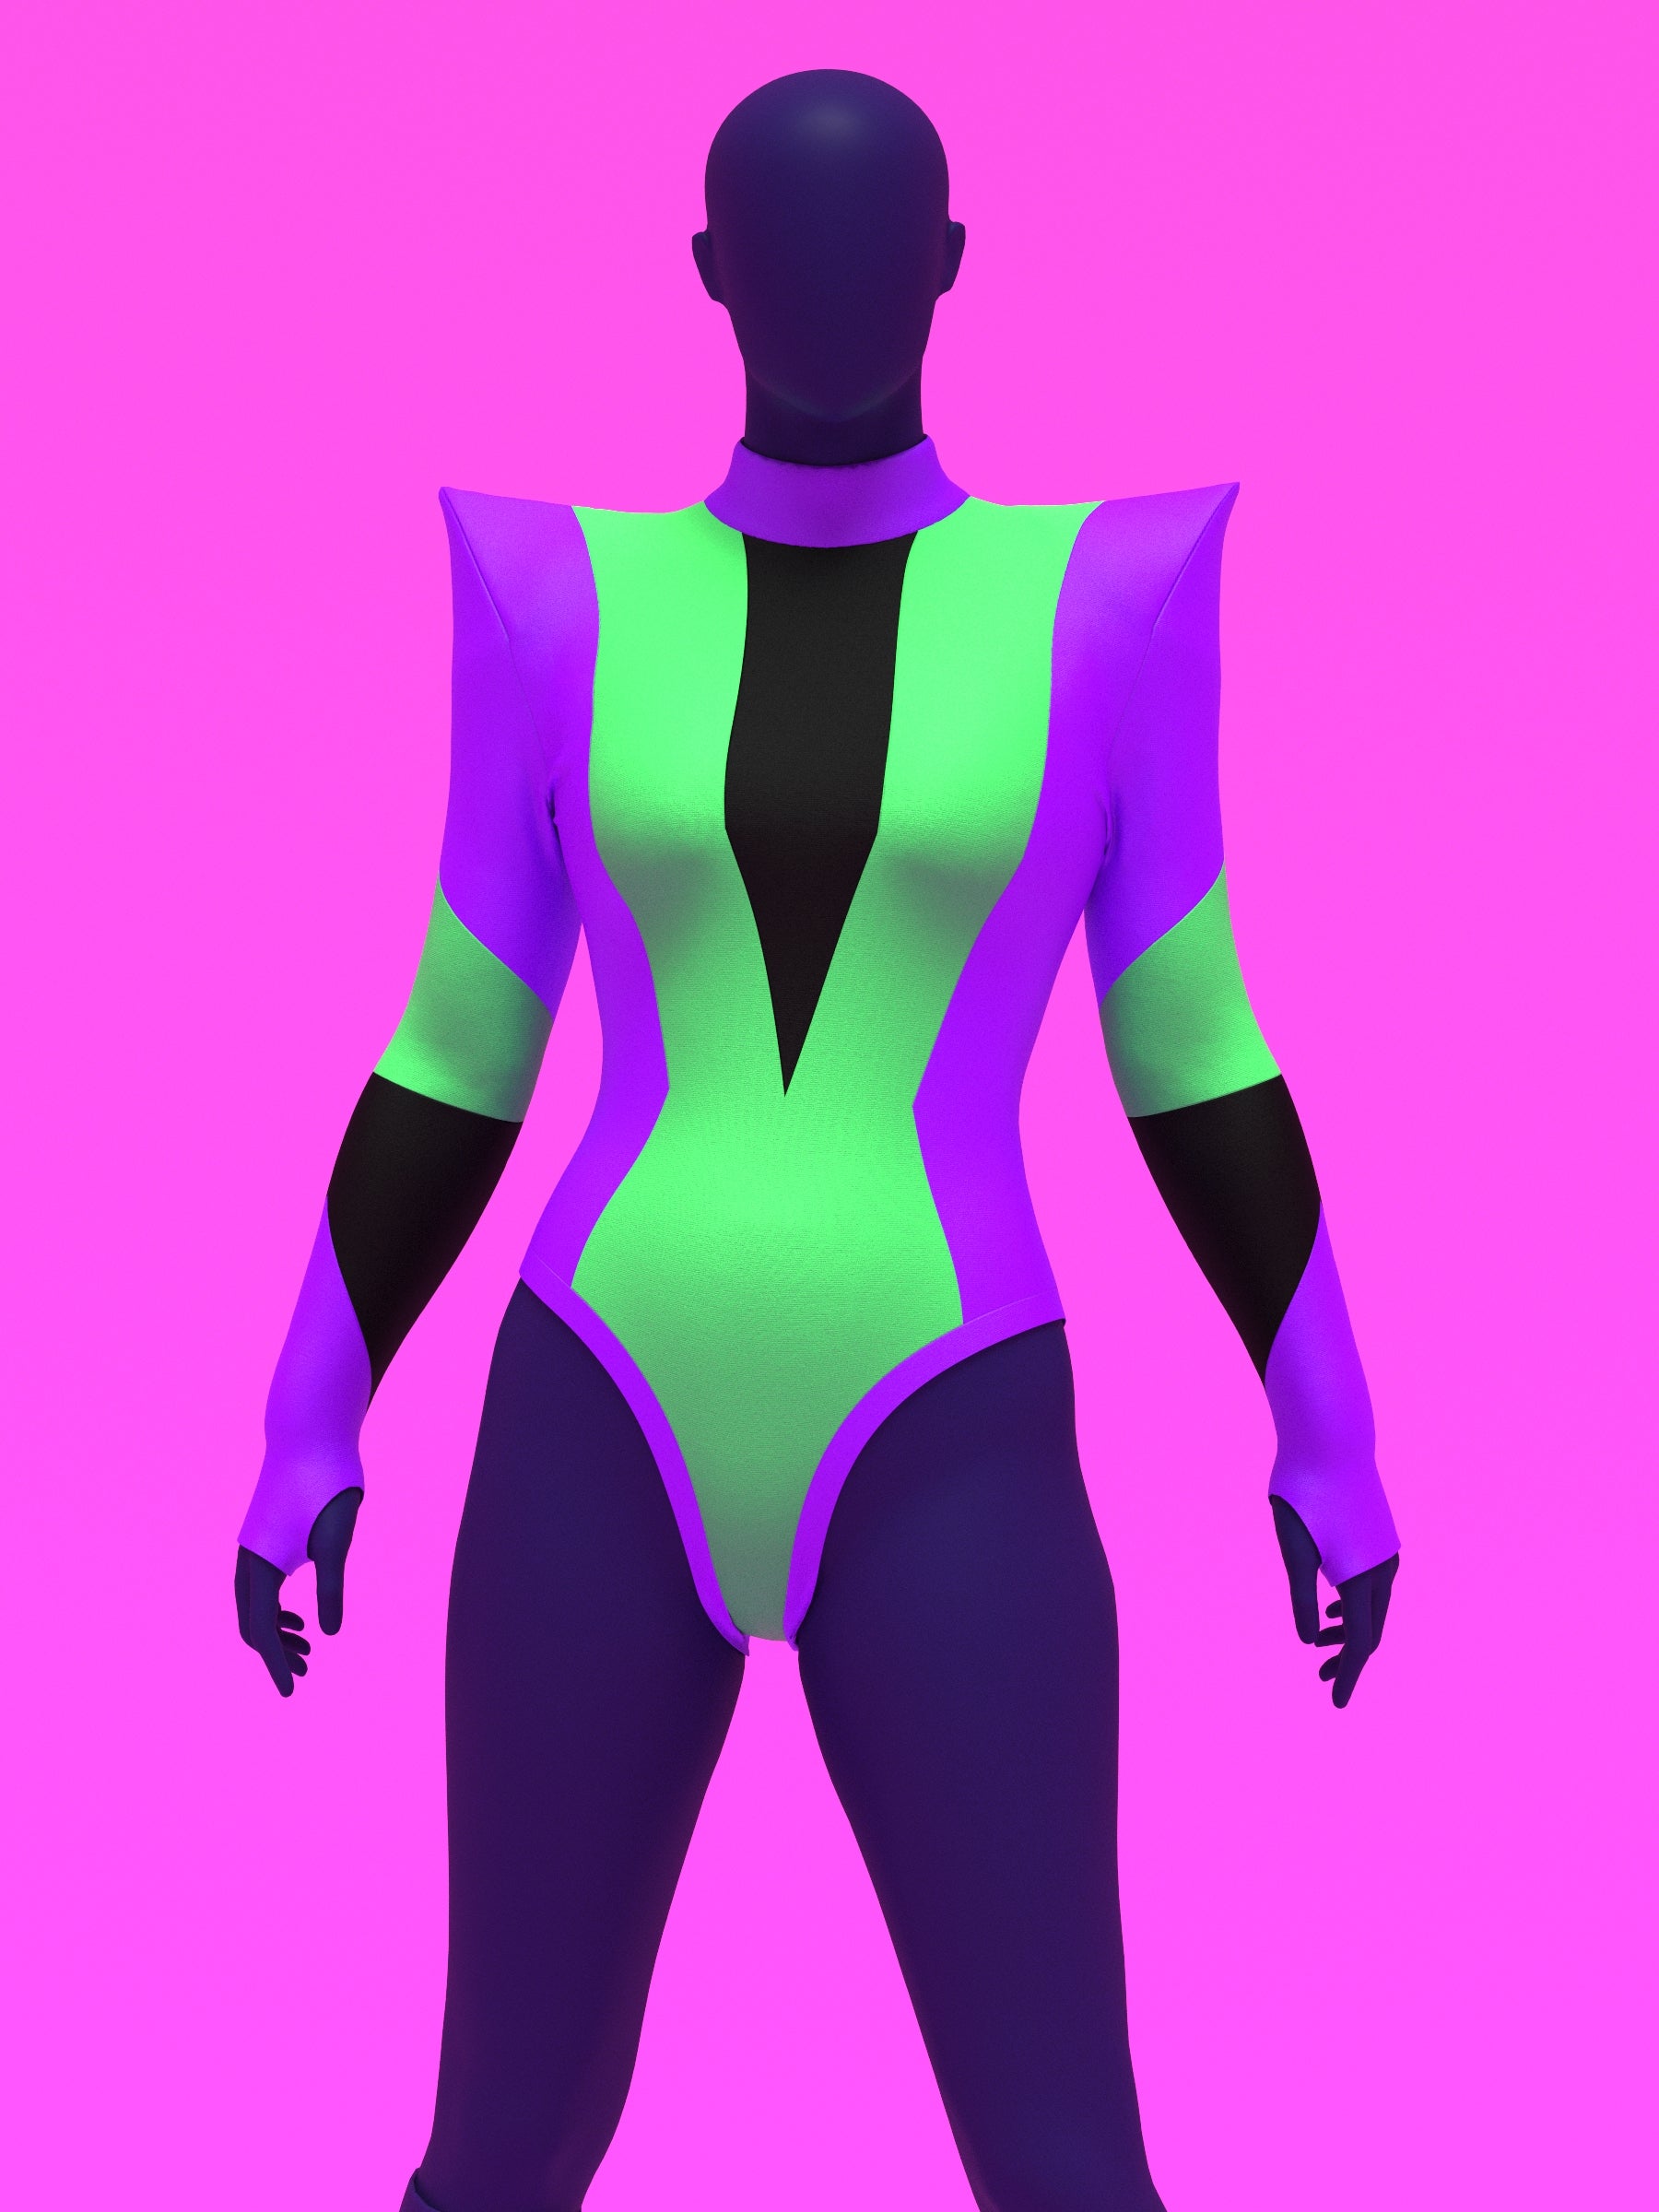
Aprende a coser nuestro maillot con hombros puntiagudos y cortes en bloques de color para drag queens y artistas. Este diseño elástico en cuatro direcciones presenta hombreras piramidales estructuradas, confeccionadas con entretela ultra firme y revestidas de tela elástica para una silueta definida y exagerada. Sigue las instrucciones paso a paso para confeccionar las unidades de entretela para los hombros, instalar el cuello y la cremallera central de la espalda, colocar las mangas con orificios para los pulgares, cerrar el cuerpo y rematar las aberturas de las piernas con un ribete elástico impecable. Diseñado exclusivamente para telas elásticas en cuatro direcciones y apto para principiantes que buscan mejorar su look en el escenario.
Yardas de tela
The fabric yardage below is for fabric bolt widths of 54" or more.

| Size | Fabric A | Fabric B | Fabric C |
|---|---|---|---|
| XS | 1y | 1y | 0.5y |
| S | 1y | 1y | 0.5y |
| M | 1y | 1y | 0.5y |
| L | 1y | 1y | 0.5y |
| XL | 1y | 1y | 0.5y |
| 2XL | 1y | 1y | 0.5y |
Telas y artículos de mercería
Tela
- Solo tejidos elásticos en cuatro direcciones, como Spandex, Lycra, Milliskin Tricot y Power Mesh.
Nociones
- Cremallera invisible de 22-24", para cierre posterior.
- Para entretela de hombros, estabilizador/entretela fusible ultra firme de un solo lado como (71F Peltex)
Detalles de tallas
Este patrón está diseñado en nuestras exclusivas tallas drag queen, desde la XS hasta la 2XL, para cuerpos con relleno y hombros, brazos y piernas más anchos. Aunque está diseñado pensando en drag, puede ser usado por personas de cualquier género que cumplan con las medidas que se indican a continuación.
| Tamaño | Pecho de hombre | Arrastre el pecho (acolchado) | Cintura de hombre | Cintura de arrastre (con corsé) | Cadera masculina | Arrastre de cadera (acolchado) | Altura |
|---|---|---|---|---|---|---|---|
| XS | 33-35 | 36-38 | 27,5-29,5 | 24.5-26.5 | 32,5-34,5 | 38-40 | 70 |
| S | 35-37 | 38-40 | 29,5-31,5 | 26,5-28,5 | 34,5-36,5 | 40-42 | 70 |
| METRO | 39-41 | 42-44 | 33,5-35,5 | 30,5-32,5 | 38,5-40,5 | 44-46 | 70 |
| L | 43-45 | 46-48 | 37,5-39,5 | 34,5-36,5 | 42-44 | 47,5-49,5 | 70 |
| SG | 47-49 | 50-52 | 42,5-44,5 | 39,5-41,5 | 45-47 | 50,5-52,5 | 70 |
| 2XL | 51-53 | 55-57 | 47,5-49,5 | 44,5-46,5 | 48-50 | 54.5-56.5 | 70 |
Instrucciones de costura
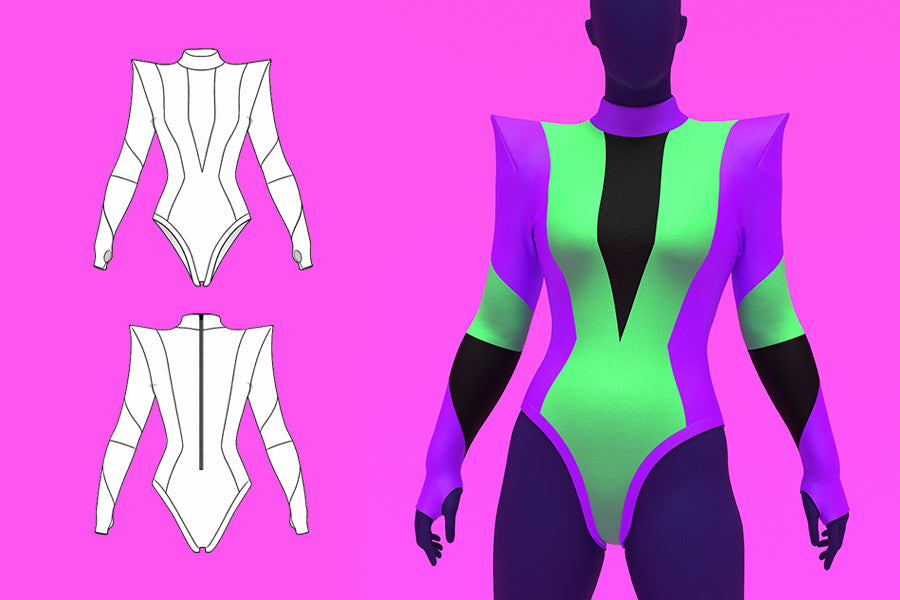
Color Guide

About Pattern
This pattern is a color block cutout, four-way stretch pointed shoulder leotard designed for bold stage presence. The shoulders are structured with interfacing to create sharp, exaggerated points, giving the garment an edgy, dramatic silhouette. Perfect for drag performances, this design combines stretch comfort with strong, sculpted shoulders for a powerful on-stage look. Mix and match with different fabric colors to make it your own.
Fabric Pieces
This pattern includes 16 paper pattern pieces. Use these pieces to cut your fabric before starting construction.
Piece 1, the center front of the leotard, is cut on a folded fabric layer.
Piece 2, the front middle of the leotard, is cut on a folded fabric layer.
Piece 3, the front side of the leotard, cut 2 pieces mirrored.
Piece 4, the center back zipper pieces, cut 2 pieces mirrored.
Piece 5, the back middle of the leotard, is cut on a folded fabric layer.
Piece 6, the back side of the leotard, cut 2 pieces mirrored.
Pieces 7, 8, 9, and 10, make up the sleeves, they are all to be cut on a folded fabric layer. Cut two of each mirrored. When cutting the thumb holes for number 10, only cut one thumb opening per sleeve, mirrored so each sleeve has the correct orientation.
Piece 11, the collar, is cut one on a folded fabric layer.
Piece 12, the shoulder interfacing without seam allowance, is cut in ultra firm interfacing. Cut four pieces, two mirrored for the front shoulders, and two mirrored for the back shoulders.
Piece 13, the casing for the Piece 13 interfacing, is cut in stretch fabric. Cut eight pieces to fully encase the interfacing sections.
Piece 14, the pointed shoulder sleeve interfacing without seam allowance, is cut in ultra firm interfacing. Cut two pieces mirrored, one per sleeve.
Piece 15, the pointed shoulder sleeve interfacing casing, is cut in stretch fabric. Cut four pieces to enclose the Piece 14 interfacing.
Piece 16, the leg hole trims, are cut on a folded fabric layer. Cut two in four way stretch fabric.

Constructing the Shoulder Interfacing
Begin by assembling the shoulder interfacing pieces. For structure, it is best to use an ultra firm interfacing for Pieces 12 and 14. For each shoulder, you will need two mirrored Piece 12 sections and one Piece 14 section.
An ultra firm option such as Pellon 71F works very well. It is thick and sturdy, almost like cardboard but slightly flexible. This helps maintain the sharp pointed shoulder shape. If you prefer a different interfacing, you may use a medium weight type and fuse multiple layers together until you achieve a stiff, structured result for each piece.
Pieces 12 and 14 do not include seam allowance because they will be sewn together edge to edge. Take one Piece 12 and one Piece 14 and align them at the marked dots. Sew them side by side using a zigzag stitch, gently pushing the edges together as you stitch so there is no gap between them.

Next, attach the second mirrored Piece 12 to the opposite side of the Piece 14 in the same way, using a zigzag stitch and sewing the edges directly together.
Finally, sew the two Piece 12 sections together along the pointed shoulder edge, again using a zigzag stitch and butting the edges together. Once complete, the three pieces will form a structured pyramid shape in ultra firm interfacing, creating the base for your exaggerated pointed shoulder.

Encasing the Shoulder Interfacing
Once the interfacing pyramid is constructed, it will be encased inside a fabric shell and lining using Pieces 13 and 15. This finished shoulder unit will later be sewn into the shoulder seams of the leotard, but for now focus on building the structured pad.
Take one Piece 13 and one Piece 15. These pieces include a 1/2 inch seam allowance. Place Piece 13 right side facing on top of Piece 15, aligning along the letter A edge. Sew from the A edge down toward the B marking.
Repeat this step with the second Piece 13 on the opposite side of the same Piece 15, again sewing from A toward B. Then sew the two Piece 13 edges together along the top A edge. This completes the shell layer.

Repeat the same construction steps to create the lining layer.
Next, place the shell and lining right sides facing each other and sew around all B edges. Leave an unsewn opening large enough to insert the interfacing pyramid.
Turn the shell and lining right side out through the opening. Insert the structured interfacing pyramid into the casing, pushing it fully into the pointed tip. Fold the seam allowance of the opening inward and topstitch closed to fully encase the shoulder pad.

Repeat the entire process for the second shoulder and set both aside for later construction.
Preparing the Cutout Panels
Take the 1, 2, and 3 front pieces and pin the edges together, right sides facing. Sew the seams using a stretch stitch first. A lightning bolt stitch is preferred, or use a small zigzag stitch, with a 1/2 inch seam allowance. Then finish the raw edges on the wrong side using an overlock machine to serge the seam allowance.
This will make up the complete front panel of the leotard.

Repeat for back pieces 4, 5, and 6. Keeping the center back number 4 pieces unsewn to add a zipper later.

And repeat for both sleeve panels 7, 8, 9, and 10.

Sewing the Front and Back
Take the front and back panels. Place them right sides facing each other and align the shoulder edges.
Sew the shoulder seams using a stretch stitch. A lightning bolt stitch is preferred, or use a small zigzag stitch. Sew with a 1/2 inch seam allowance. Once stitched, finish the raw edges together on the wrong side using an overlock machine to serge the seam allowance.

Preparing and Attaching the Collar
Take Piece 11, the collar. Fold it lengthwise in half along the fold line with the wrong sides facing each other. Match the raw edges and pin along the fold to keep it in place.

Turn the leotard body right side out. With the collar still folded, position it upside down so the raw edges of the collar align with the neckline. The right side of the collar should face the right side of the leotard.
Begin pinning at the center back slit and continue around the neckline. The collar notch should align with the shoulder seam. The folded edge that was cut on fold should sit at the center front of the leotard.
Pin the collar evenly around the entire neckline. Sew through both collar layers and the neckline using a stretch stitch, preferably a lightning bolt or small zigzag, with a 1/2 inch seam allowance. Then finish the raw edge with a serger on the wrong side.

Installing the Zipper
Use a 20 to 24 inch zipper for the center back. An invisible zipper is recommended, but a regular zipper may also be used. Follow the specific instructions for your zipper type.
With the leotard right side out, place one side of the zipper right sides together with one side of the center back opening, starting at the collar edge. The top of the zipper tape should align with the collar fold. Fold the excess zipper tape at the top inward so it is cleanly finished at the collar.
Sew from the collar down to the end of the slit using a straight stitch. Keep the stitching close to the zipper teeth, depending on your zipper type.
If desired, place a strip of tearaway stabilizer between the zipper tape and the fabric before sewing. This helps prevent rippling. After stitching, gently tear away any excess stabilizer.
Repeat the same steps for the opposite side of the zipper, aligning the top edges evenly at the collar and sewing down to the base of the opening.
Once installed, the excess zipper tape should lie flat on the wrong side of the garment. You may topstitch at the base of the zipper and along each side of the zipper opening for added security and a clean finish.

Attaching the Sleeves
Take the sleeve panels. Make sure the right sleeve has the thumb hole positioned toward the right side of the front, and the left sleeve has the thumb hole positioned toward the left side of the front. When worn, the thumb openings should sit correctly on each hand.
Finish the thumbhole by adding a double folded stretch bias tape, or try a rolled hem. You can also leave it raw, since this small opening can be difficult to sew.

Lay the leotard body flat with the right side facing up. Take one sleeve and place it right sides together with the armhole, aligning the sleeve cap with the shoulder seam.
Pin the sleeve along the armhole curve up to the shoulder point. You may find it easier to sew one side at a time rather than pinning the entire sleeve at once.
Sew the sleeve to the armhole using a stretch stitch, such as a lightning bolt or small zigzag, with a 1/2 inch seam allowance. After sewing, finish the raw edges together using a serger.

Repeat for the opposite sleeve.
Closing the Body
Once both sleeves are attached, turn the garment wrong side out.
Align the sleeve underarm edges and sew from the wrist up through the underarm to the armpit using a stretch stitch. Repeat for the opposite sleeve.
Next, align the front and back side seams. Sew from the underarm down to the leg opening using a stretch stitch, then finish the raw edges together with a serger.
After the side seams are complete, align the front and back crotch edges. Sew along the crotch curve using a stretch stitch, then serge the raw edges.
Turn the leotard right side out.

Hem the sleeves with a rolled hem by folding the raw edge twice, then topstitching with a stretch or zigzag stitch.

Attaching the Leg Hole Trim
Take Piece 16, the leg hole trim pieces. For each trim, fold it widthwise with right sides facing each other and sew the short ends together to create a continuous loop.

Next, fold the loop lengthwise with wrong sides facing each other, aligning the raw edges. Pin the raw edges together to keep the fold in place.
Locate the seam where the trim ends were sewn together. Match this seam to the point where the front and back crotch seams meet on the leotard. With right sides together, pin the raw edges of the trim to the leg opening, distributing evenly around the entire curve.
Sew the trim to the leg opening using a stretch stitch, keeping the folded edge facing inward toward the garment. After stitching, serge the raw edges together to finish.

Repeat the same process for the opposite leg opening.
Attaching the Shoulder Pads
Turn the leotard wrong side out.
Take one completed shoulder pad unit and position it inside the shoulder area so the pointed tip sits at the shoulder seam.
Using a hand needle and thread, tack the shell casing fabric of the shoulder pad to the serged seam allowances on the inside of the garment. Secure it along the shoulder seam and at the area where the armhole seam meets the sleeve. Take small stitches through the seam allowance only so they do not show on the outside.

Repeat the same process for the opposite shoulder.
Turn the garment right side and your pointed shoulder leotard is finished.
Obtén el patrón