Cómo coser un bolero con mangas de bola de adorno
Saltar a instruccionesDescripción general
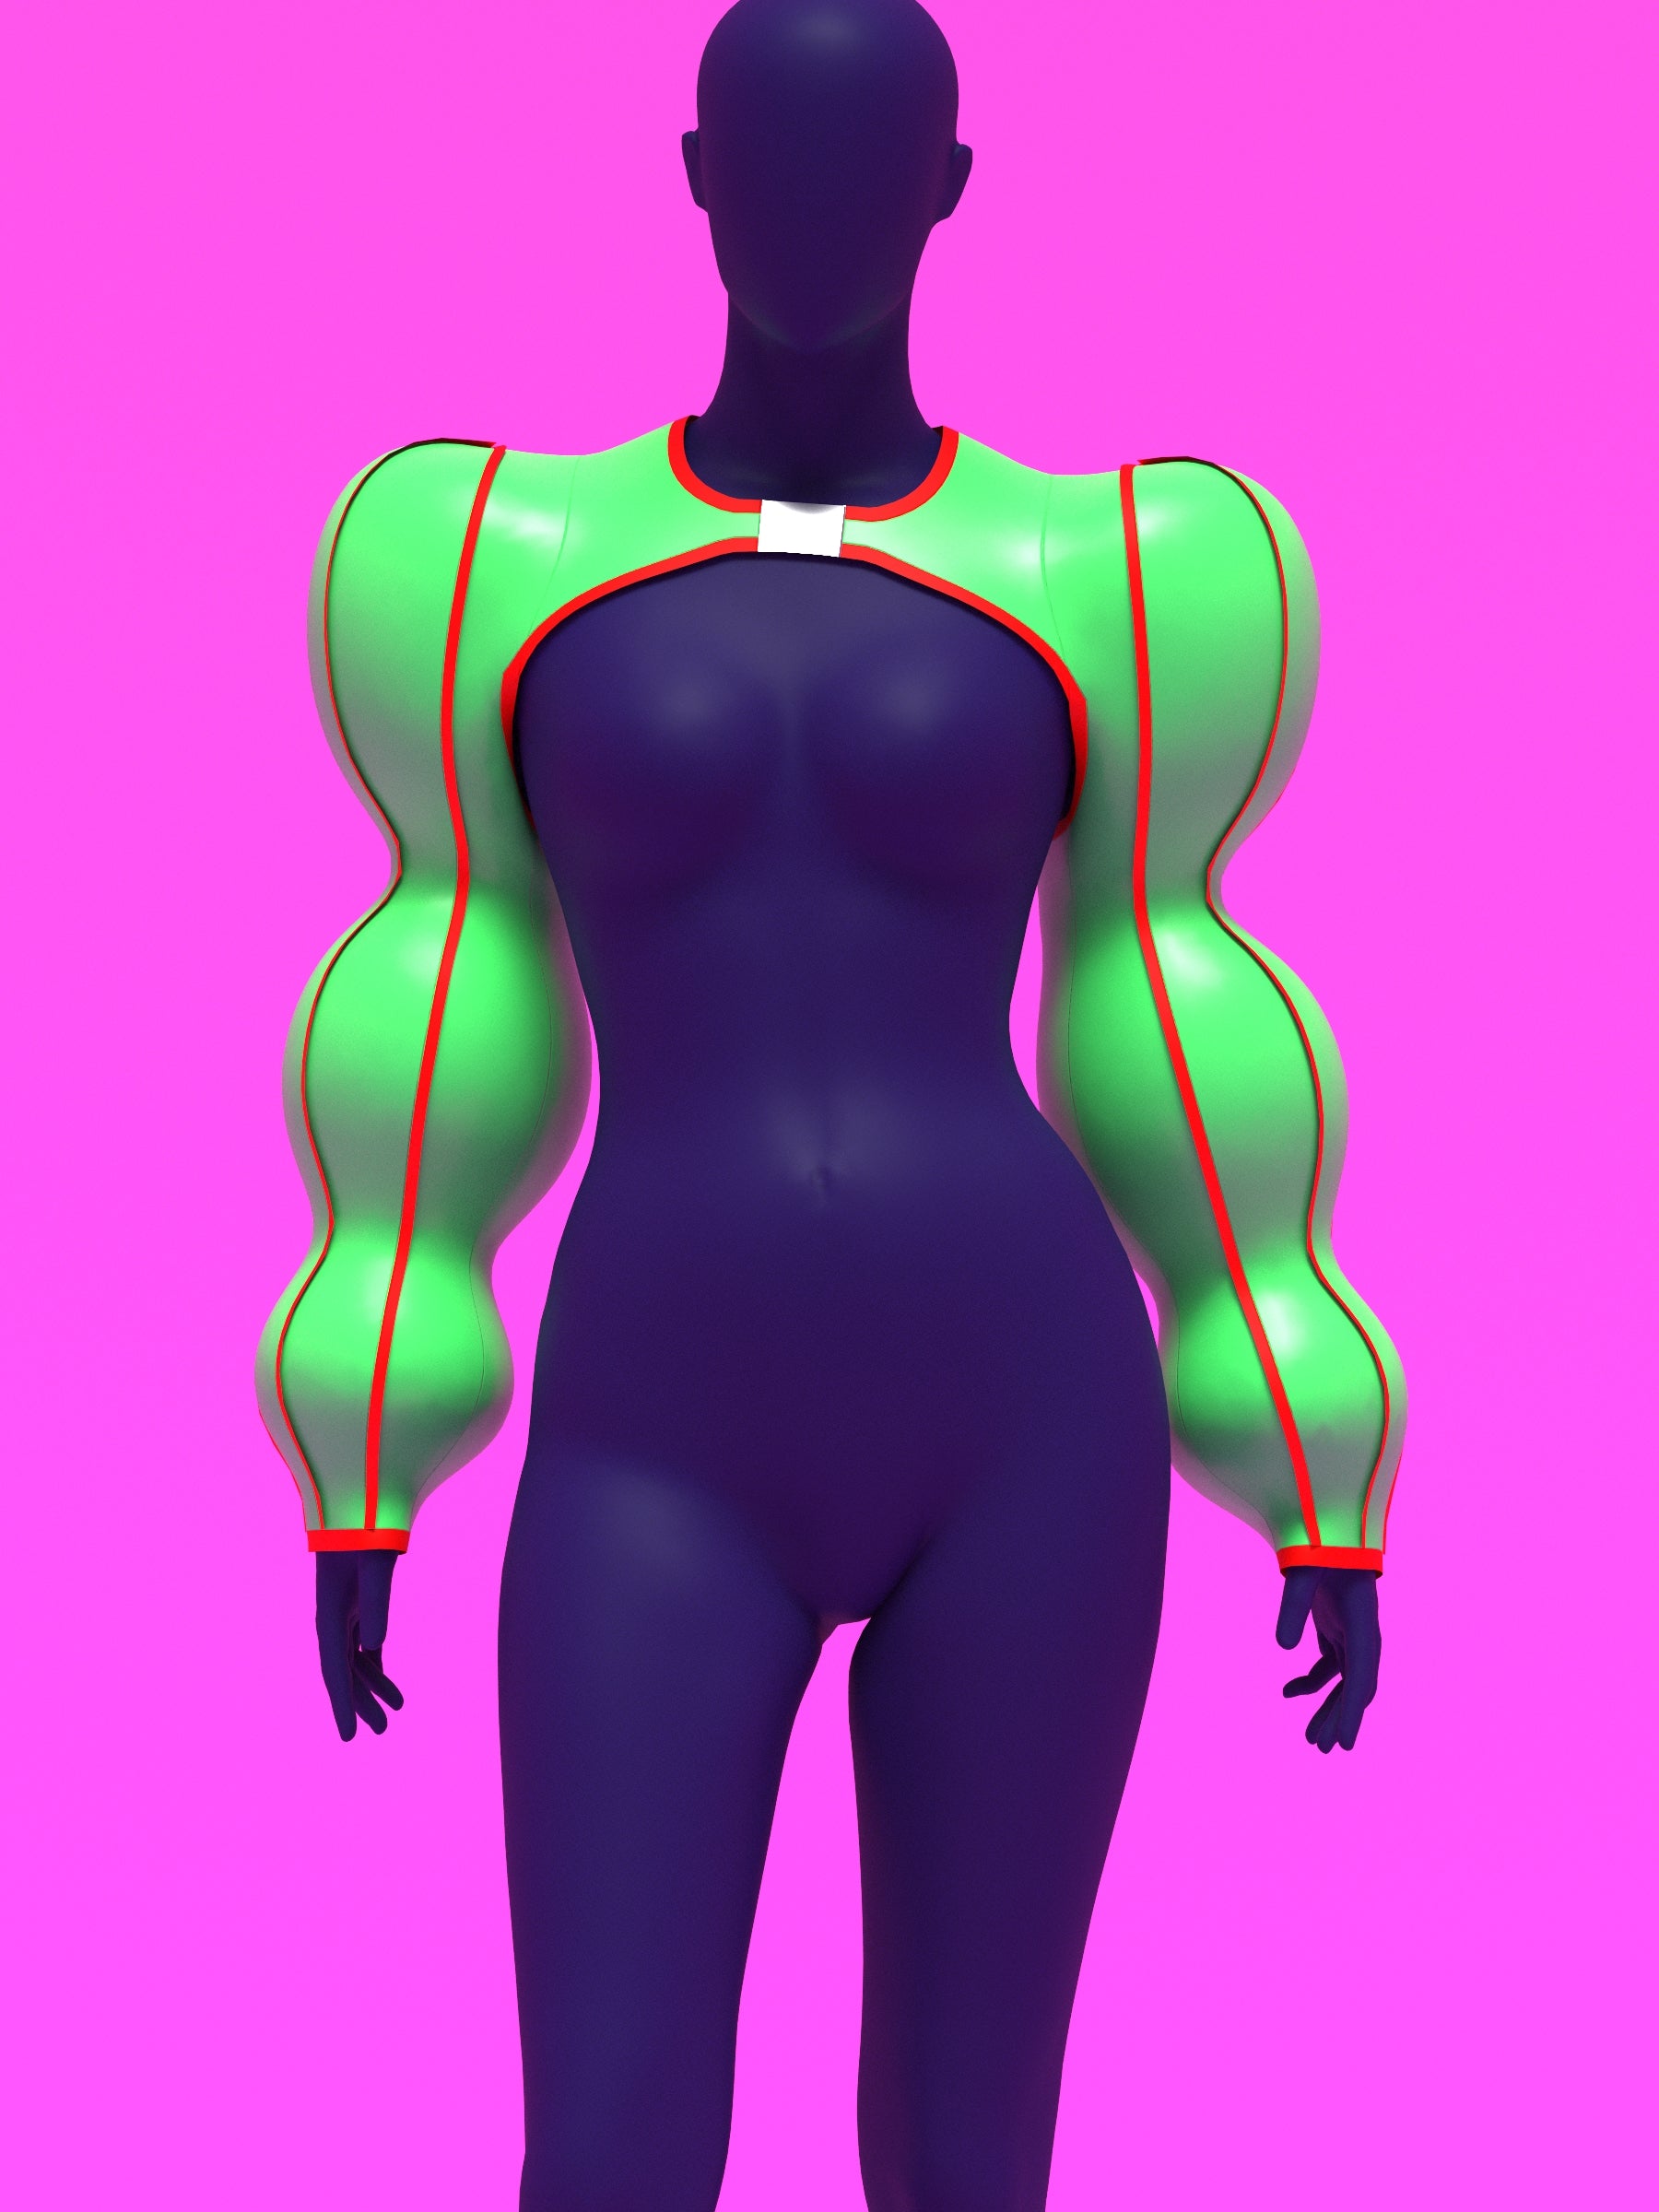
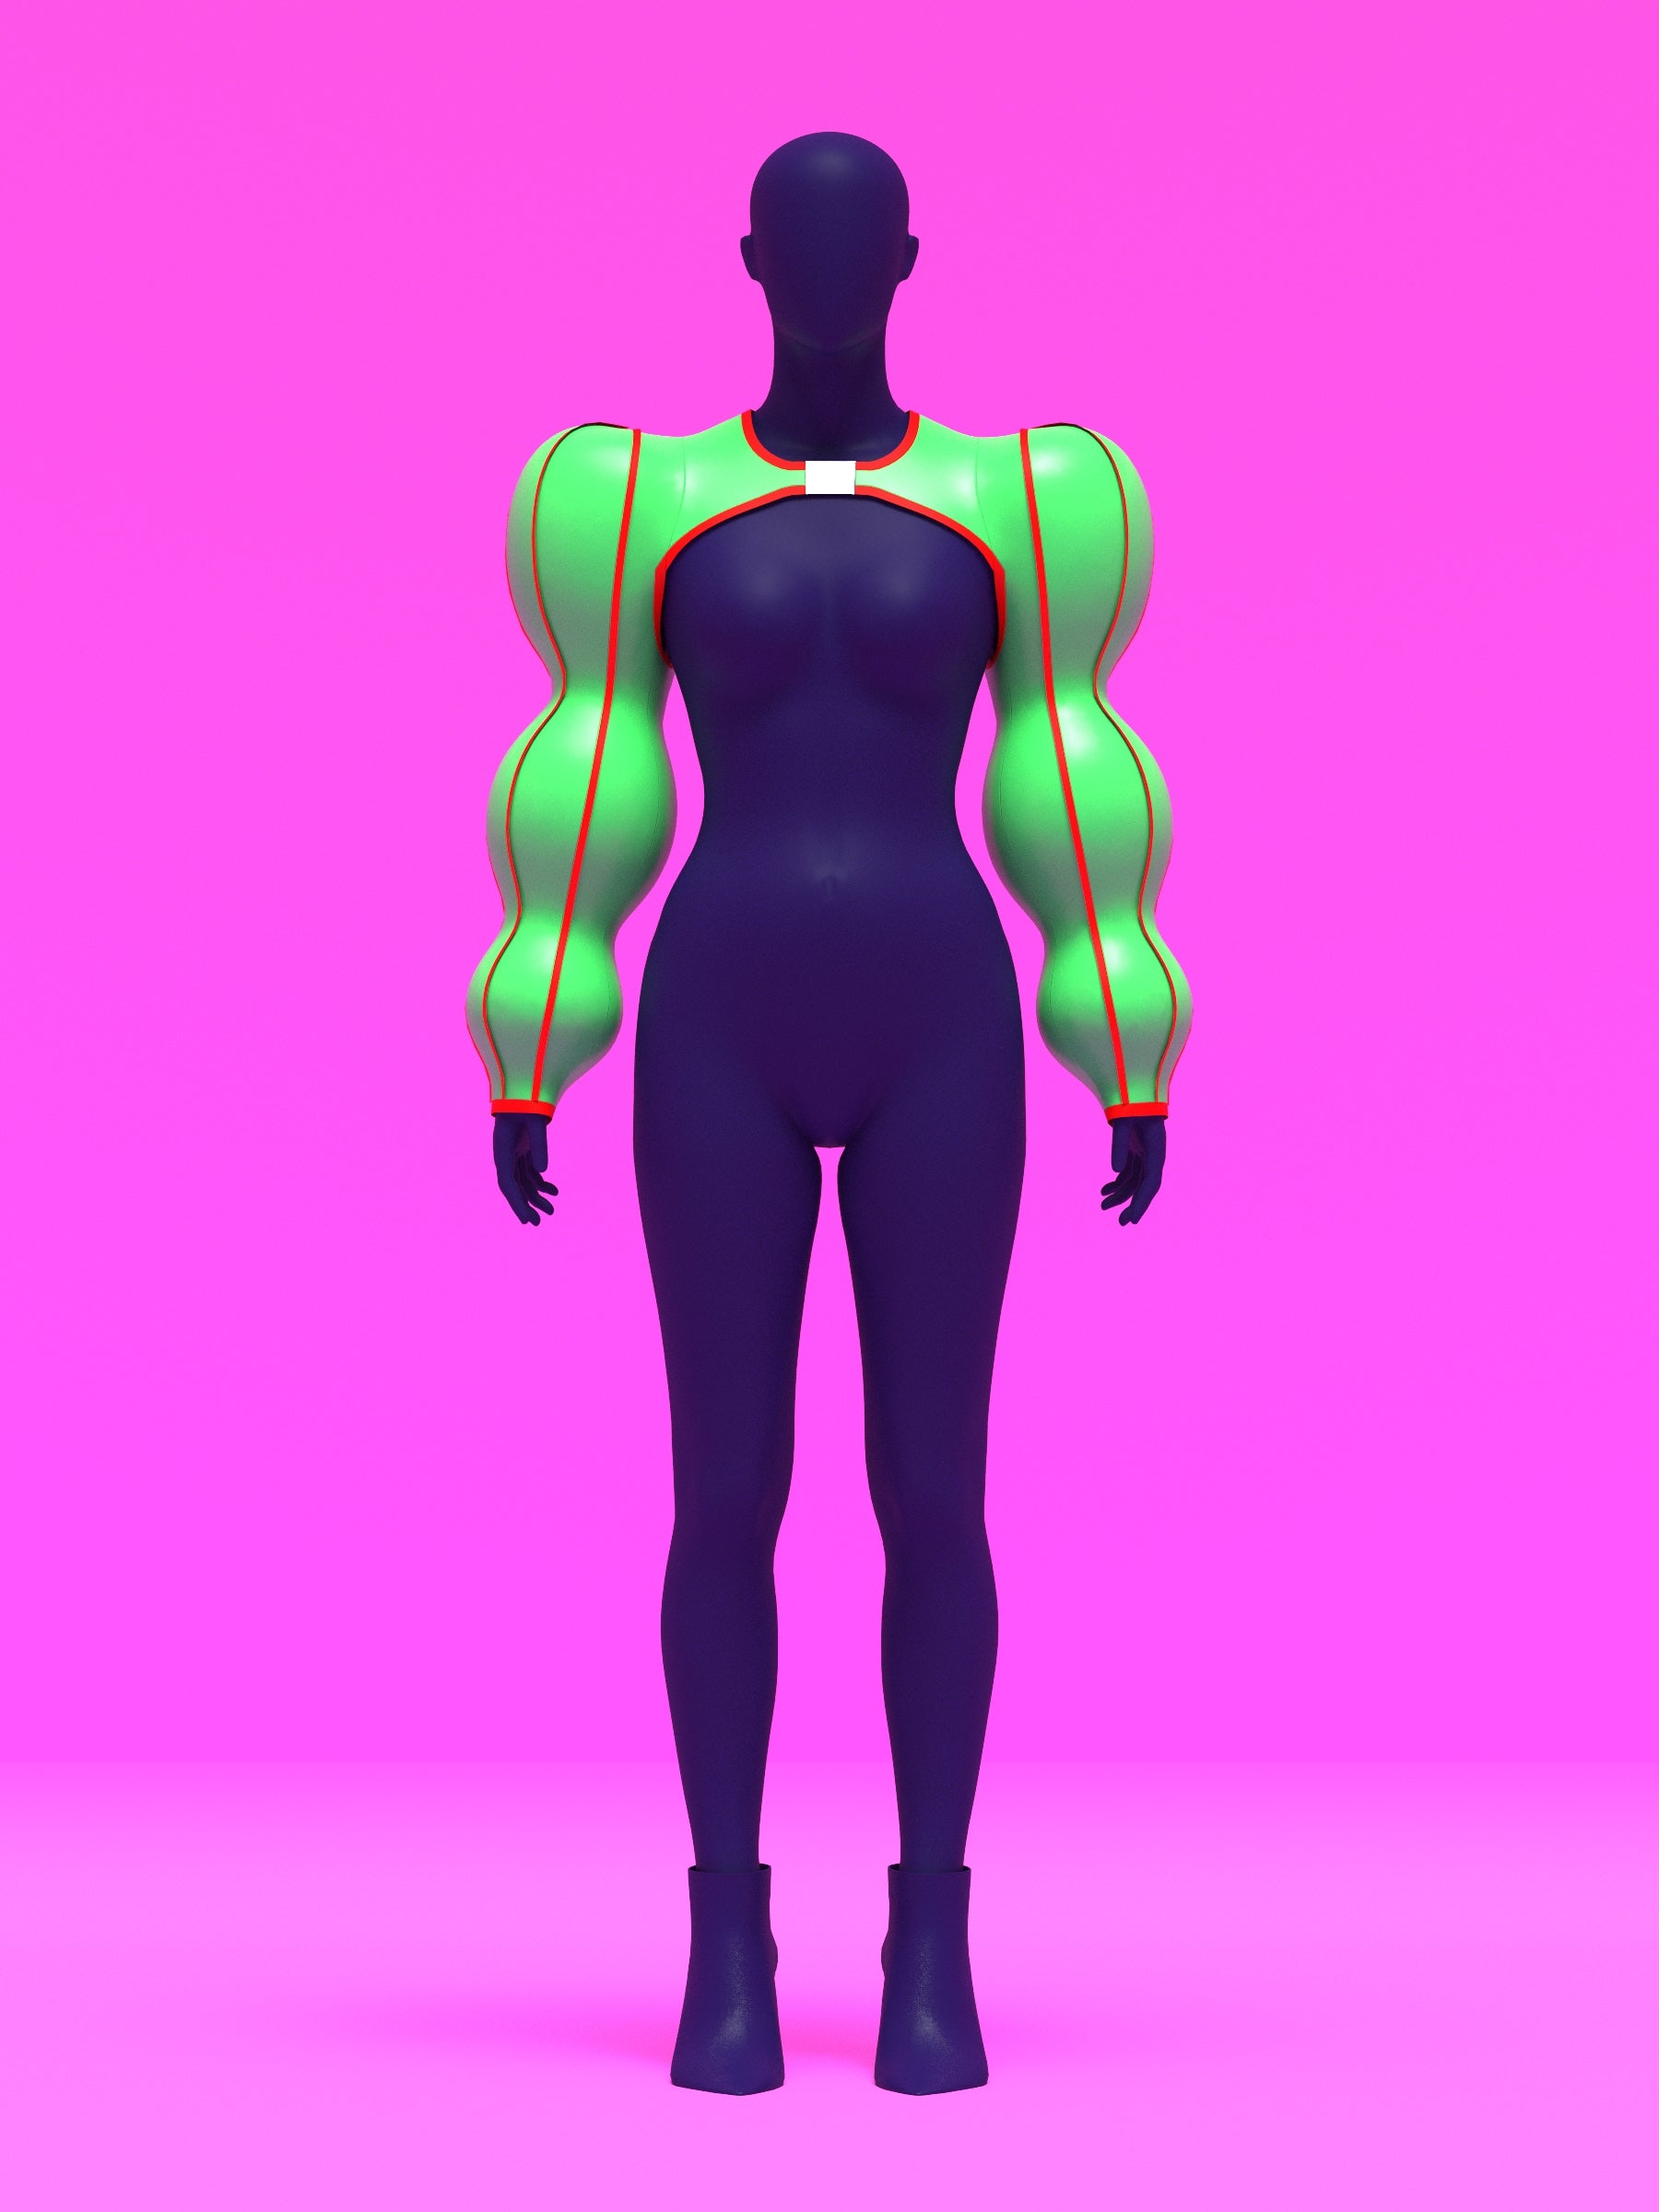
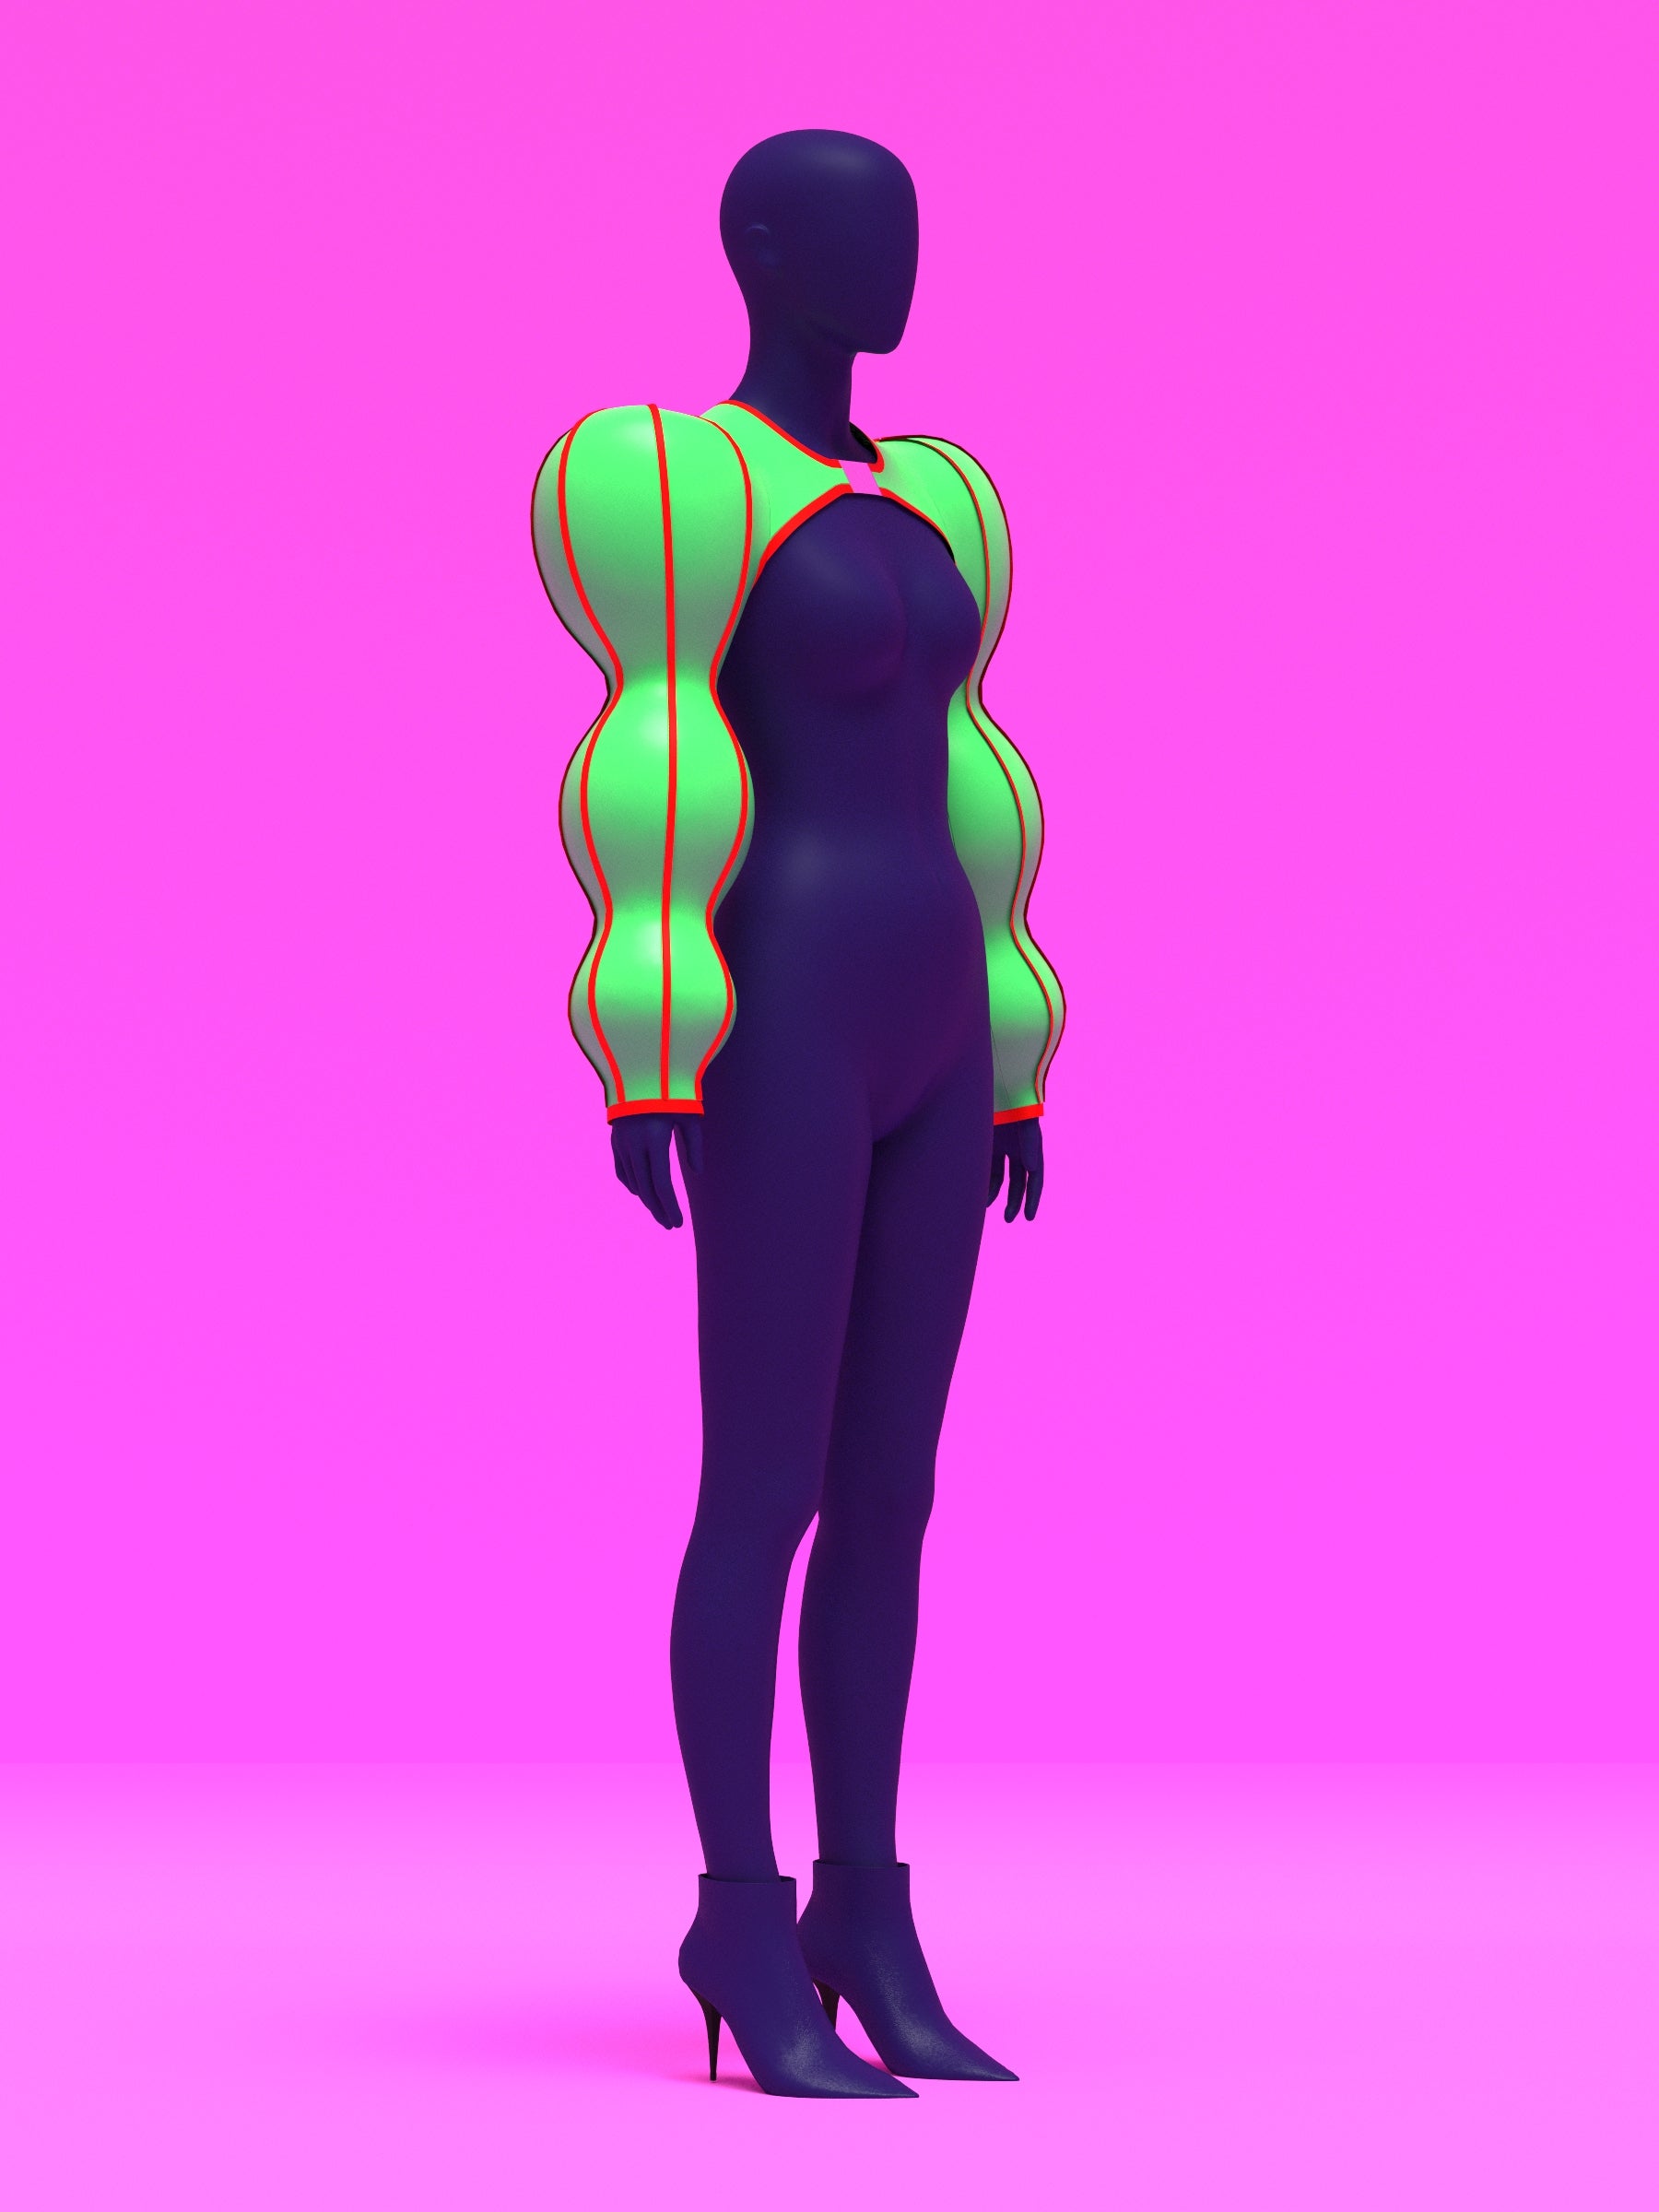
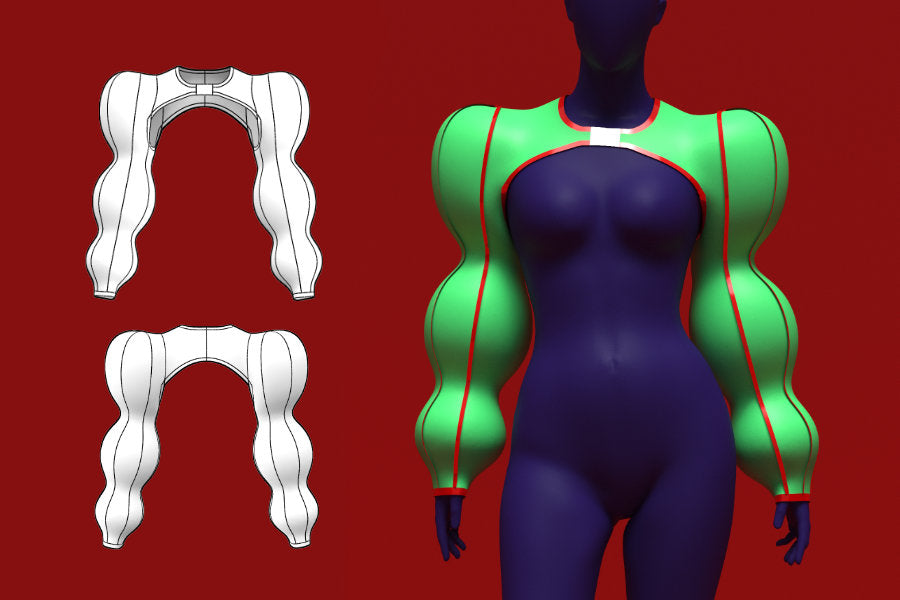
Aprende a coser nuestro patrón de bolero con adornos, perfecto para looks navideños, atuendos para chicas de fiesta y un estilo drag queen atrevido. Esta guía te guía paso a paso para que puedas crear mangas esculpidas, acabados impecables y un cierre frontal elegante con telas no elásticas como vinilo o piel sintética. Ya sea que optes por un estilo sencillo o añadas ribetes y bloques de color, este tutorial te ayudará a dar forma a la llamativa estructura de las mangas redondas que le da a este bolero su característica silueta con adornos.
Yardas de tela
Las medidas de tela a continuación corresponden a rollos de tela con un ancho de 54" o más.
| Tamaño | Tela |
|---|---|
| XS | 1,5 años |
| S | 1,5 años |
| METRO | 2 años |
| L | 2 años |
| SG | 2 años |
| 2XL | 2 años |
Telas y artículos de mercería
Telas
Utilice vinilo, PVC o cuero sintético para construir las mangas o cualquier tela que no se estire.
Nociones
- Hebilla de 1,5 pulgadas para cierre frontal
- Cinta al bies doblada dos veces o cinta al bies para rematar los bordes
- Opcional: cordón para ribetear y tela para ribetear.
- Opcional: Entretela termoadhesiva si utiliza telas ligeras y no elásticas.
Detalles de tallas
Este patrón está diseñado en nuestras exclusivas tallas drag queen, desde la XS hasta la 2XL, para cuerpos con relleno y hombros, brazos y piernas más anchos. Aunque está diseñado pensando en drag, puede ser usado por personas de cualquier género que cumplan con las medidas que se indican a continuación.
| Tamaño | Pecho de hombre | Arrastre el pecho (acolchado) | Cintura de hombre | Cintura de arrastre (con corsé) | Cadera masculina | Arrastre de cadera (acolchado) | Altura |
|---|---|---|---|---|---|---|---|
| XS | 33-35 | 36-38 | 27,5-29,5 | 24.5-26.5 | 32,5-34,5 | 38-40 | 70 |
| S | 35-37 | 38-40 | 29,5-31,5 | 26,5-28,5 | 34,5-36,5 | 40-42 | 70 |
| METRO | 39-41 | 42-44 | 33,5-35,5 | 30,5-32,5 | 38,5-40,5 | 44-46 | 70 |
| L | 43-45 | 46-48 | 37,5-39,5 | 34,5-36,5 | 42-44 | 47,5-49,5 | 70 |
| SG | 47-49 | 50-52 | 42,5-44,5 | 39,5-41,5 | 45-47 | 50,5-52,5 | 70 |
| 2XL | 51-53 | 55-57 | 47,5-49,5 | 44,5-46,5 | 48-50 | 54.5-56.5 | 70 |
Instrucciones de costura
Color Guide

Paper Pattern Pieces
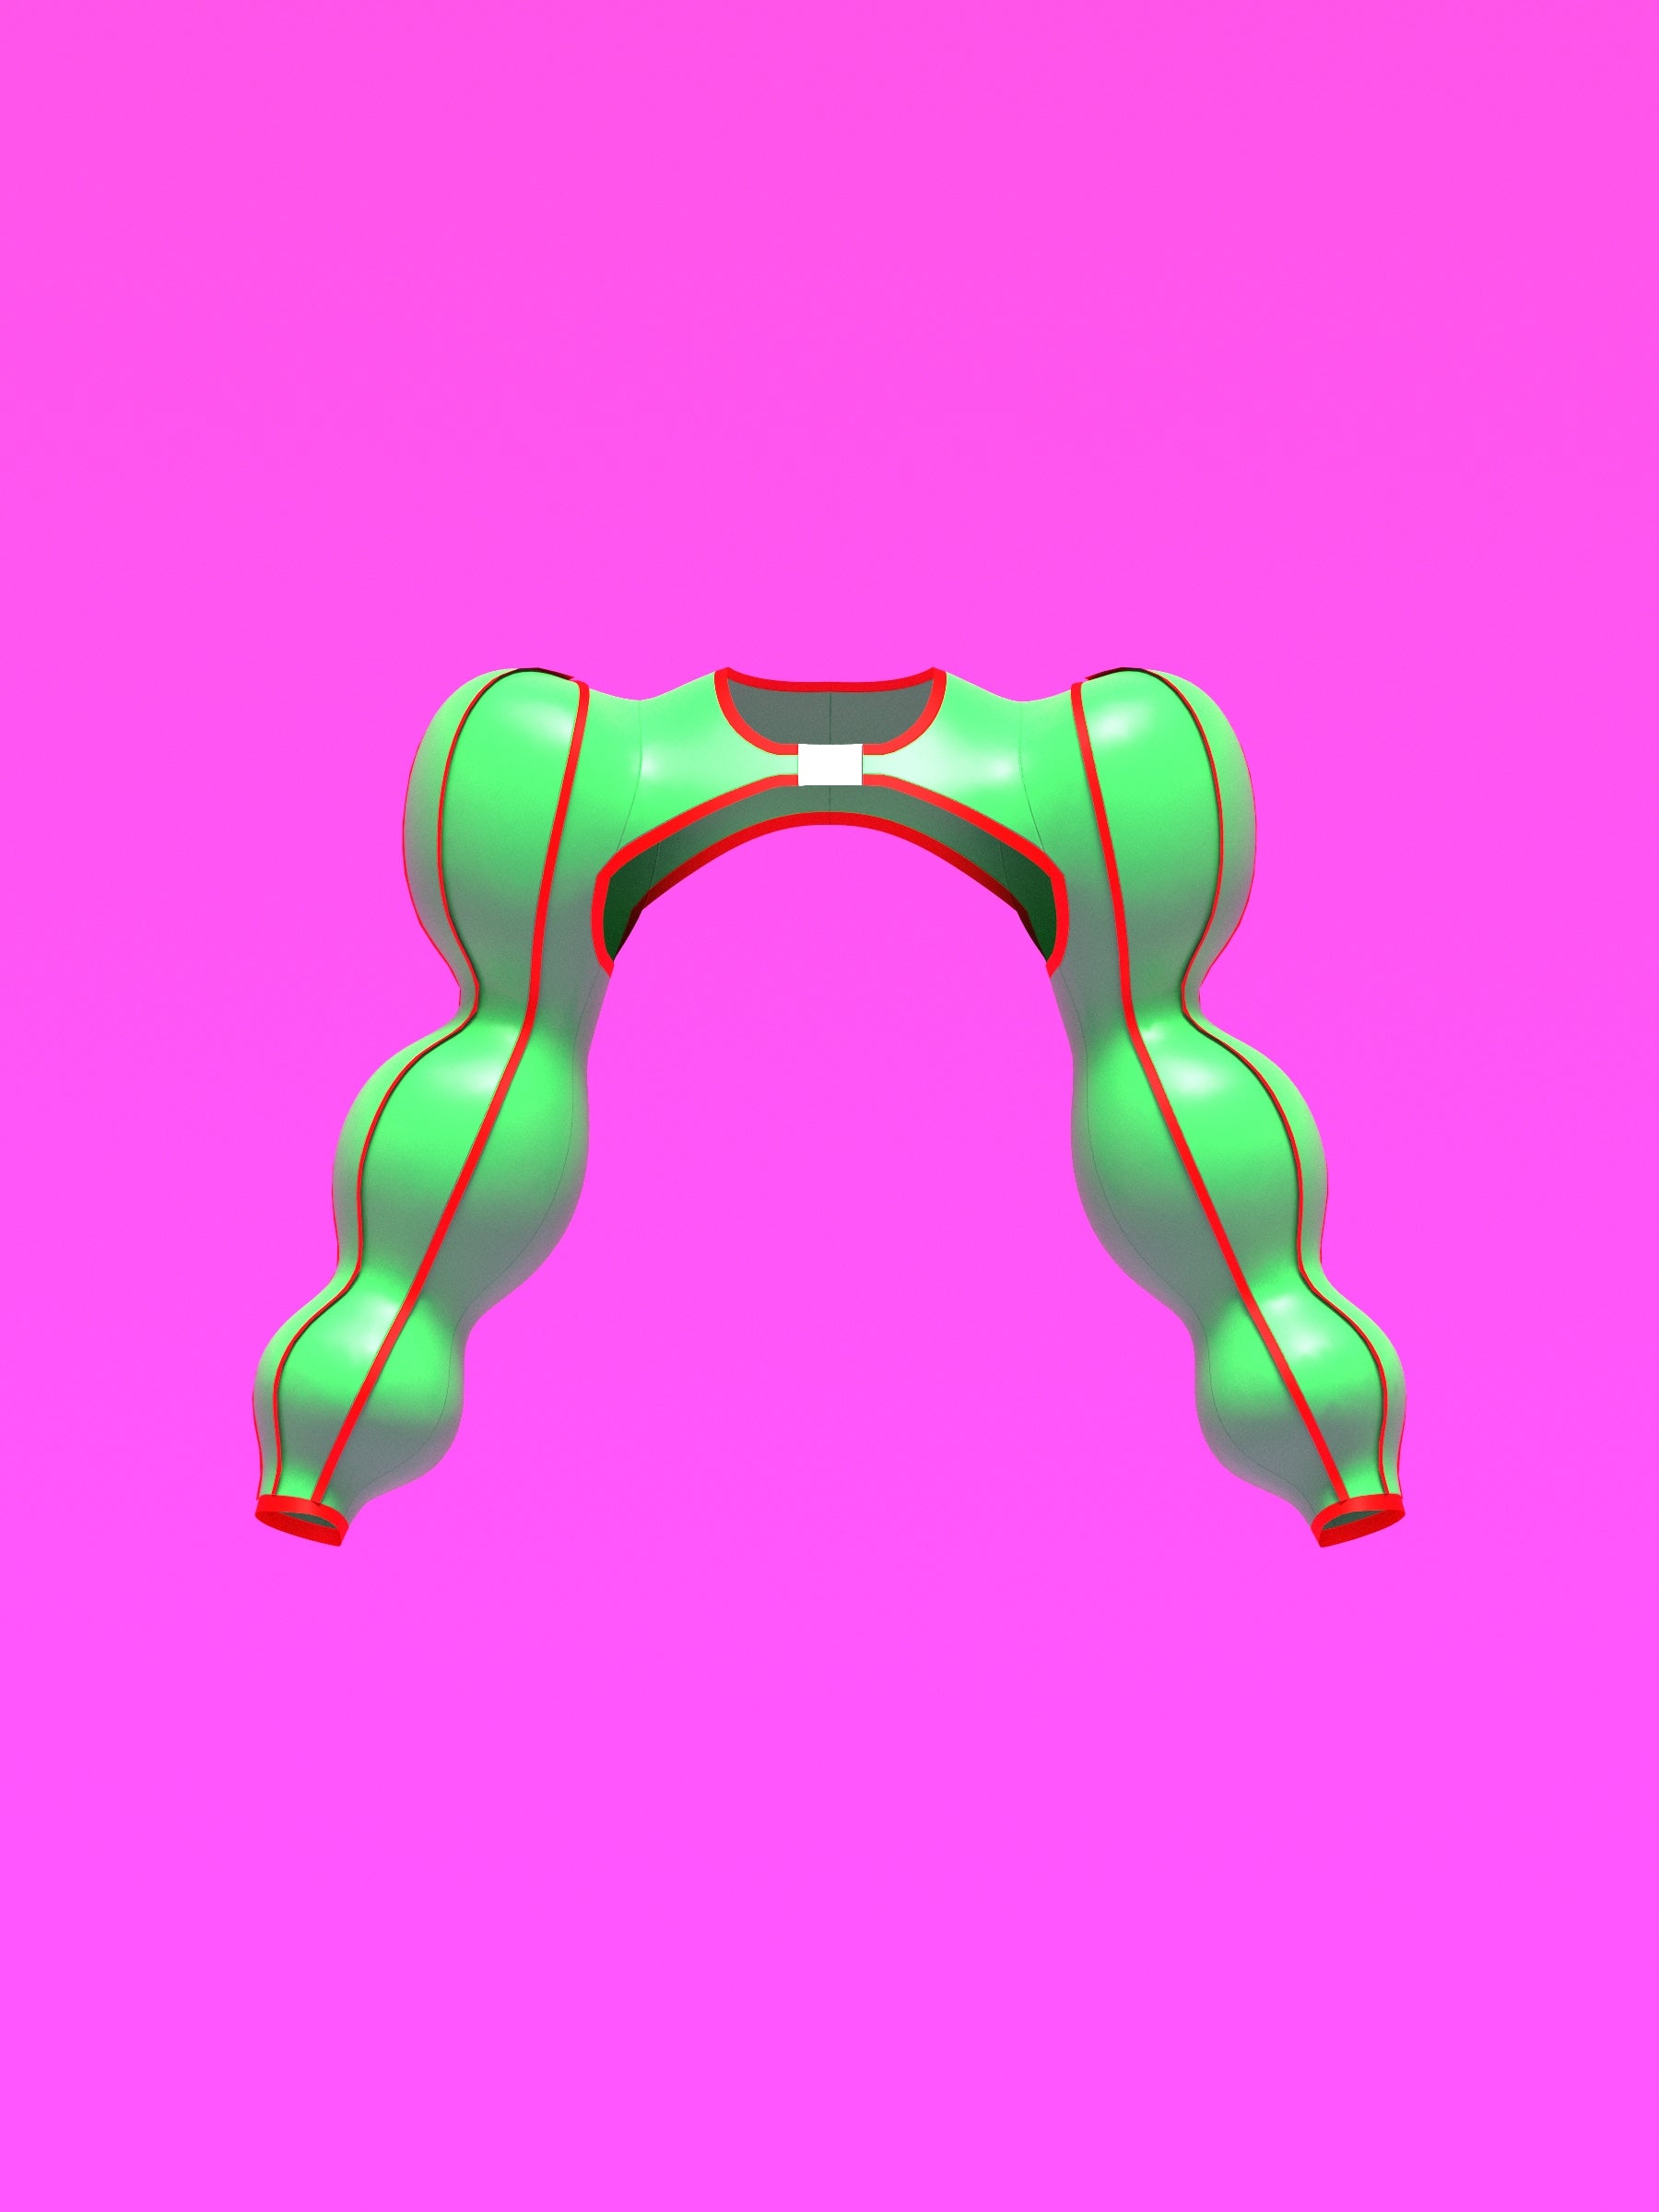
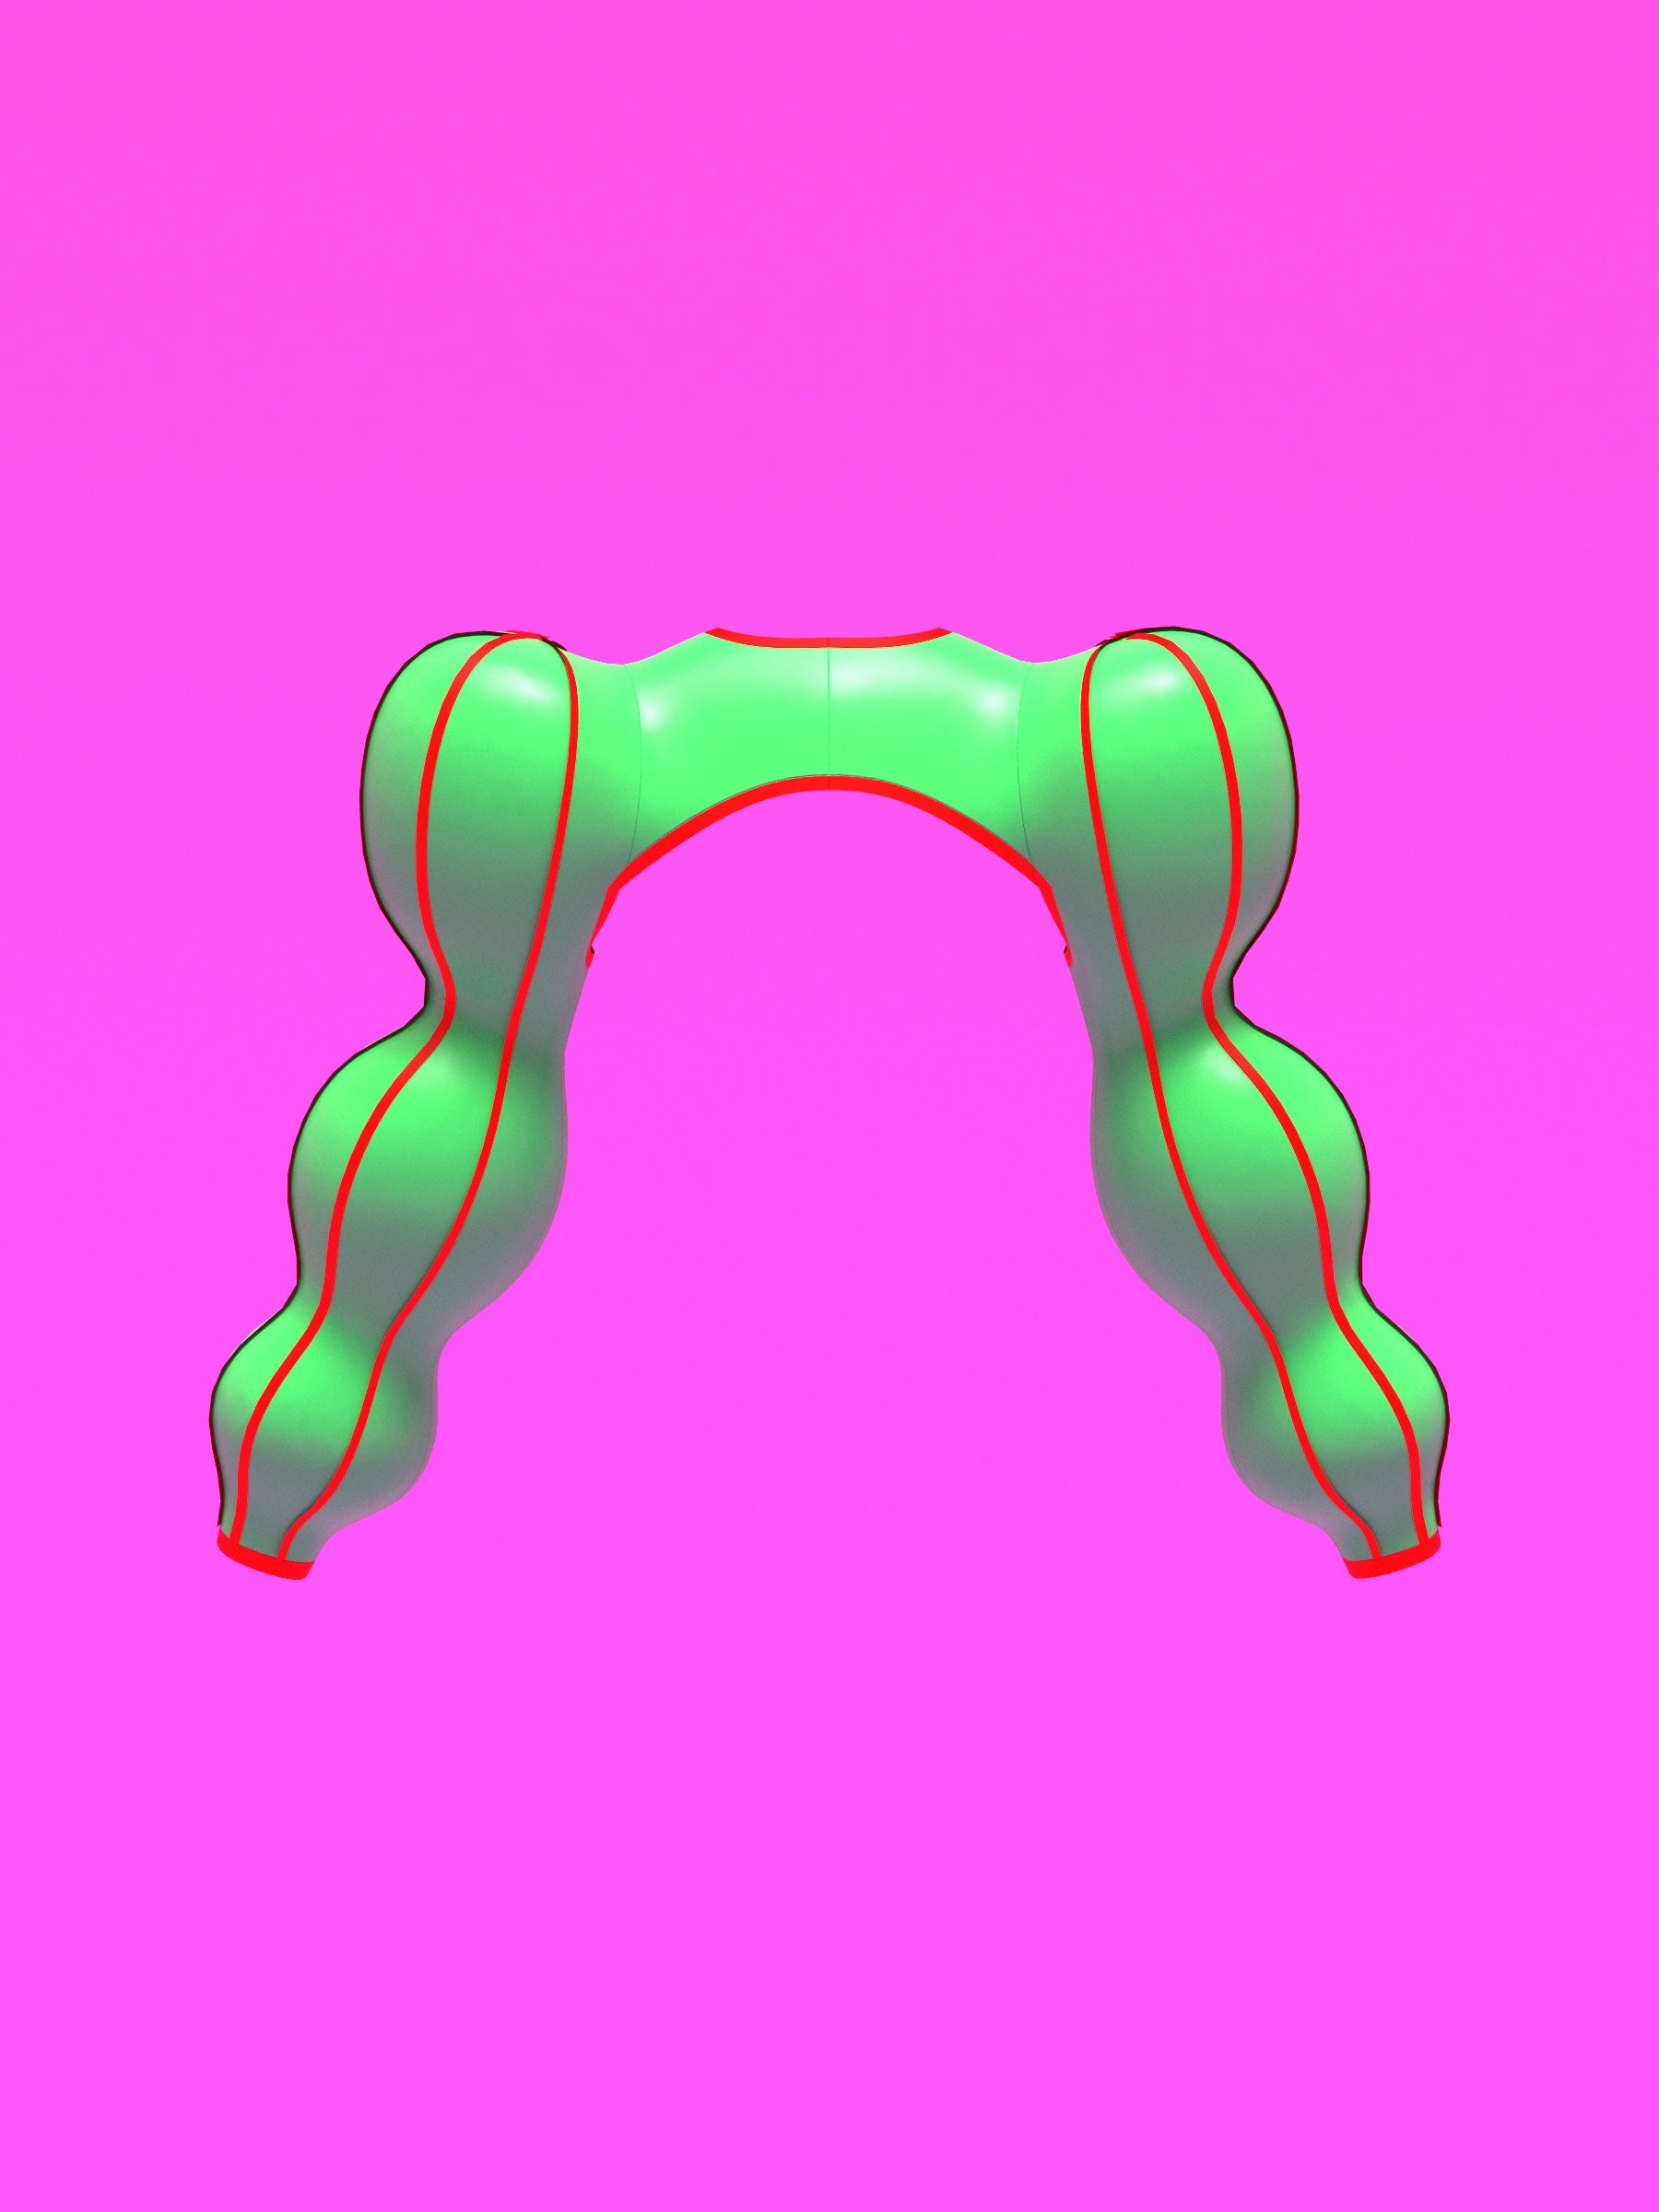
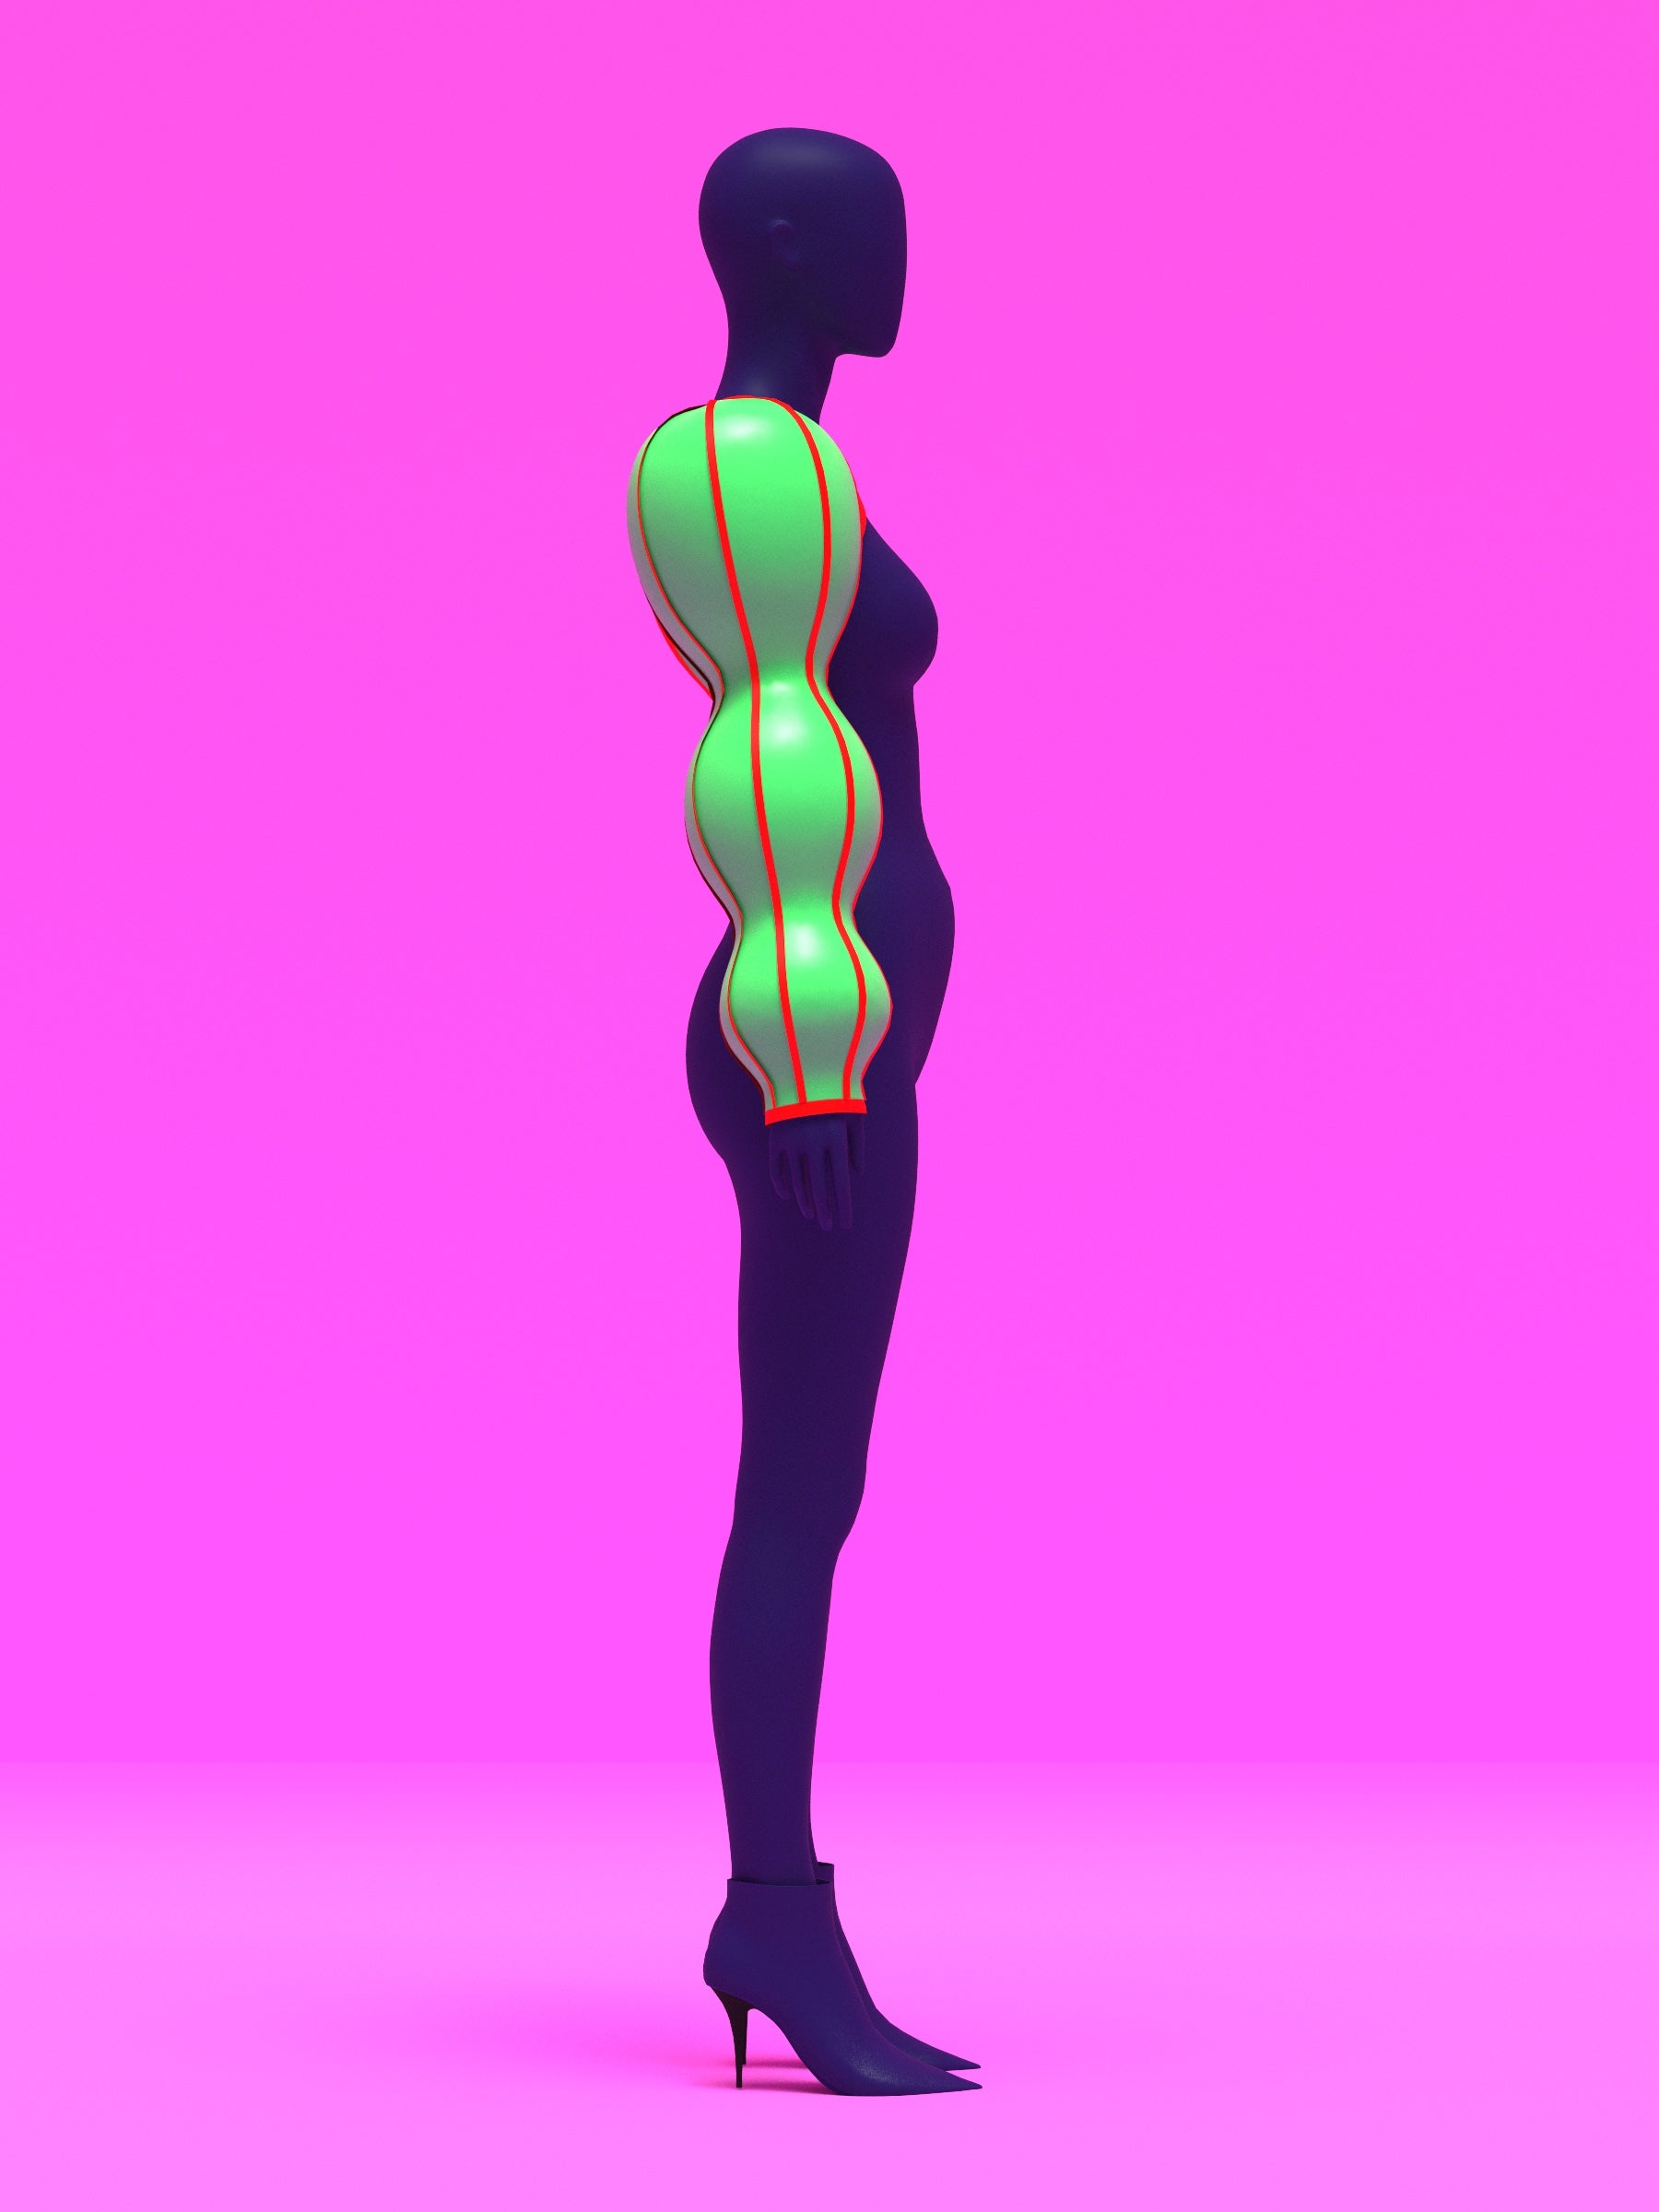
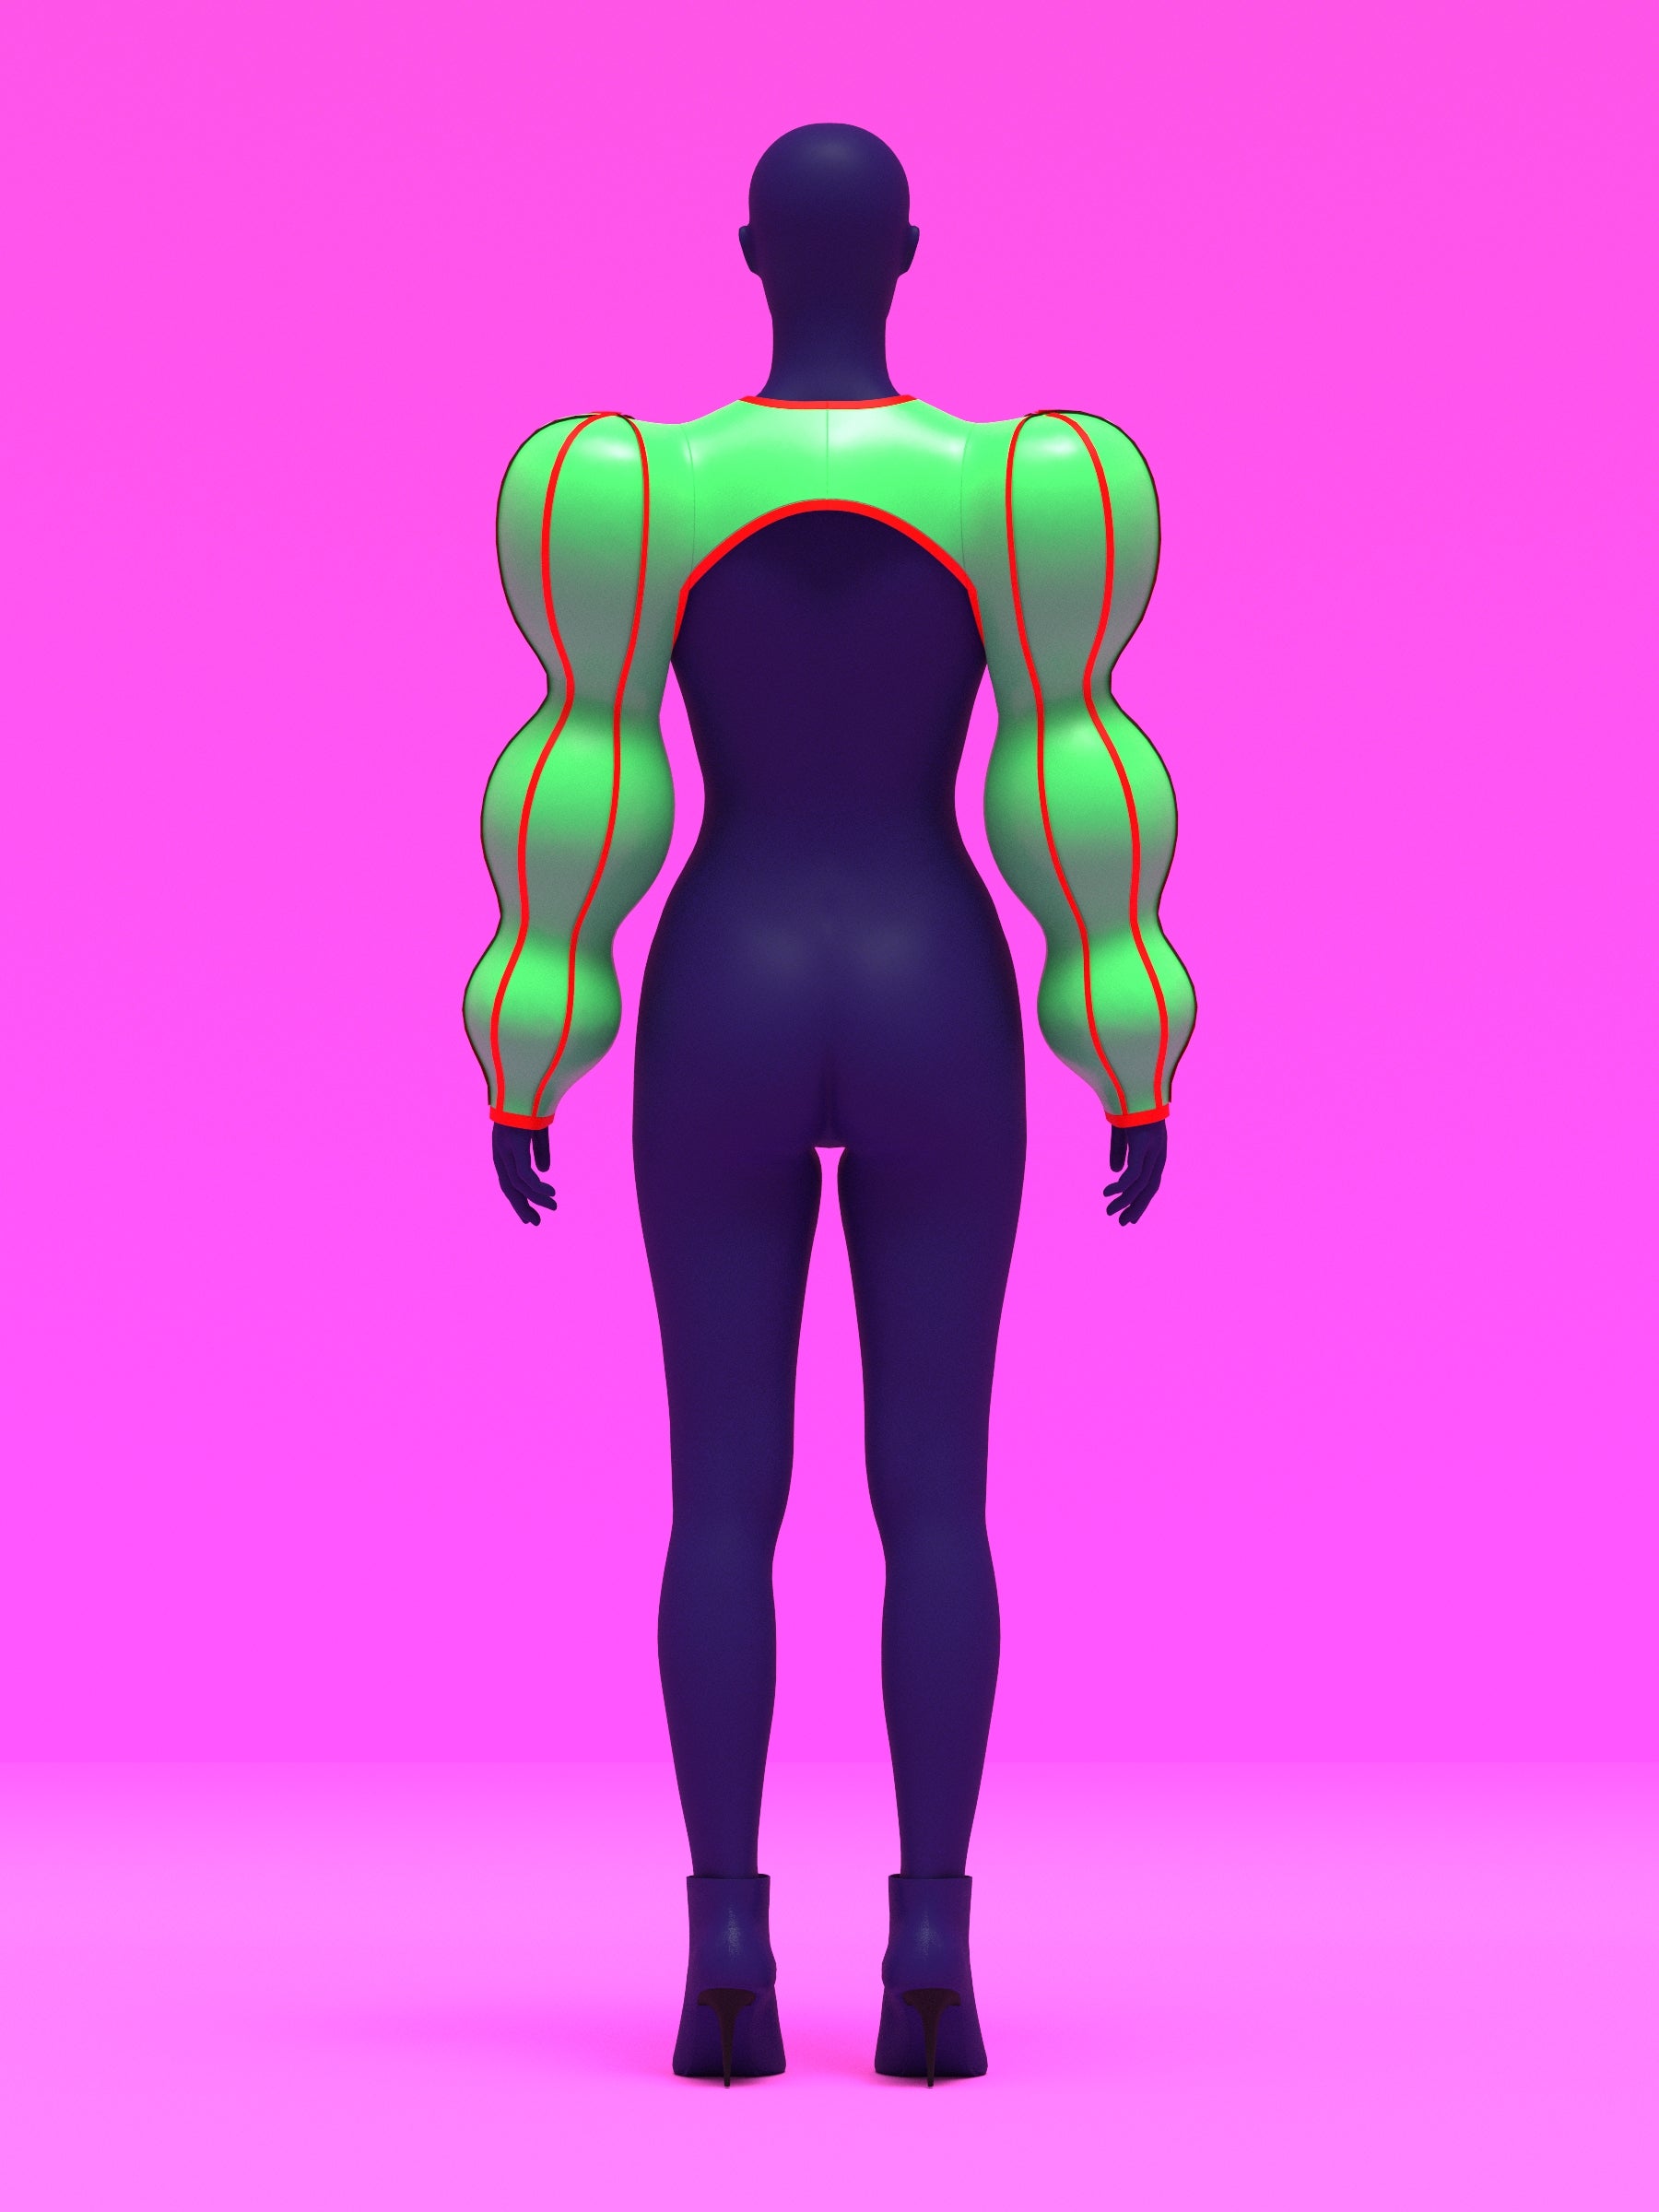
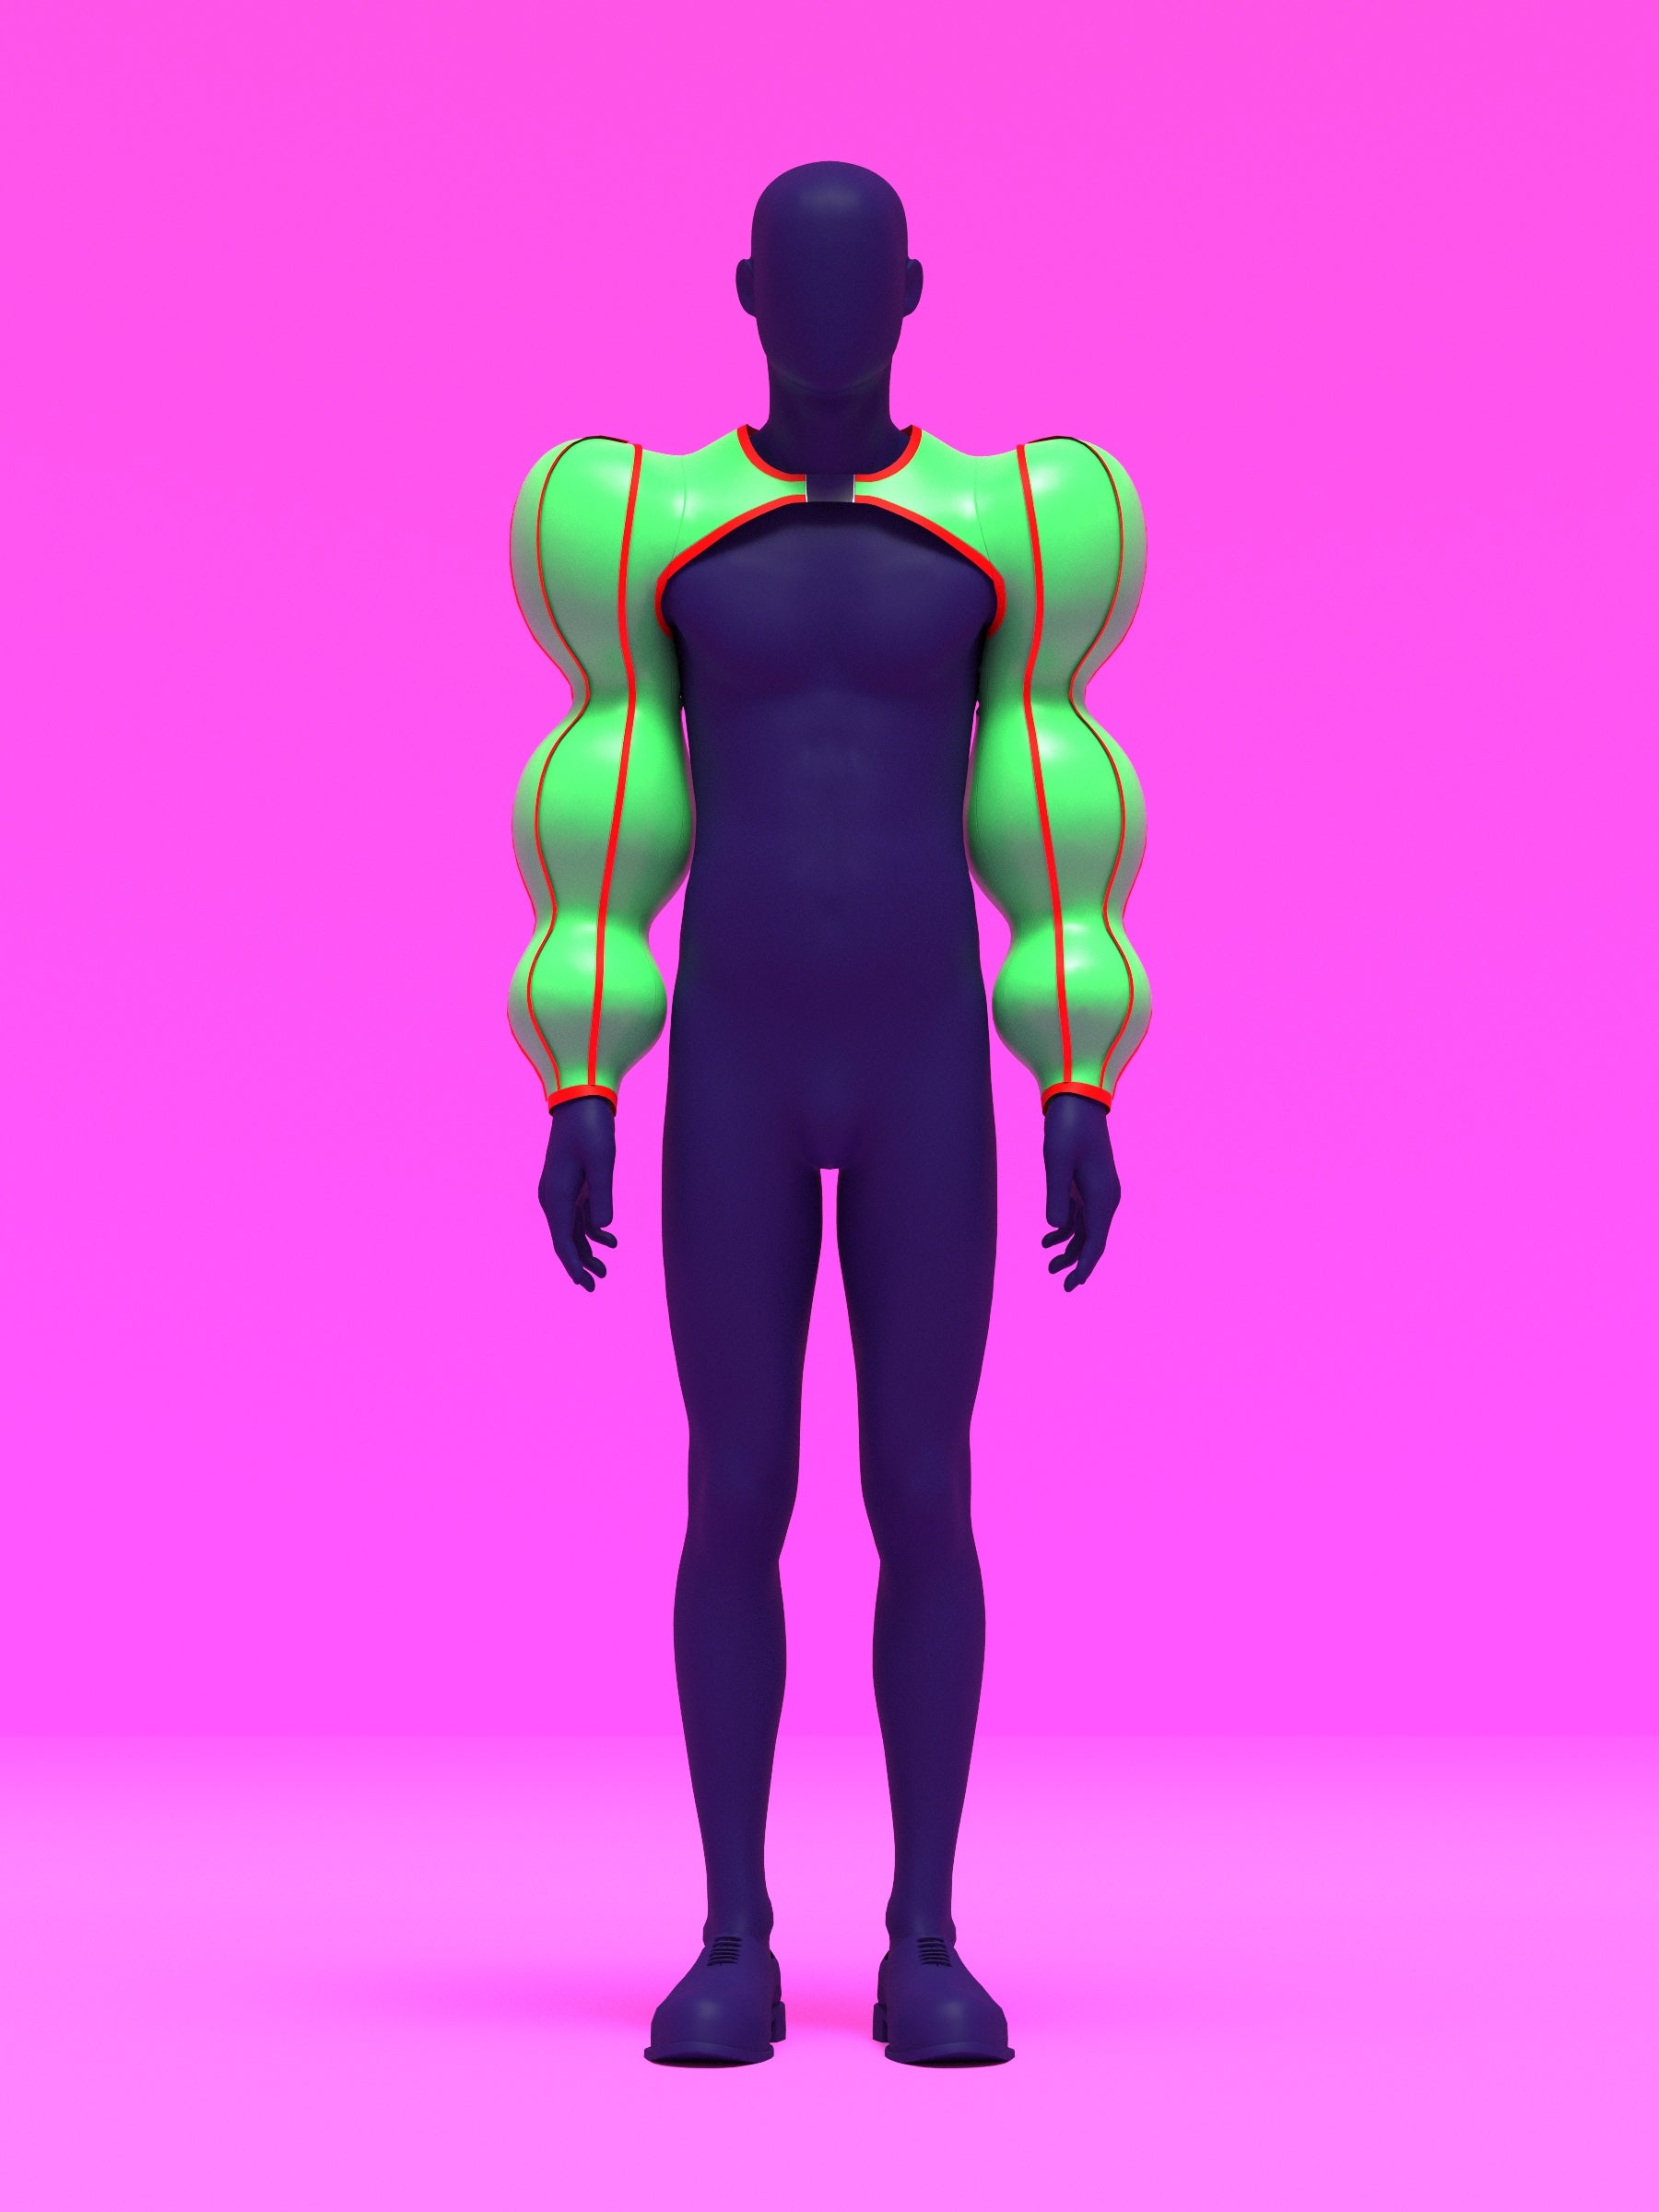
This pattern includes five paper pieces, and each one is mirrored to form the full garment. Piece 1 is the front shoulder of the shrug, and you will cut two mirrored pieces. Piece 2 is the back of the shrug, and you will also cut two mirrored pieces.

The sleeves are created using pieces 3, 4, and 5. Even though there are only three sleeve pieces on paper, one full sleeve is made from seven total fabric cutouts. Each sleeve uses four cutouts of piece 3, two cutouts of piece 4, and one cutout of piece 5. Piece 5 forms the inner inseam section that sits under the arm. These seven cutouts make up a single sleeve, and you will repeat the same set for the opposite arm.

You can use any non stretch fabric for this project, though a thicker material such as faux leather or vinyl gives the ornament ball sleeves their structure and helps each ball keep its round shape.
Choose a style
Before you begin sewing the pieces together, decide which style you want for your sleeves. You can add piping between each seam to create a pinstriped or striped effect. If you plan to add piping, make it first by inserting a small cotton cord into long strips of fabric that you fold and sew closed. Measure the length of each strip, then stitch the piping along the edges of your sleeve pieces before joining two pieces together, placing the piping between the layers.
Another option is to cut each ornament shape into three sections across the middle circular part of the sleeve. This lets you mix colors or fabrics for a more detailed look. If you choose this style, cut out the middle circle of your paper pattern pieces and add seam allowance around each cut edge. Once your pieces are prepared, you can begin sewing everything together.

Sewing Sleeves
To sew the sleeves, begin by gathering your sleeve pieces. Start with piece 5 and one piece 4. Place them right sides together, aligning the bottom edge where the sleeve opening sits at the wrist. Sew upward along the curved edge until you reach the armhole area. Repeat this process by attaching a piece 3 to the opposite side of piece 4, again sewing right sides together and following the curve up toward the shoulder.
These seams curve, so guide and pivot as you sew. You may finish the seams with a serger or bias trim if you prefer covered edges, though raw edges are fine when working with vinyl or faux leather.

Continue building the sleeve by sewing another piece 3 to the free edge of the first piece 3, then adding the next set of pieces on the opposite side of the sleeve. Once you have assembled the sequence of pieces 5, 4, 3, 3 on one side and 4, 3, 3 on the other, stack both halves together with right sides facing in. Sew along the remaining open edges to form a closed sleeve shape.
After the seams are complete, finish the top of the sleeve by sewing along the shoulder edge where the two piece 4 sections meet, which closes the top ball of the ornament sleeve. Repeat the entire process to create the second sleeve.

Sewing the Front and Back

Next, attach the front and back pieces to each sleeve. The front piece, number 1, connects to the armhole edge of the front section of piece 4. The seam allowances should match without adjustment. Place piece 1 against piece 4 with right sides facing, clip or pin along the curve, and sew that armhole seam. Then attach the back piece, number 2, to the back armhole edge of the same sleeve in the same way.
Once both sleeves are attached, sew pieces 1 and 2 together at the shoulder seams with right sides facing. Then flip the front and back right side out. Repeat this entire process on the opposite sleeve.

After that, sew the two back pieces together along the center back seam. At this point, the main base of the shrug is assembled.

Finish the raw edges with bias tape or double folded bias trim. Apply it around the neckline of piece 1, across the top of piece 2, along the lower edge of piece 1, around the sleeve armhole curves, and around the wrist opening of each sleeve. This gives the shrug a clean, polished finish.
You can apply the bias tape by opening one folded edge and placing it right sides together along the raw edge you want to finish. Sew directly along the opened fold line. After sewing, fold the tape up and away from the garment to smooth the seam, then wrap the bias toward the wrong side so it cleanly covers the raw edge. Fold the remaining edge under, then topstitch from the right side to secure the bias tape in place. This method gives a neat finish around curves and straight edges alike.

Front closure
To finish the shrug, add the front closure of your choice. The pattern is drafted for a buckle that is about one and a half inches wide, whether plastic or metal. You can also use snaps if you prefer. The pattern provides two inches of buckle allowance so you can fold, trim, or adjust it to fit the closure style you want.
If you are using a buckle, place the buckle allowance around the buckle loops, fold the fabric neatly, and topstitch it in place to secure it. Adjust the length as needed so the shrug sits comfortably when worn. Once the closure is attached, your shrug is complete.

Obtén el patrón