Cómo coser un mono de catsuit con paneles para drag queens
Saltar a instruccionesDescripción general
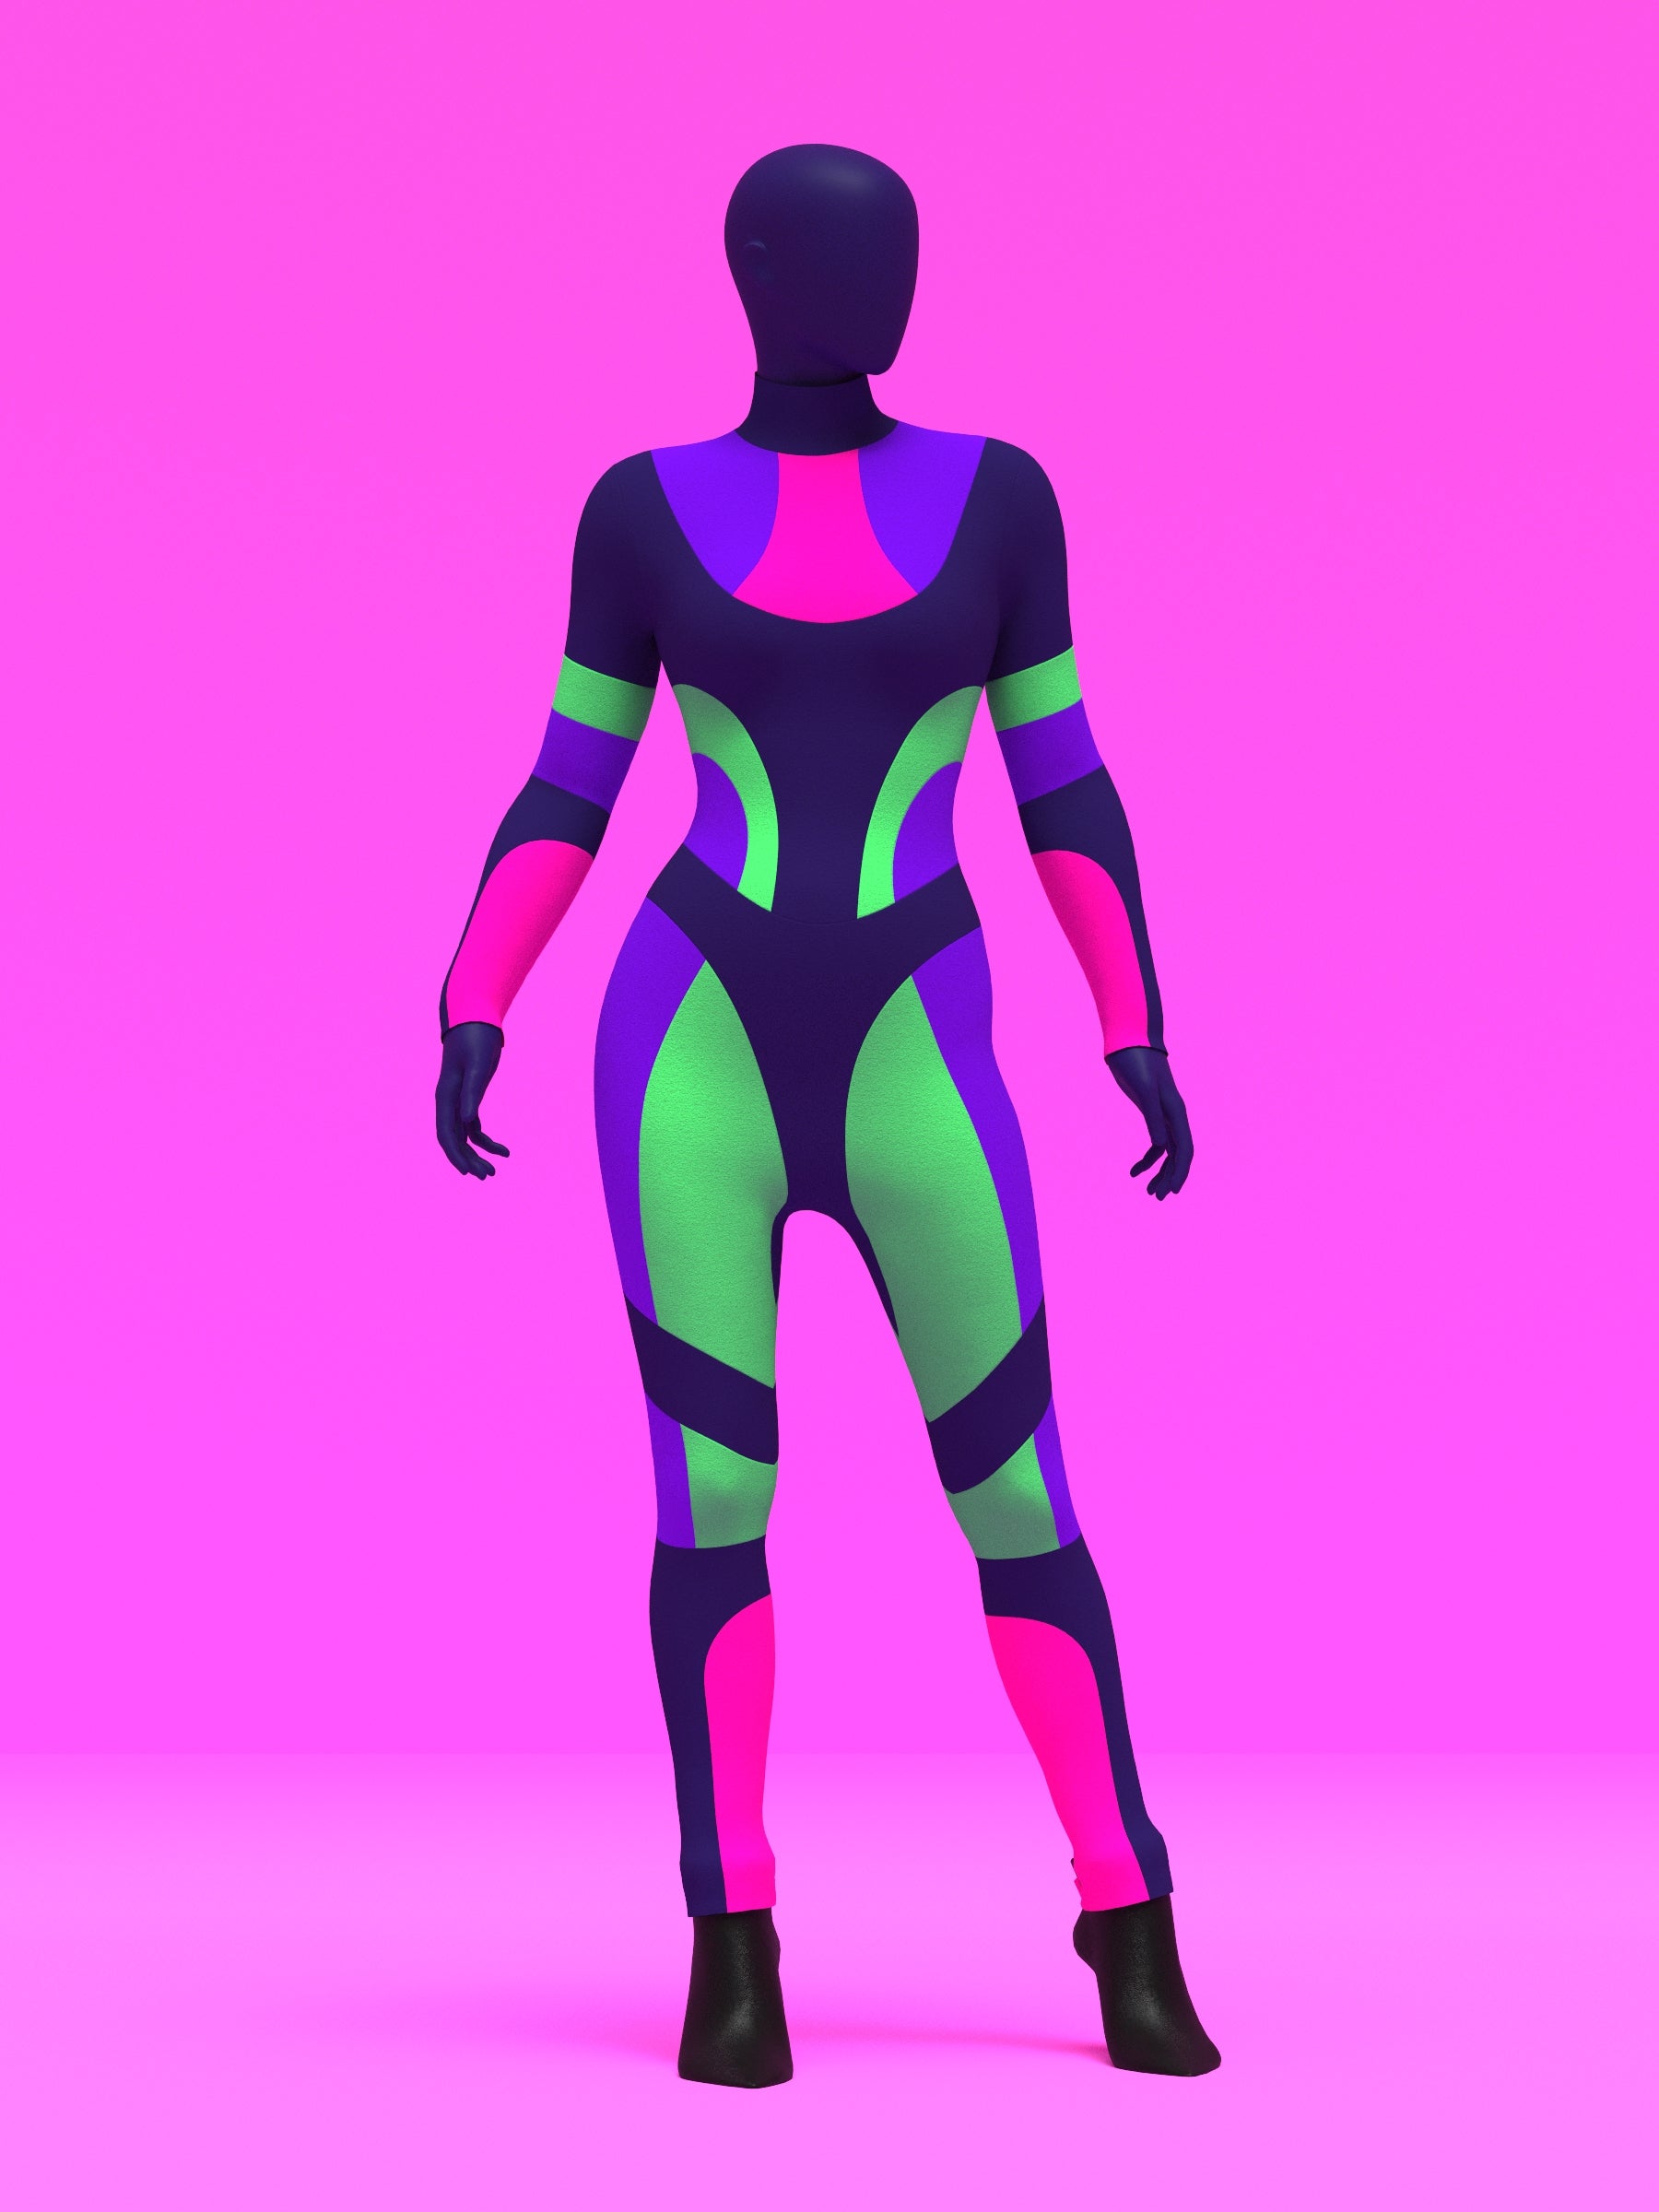
Aprende a coser nuestro patrón de mono de cuerpo entero con paneles. Un diseño atrevido y ceñido, ideal para drag queens y artistas que buscan colores vibrantes y curvas suaves. El patrón utiliza cuatro telas elásticas en cuatro direcciones que se combinan para crear líneas definidas en el pecho, la cintura, los brazos y las piernas. El ajuste es ceñido, esculpido y flexible para que puedas bailar, hacer playback y moverte sin restricciones.
Yardas de tela
The fabric yardage below is for fabric bolt widths of 54" or more. There are 4 fabric colors labeled for this pattern, you can choose our own colors.

| Size | Fabric A | Fabric B | Fabric C | Fabric D |
|---|---|---|---|---|
| XS | 1 | 0.5 | 0.5 | 0.5 |
| S | 1 | 0.5 | 0.5 | 0.5 |
| M | 1.25 | 0.5 | 0.75 | 0.5 |
| L | 1.25 | 0.5 | 0.75 | 0.5 |
| XL | 1.5 | 0.75 | 0.75 | 0.75 |
| 2XL | 1.5 | 0.75 | 0.75 | 0.75 |
Telas y artículos de mercería
- Tejidos elásticos en cuatro direcciones, como elastano, lycra o mezclas de punto.
- Cremallera de 22 a 24 pulgadas para el cierre trasero.
Detalles de tallas
Este mono está confeccionado en nuestras exclusivas tallas drag queen, desde la XS hasta la 2XL, y se adapta a cuerpos con relleno y hombros, brazos y piernas más anchos. Aunque este patrón está pensado para drag queens, puede ser usado por cualquier género que cumpla con las medidas que se indican a continuación.
| Tamaño | Pecho de hombre | Arrastre el pecho (acolchado) | Cintura de hombre | Cintura de arrastre (con corsé) | Cadera masculina | Arrastre de cadera (acolchado) | Altura |
|---|---|---|---|---|---|---|---|
| XS | 33-35 | 36-38 | 27,5-29,5 | 24.5-26.5 | 32,5-34,5 | 38-40 | 70 |
| S | 35-37 | 38-40 | 29,5-31,5 | 26,5-28,5 | 34,5-36,5 | 40-42 | 70 |
| METRO | 39-41 | 42-44 | 33,5-35,5 | 30,5-32,5 | 38,5-40,5 | 44-46 | 70 |
| L | 43-45 | 46-48 | 37,5-39,5 | 34,5-36,5 | 42-44 | 47,5-49,5 | 70 |
| SG | 47-49 | 50-52 | 42,5-44,5 | 39,5-41,5 | 45-47 | 50,5-52,5 | 70 |
| 2XL | 51-53 | 55-57 | 47,5-49,5 | 44,5-46,5 | 48-50 | 54.5-56.5 | 70 |
Instrucciones de costura
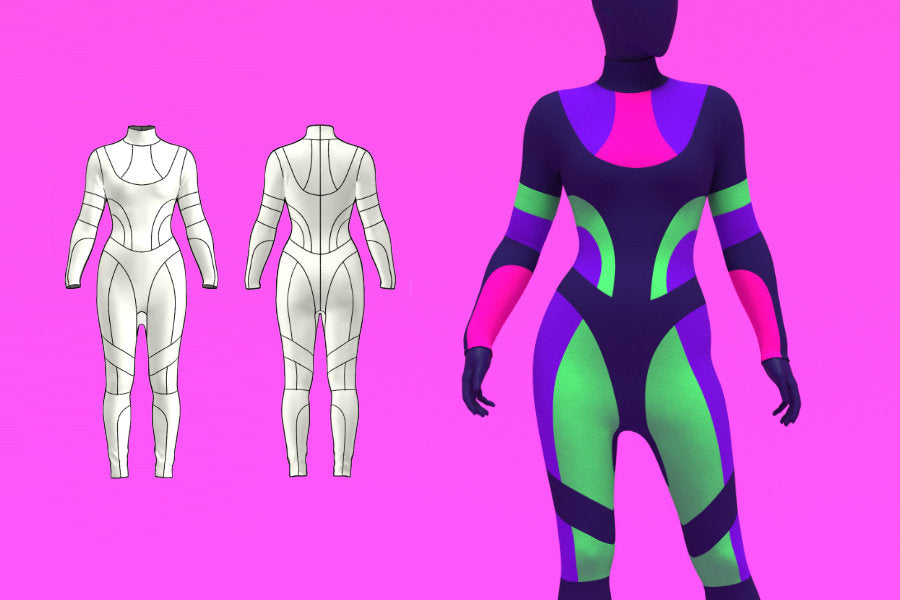
Color Guide

Fabric
Start by using the paper pattern pieces to cut your fabric. This catsuit uses four different four way stretch fabrics. They are labeled as fabric A, fabric B, fabric C, and fabric D. You can choose any colors you like, but it helps to group your paper pieces by fabric type before cutting.
Most of the front, back, and sleeve pieces are identical. The only differences happen along the center front and center back. For the front, pieces 2A, 4A, and 7A are cut on the fold so the center front remains smooth with no seam. For the back, switch to the versions drafted with seam allowance for the zipper.
Piece 3A is for the front shoulder. Piece 3B is for the back shoulder which sits a little higher. Piece 2B replaces 2A for the back. Piece 4B replaces 4A for the back. Piece 7B replaces 7A so you can attach the zipper along the back collar through 2B, 4B, and 7B depending on how long you want the zipper.
If you prefer the zipper to stop above the seventh thong piece, you can duplicate 7A for the back and use that instead. All remaining pieces match for the front and the back. Pieces 9, 8, 11, 12, 13, 14, and 15 are mirrored on both sides with no change.


Stitches
Every seam in this catsuit needs a stretch friendly stitch. The best option is a lightning bolt stitch. If your machine does not have that, use a small zigzag stitch or a three line stretch stitch.
The recommended method is to sew the seam using a stretch stitch at the three eighths seam allowance, then finish the raw edges with a serger. This gives you strength and a clean finish. You can sew only with a serger or only with a stretch stitch if you prefer, but since this is a tight fitting stretch garment for performance, the combination gives the most secure result.

Horizontal Sections
Start by joining the first set of panels for the front. Piece 2A is cut on the fold, so begin with that centered panel. Place one 3A on the right side of 2A and one 3A on the left side. Sew each seam with right sides together using your stretch stitch, then finish the wrong side with a serger. You should now have a single 3A, 2A, 3A panel. Set it aside.

For the back, join 2B to 3B for both the right and left sides. Sew each side separately and keep them apart. Do not sew along the center back edge of 2B, because that area stays open for the zipper.

Next, join pieces 5 and 6. Match the notches along the curved edge to help shape the seam. Sew with a stretch stitch and finish the edge. Set that aside.

Sew pieces 8 and 9 together in the same way. Then sew 12 to 13, and 14 to 15, matching the notches. Repeat these steps for the back.

Vertical Sections
Now you can attach the vertical sections. Take your 2A and 3A assembly and sew it to the curved top edge of 4A. Piece 4A is also cut on the fold. Sew it with a stretch stitch and finish the edge.

Next, attach the 5 and 6 assembly to the lower side edge of 4A. Match the curved notches so the lines flow smoothly. After this seam, your front section above the waist should be complete. Sew this entire assembly to the top of 7A, which is also cut on the fold. Match the notches and align the seams.

For the back, repeat these steps with the matching pieces. Keep the center back edges of 2B, 4B, and 7B open for the zipper.

Legs
For the legs, attach the 8 and 9 assembly to the top edge of piece 11. Match the notches. Then sew the 12 and 13 assembly to the lower edge of 11. After that, attach the 12 and 13 assembly to the top edge of 14.

Once each full leg panel is assembled, sew the completed 8 and 9 section to the side edge of 7A for the front. Repeat the same steps for the opposite front leg and for the back legs, attaching the matching panels to 7B.

Gusset
Piece 10 is cut on a fold. It connects the lower edge of 7A to the lower edge of 7B and gives the catsuit flexibility.
Start by attaching piece 10 only to the front. Line up the center of the gusset with the center bottom of 7A. Sew the gusset down along 7A and continue onto piece 8 until you reach the bottom notch of piece 8. Sew only the front section for now. Leave the remaining half unsewn. You will attach it to the back later.

Collar
After the front and back are assembled, join the shoulders. Place the front and back together with right sides facing and sew the shoulder seams.

Attach the collar. Piece 1 is cut on a fold. Fold it vertically in half with wrong sides facing. Mark the center. Match the center of piece 1 to the center front of 2A.

Pin the folded collar around the neckline, upside down and right sides facing. Sew the collar to the neckline and finish the seam.

Zipper
Unzip the invisible zipper. Place the right side of the zipper tape against the right side of the left back panel. The top of the zipper teeth should sit at the folded edge of the collar. Extra tape above that point is normal. Leave it.
Pin the zipper straight down. Sew it with a straight stitch using a zipper foot. Repeat on the opposite side. Fold the extra tape at the top toward the wrong side and hand stitch it down.
To finish the bottom, keep the zipper unzipped. Bring the two back panels together below the zipper and sew the short seam on 7B. Trim extra zipper tape and hand tack the end to the seam allowance.

Sleeves
Assemble the sleeves the same way you assembled the body. Pieces 16, 17, 18, and 19 are cut on a fold and mirrored for the opposite sleeve. Sew 16 to 17, then 17 to 18, then 18 to 19. Attach piece 20 to the curved side of 19. Repeat for the second sleeve.

Attach Sleeves
The front and back should already be joined at the collar with the zipper installed. The sides should still be open. Lay the front and back flat with the right side up. Place one sleeve at the armhole, also right side up, then flip it so right sides face. Pin around the armhole and sew. Repeat for the other sleeve.

Finishing
Turn the garment wrong side out. Sew the sleeve seams closed. Continue down the side of the catsuit to the ankle. Repeat for the other side.
For the inseam, start at one ankle and sew toward the crotch. When you reach the gusset, attach the remaining half of piece 10 to 7B. Match the notches. Continue across the gusset and down the other leg.

Hem the sleeves and ankles. Roll the raw edge once or twice and sew with a small zigzag or lightning bolt stitch.

Related Video
Watch this related similar sewing tutorial video on how to sew a simple catsuit.
Obtén el patrón