How to Sew a Heart Plate Top
Jump to InstructionsOverview
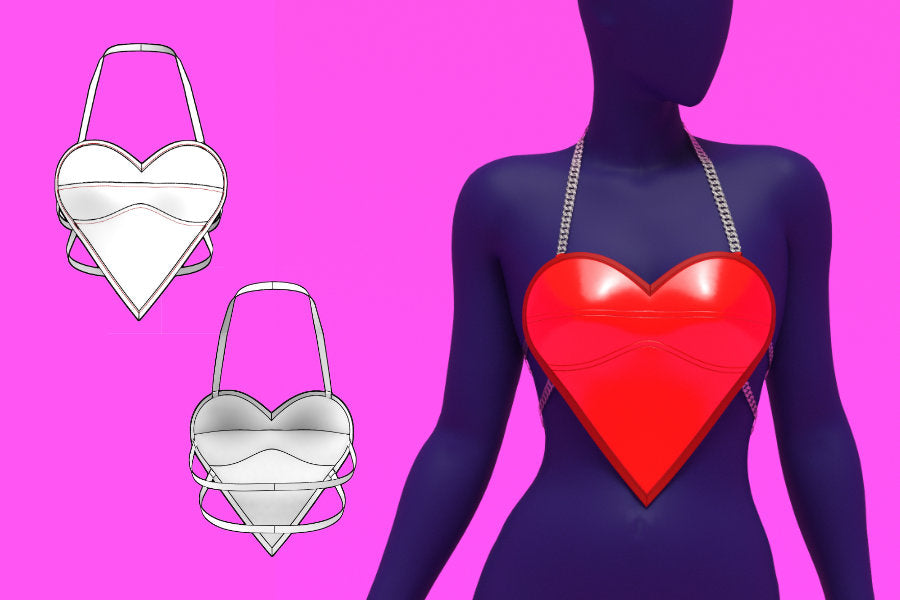
Learn how to sew a heart shaped plate top designed as a bold drag accessory with chain connections at the neck, bust, and waist. This step by step tutorial walks through assembling the shell and lining, finishing edges with bias tape or turned seams, adding hook loops and hardware, and creating custom chains. Perfect for a Valentine’s Day outfit or costume, with styling options to make it your own.
Fabric Yardage
The fabric chart below shows the recommended yardage by fabric type. The fabric yardage below is for fabric bolt widths of 54" or more, and 36" for bias tape and chain.
| Size | Shell | Lining | Bias Tape | Chain |
|---|---|---|---|---|
| XS | 0.25y | 0.25y | 1.5y | 2y |
| S | 0.25y | 0.25y | 1.5y | 2y |
| M | 0.25y | 0.25y | 1.5y | 2y |
| L | 0.25y | 0.25y | 1.5y | 2.5y |
| XL | 0.25y | 0.25y | 2y | 2.5y |
| 2XL | 0.25y | 0.25y | 2y | 2.5y |
Fabric & Notions
Fabric
- Non stretch shell fabric such as faux leather, vinyl, or other structured woven fabrics
- Non stretch lining fabric such as cotton, polyester, satin, or other lightweight woven fabrics
Notions
- Bias tape for finishing edges
- Chain for neck, bust, and waist connections
- Lobster clasps or hook closures
- Metal rings or D rings
- Optional rivets for securing hook loops
- Interfacing if using a lightweight or medium weight shell fabric
- Basic jewelry tools such as pliers
Sizing Details
This corset is drafted in our exclusive drag queen sizes from XS to 2XL, created to fit padded bodies with broader shoulders, arms, and legs. While this pattern is made with drag performers in mind, it can be worn by any gender who matches the size measurements provided below.
| Size | Mens Chest | Drag Chest (Padded) | Mens Waist | Drag Waist (Corseted) | Mens Hip | Drag Hip (Padded) | Height |
|---|---|---|---|---|---|---|---|
| XS | 33-35 | 36-38 | 27.5-29.5 | 24.5-26.5 | 32.5-34.5 | 38-40 | 70 |
| S | 35-37 | 38-40 | 29.5-31.5 | 26.5-28.5 | 34.5-36.5 | 40-42 | 70 |
| M | 39-41 | 42-44 | 33.5-35.5 | 30.5-32.5 | 38.5-40.5 | 44-46 | 70 |
| L | 43-45 | 46-48 | 37.5-39.5 | 34.5-36.5 | 42-44 | 47.5-49.5 | 70 |
| XL | 47-49 | 50-52 | 42.5-44.5 | 39.5-41.5 | 45-47 | 50.5-52.5 | 70 |
| 2XL | 51-53 | 55-57 | 47.5-49.5 | 44.5-46.5 | 48-50 | 54.5-56.5 | 70 |
Sewing Instructions
Color Guide

About the Pattern
This heart-shaped plate top sewing pattern is designed as a bold drag accessory, featuring three connection points at the neck, bust, and waist. Chains attach at each point and connect at the back using hooks, rings, and clasps. You can customize the look by swapping chains for ribbon, cord, or any connection style you prefer.
The pattern is built with a structured shell using thick, non-stretch fabrics such as vinyl or faux leather, paired with a lighter non-stretch lining like cotton, polyester, or satin. The edges are finished with bias tape, or you can sew the shell and lining together and turn them right side out for a clean finish. If using bias tape, trim away the outer seam allowance before finishing. Optional ruffles can be added around the outer edge to personalize the design and push the look further.
Fabric Pieces
This pattern includes four paper pattern pieces. Use these pieces to cut your fabric before starting construction.
Piece 1, the top bust piece, is cut on the fold. Cut one for the shell fabric and one for the lining fabric. Piece 2, the bottom bust piece, is also cut on the fold. Cut one for the shell and one for the lining. Piece 3, the bottom heart piece, is cut on the fold as well. Cut one for the shell and one for the lining.
If you are using faux leather or another thick fabric that is difficult to fold, do not place the pattern on the fold. Instead, trace the full shape by mirroring each pattern piece, then cut it out as a single piece for both the shell and lining.
There is also a hook loop pattern piece. Use this piece as a guide to create foldable hook loops for attaching the chains to the plate. These can be made from full faux leather, or bias tape. You will need a total of six hook loops.

Interfacing
If you are using faux leather or vinyl for the shell, interfacing is not necessary. If you are using a lightweight to medium weight shell fabric, fuse interfacing to the wrong side of the shell pieces before starting construction to add structure and stiffness.

Sewing the Busts
Start by taking the number 1 and 2 shell pieces. Place them right sides together, matching the notches. For the curved edges, clip small slits into the seam allowance so the curves can relax and align smoothly. Be careful not to clip past the 1/2 inch seam allowance. Sew the pieces together using a straight stitch with a 1/2 inch seam allowance.

Once sewn, press or finger press the seam allowance downward toward piece 2, the bottom bust piece. From the right side, topstitch or edge stitch to secure the seam allowance in place.

Attaching the Bottom Heart Piece
Next, take piece 3, the bottom heart piece, and attach it to the bottom edge of piece 2. Place the pieces right sides together and align all notches. Clip small slits into the curved areas of the seam allowance to help the curves lay flat, being careful not to cut past the 1/2 inch seam allowance. Sew the seam using a straight stitch at a 1/2 inch seam allowance. Once sewn, press or finger press the excess seam allowance downward and topstitch it in place on the right side.

Shell and Lining
Repeat the same steps for the lining pieces. Once both are finished, you can choose one of two methods to attach them.

OPTION 1: The first option is finishing with bias tape. If using this method, trim away the outer 1/2 inch seam allowance around both the shell and lining. Stack the shell and lining WRONG sides together and pin in place. Attach bias tape around the entire outer edge. Refer to the linked video for guidance on sewing bias tape around curved and angled edges.
Watch this video on how to sew bias binding on sharp angels https://www.youtube.com/shorts/oIGWphB9pCs

OPTION 2: The second option is turning the piece right side out. Stack the shell and lining with RIGHT sides facing and sew around the entire outer edge using a 1/2 inch seam allowance. Leave a 2 to 3 inch opening at the bottom point so the piece can be turned right side out. Trim excess seam allowance to help the edges turn cleanly. Turn the piece right side out, press, then topstitch the opening closed and edge stitch around the entire outer edge to finish.

Adding the Hook Loops
Once the shell and lining are complete, you can add the hook loops. Gather all six hook loop pieces and fold each one lengthwise in half. You may topstitch or edge stitch along the open edge to create a finished loop, but this is optional.

Keep the loops folded and place them on the wrong side of the plate, against the lining, using the paper pattern as a placement guide. Position the loops at the top of the heart, the side bust areas, and the side waist areas. Secure them by topstitching from the right side of the shell.
For extra durability, you can also attach the loops using metal rivets by punching holes through the loop ends and the plate. A bar tack, tacking stitch, or straight stitch can also be used to lock the loops firmly in place.

Additionally, before attaching the hook loops, you may also add hardware if desired. Small D-rings or metal rings can be inserted inside the folded loop before securing it to the plate. This allows you to connect chains, ribbon, cord, or other fasteners more easily, depending on how you plan to style and wear the plate top.
Creating the Chains
Making the chains is similar to basic jewelry construction and will require simple jewelry tools, such as pliers. The plate top uses three chain areas: the neck, bust, and waist. Refer to the chain length guide included in the paper pattern for suggested measurements.
You will need two chains per area, which connect at the back using metal rings and a lobster clasp or your preferred closure. Choose thick or thin chain based on the look you want, as long as it is strong enough to support the plates.

Cut the chains to the suggested lengths, adjusting longer or shorter as needed for your body. Attach metal rings to each end of the chains, then use pliers to secure lobster clasps or your chosen closure to one side. On the opposite ends, add metal rings or connect the chains directly to the D-rings or hook loops on the plate using pliers.

More Styling and Design Options
For a more decorative look, you can add folded ruffles around the outer edge of the plate. These ruffles can be sewn in between the shell and lining during assembly, or topstitched to the back of the plate after it is finished.
To create the ruffles, cut fabric strips at double the length of the plate’s outer edge. Fold and gather or pleat the strip as desired, then attach it evenly around the plate. This detail adds texture, movement, and a customizable design element to make the plate top your own.
Get the Pattern